By Rebecca Autry September 25, 2017 September 28, 2017 How to Make Super Mario Blocks Podcast 32 – Game On eBook Available
This site uses Akismet to reduce spam. Learn how your comment data is processed.

By Rebecca Autry September 25, 2017 September 28, 2017 How to Make Super Mario Blocks Podcast 32 – Game On eBook Available
This site uses Akismet to reduce spam. Learn how your comment data is processed.

What you Need:
– Sugar Cones
– Frosting White
– M&M’s
– Mini Marshmallows
– Green Food Coloring
How to Make:
1. First take your Sugar cone and make sure the opening is as flat as you can get it.
2. Turn your sugar cone with open side facing down.
3. Take your frosting and add a couple of drops green food coloring and mix well. Continue to add more food coloring until the color is what you want is desired. Mix well.
4. Add your frosting to your upside down cone. Make sure to cover the entire cone.
5. Add your desired M&M’s to your tree pressing firmly.
6. Lastly take one mini marshmallow and place on top of your Sugar Cone Christmas Tree Treat.
That”s it! You’re done.
This is a great and easy treat to let the kids decorate their own treat and eat. Yes it can be messy but its alot of fun. Let kids be kids.
You might also be interested in the Santa Hat Fruit Sticks. Be sure to follow me on Pinterest at Pinterest.com/rebeccaeautry
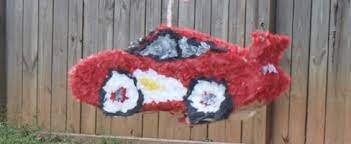
My kids absolutely adore Disney Cars. This was a great Lightening McQueen Car Pinata to have fun break apart.
What you Need:
– Cardboard box/Large balloon
– Tissue Paper (red, black, white)
– Bungy Cord
– Packaging Tape or Duck Tape
– Glue
– Scissors
– Pencil
– Candy and piñata fillings (be creative and have items that connect to the theme)
How to Make:
1. First take your cardboard box and draw out the shape of the side of the Lightening McQueen. You will need to to cut out, one for each side.
2. Then determine the width you want the care to be and cut out the hood, back, ceiling and windows. Match them up and tape them securely to the sides. Make sure to keep an opening to add the pinata toys and candy.
3. Add the bungy cord to a piece of cardboard and secure it with tape. Add it from the inside of the pinata to the top as the hook loop.
4. Now the fun part, Get your tissue paper and cut into 1 1/2 inch squares. Use the top of the pencil to place a tissue paper on, Dip in glue and place on desired area of the pinata. Make sure you fully cover the pinata.
5. Add the pinata fillings such as small toys and candy. Close securely and cover.

Congrats, You Did It!
Check out these other Pinata Tutorials
Treasure Chest, Mario 1Up Mushroom, Tinkerbell Flower, Frog Prince, Blues Clues, Spider-man, Optimus Prime, Batman, Power Rangers, Transformers, Princess Castle, Dora’s Backpack, Minion, Smiley Face, Donald Duck, Handy Manny Measuring Tape
Topic: How to Make a Lightening McQueen Car Piñata
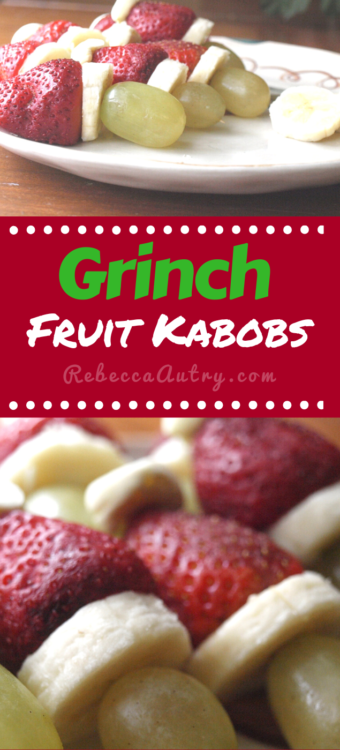
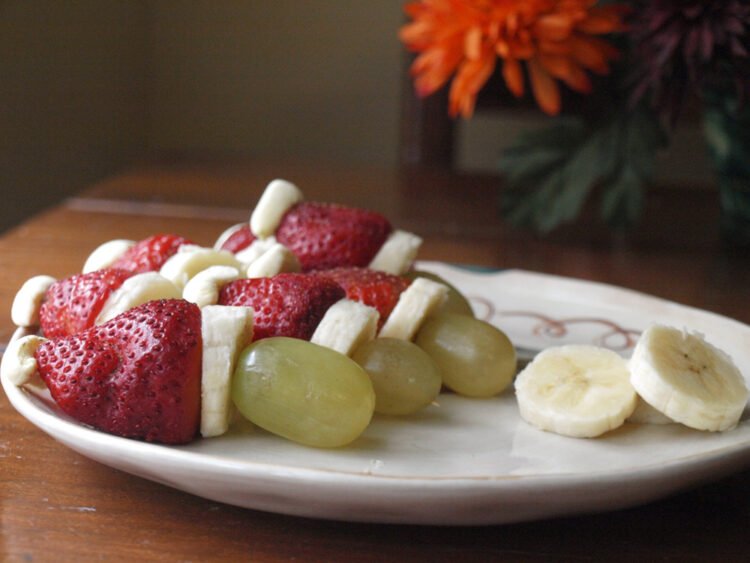
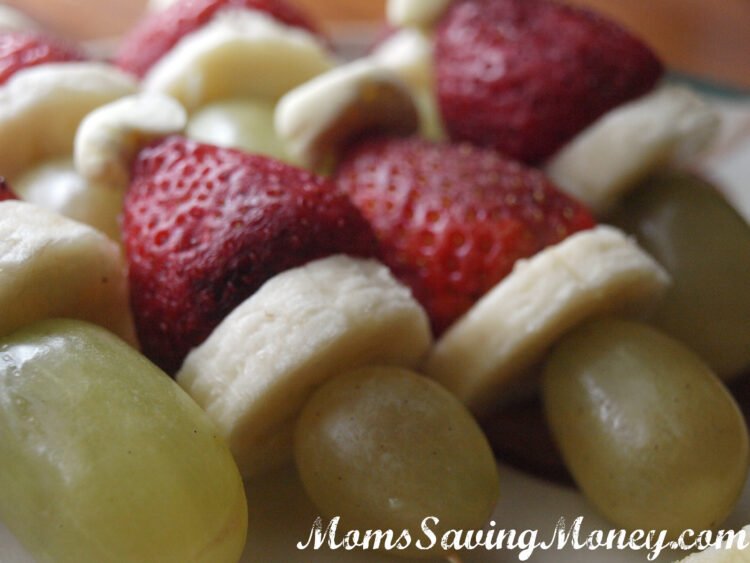
What a great fun way to get kids to each their fruit this Christmas Season. Easy to Make and sure to please. Also great way to make a memorable impression at friends parties. Not everyone is Martha Stewart, but we can all sure make fruit look delicious! Kids will enjoy assembling these Grinch Fruit Kabobs as you prepare Christmas Dinner and need a quick snack for Christmas Break. Parents get a good laugh and enjoy them as well. The best part they are healthy!
*Get more Rebecca Autry Creations Recipes here*
*Pin It* by clicking the PIN button on the image above*
This is a great Christmas treat that involves no baking and can be made in any quantity as desired. These are great Christmas Treats to Eat! Not to be a Grinch! But I truly love Christmas Decorations, so I have to hold myself back and wait to put up Christmas Decorations until Thanksgiving. If I didn’t feel so ashamed I really would put my Christmas Tree up at the end of September! Really!!! My oldest birthday is at the end of September and so once we are done celebrating his birthday I am really ready for the Christmas season, the smells, everything! But I control myself! I really enjoy pumpkin pie but not all the pumpkins stuff, so I am Ok with skipping over the Fall Decorations. However now that we have our own home, I tend to decorate for more seasons than I ever did.
You might be interested in seeing my attempt for Fall Decorations!
OLYMPUS DIGITAL CAMERA
Don’t they just look yummy, you want to eat them right from the picture! Be sure to pin and share to come back later and make them for yourself.
OLYMPUS DIGITAL CAMERA
That is it! You are done!
 Grinch Fruit Kabob princess fun
What you Need:
– Juice Boxes (Unopened)
– Red, Blue, Green, Yellow Cardstock or Wrapping paper
– Double Sided Tape
– Scissors
– Ruler
– Pencil
– Circle Shape (cutable shape or you can trace and cut out)
How to Make:
1. Make sure your juice boxes are filled and unopened. First you will need to measure your juice box height and length on all four sides added together. Take your straw off but leave it unopened if possible.

2. Measure your paper using a ruler and pencil for the rectangle shape to cover the juice box. Use your scissors to cut it out. You can save time by using a paper cutter if you already have one on hand.
3. Take your double-sided tape and place at the bottom and top of the juice box. Line up your paper and press down. Wrap all the way round and place two more pieces of tape to complete the wrap.

4. Take your circle shape to trace and cut out the circles or cut the circles on your cutting machine. You can either use the double sided tape to place your circles on in two rows or you can use the Foam Dots that can be found in the scrap-booking section of a Craft store. The foam circles will create a 3D effect.

That is it! You are done!
Stop, Yield and Speed your way thru a fantastic Disney Cars Party with these fun and easy decorations. Products used to create these street signs can be found at Dollar Tree.
Be inspired with these Disney Car DIY Decorations. Simply click on the image below.
Wall Signs/Street Signs – Make some stop signs, yield, countries to place all over the party rooms. You can find the letters for the signs in the Moms Saving Money Store. Use your imagination and create your own. The sky is the limit! See the Wall Signs Tutorial.

– Black, Yellow, Red, White, Blue, Green Construction Paper or Cardstock
– Tape/Glue
1. Take your cardstock and cut out the shapes and letters for the signs. You can find the letters and shapes in the Moms Saving Money Store.
2. For the Yield sign take the yellow base and glue the black rim on using double sided tape, glue or glue dots. Glue the letters to the word yield.

3. Stop Sign. Take your red base and glue the white rim and letters to the word Stop.
4. Speed Limit Sign. Glue your black rim shape and black letters and number to your white base.
That is it! You are done!
For added fun attach them to poles or cardboard so they can be hand held and the kids can play with as traffic conductors.
Looking for a quick birthday punch to wow your guests with? Here it is! This Birthday Party Punch recipe is Legendary and perfect for our birthday parties and yours. My guests have come to expect this party punch. It’s super simple and easy to make. This Birthday party punch is showy and your guest will be intrigued by its fizz and colorful floating sherbet.

So I am going to tell you this up front. This is a skeleton of my recipe. Why? because its different every time. I change it up to fit the theme of the party and to what I have on hand! It has the basics but slightly different every time.
SEE ALSO
So here we go. Takes about 5-10 minutes to make. Makes 18-20 Cups.
Ingredients
1. First you need a base. This can be a Fruit punch, Lemonade, or Juice. Decide on 1 and thats is the main part of the drink and the one that you will want the most of.
2. Choose an Add-on spritz. This can be ginger ale, 7-Up, Sierra Mist or Sprite. It needs to be some type of carbonated drink but light in color. Coke will not do!
3. Add a specialty. You can add just about anything here. I added pineapple juice once, I also did strawberries once as well. One time I needed it to be green so I added green fruit punch. (this is what makes it unique) Make it your own!
4. The best part of the finishing touch! Always add Sherbert! Depending on how many your party is for the more you will want. I do 2 cartons for every 25 persons. The foam suds you get is what make the drink fun. Any kind is fine. I once used the orange pineapple which was pretty good.
5. Color with food coloring to fit your theme if desired.
Enjoy and you will get people asking whats in it and they will come back for more! I promise it will seem like it has a buzz but at you can see above there is no alcohol involved!

Topic: How to Make Birthday Party Punch

Road Walkway – Simple and cheap. Do you have children that love Disney Cars? Race around the party on this Road/Walkway. A fun and exciting activity and will only cost you $2 at Dollar Tree. Be sure to check out other Dollar Tree DIY Tutorials. Do you need Disney Cars inspiration for your theme party?
Be inspired with these Disney Car DIY Decorations. Simply click on the image below.

If you are really feeling inspired you can make Orange Caution Cones with 2 sheets of construction paper.
– Black Plastic Tablecloth
– Yellow Duck Tape
– Scissors
1. Take a black plastic tablecloth and yellow duck tape all from Dollar Tree.
2. Cut the plastic long ways in half.
3. Tape down on each side with the Duck tape on the floor.
4. Make yellow strips and place in the middle of the road to separate the lanes.
That is it! You are done!

Be inspired with these Disney Car DIY Decorations. Simply click on the image below.
This is a great cake to add to any Disney Cars Theme Party. Be sure to check out other Disney Cars Party Ideas.
What you Need:
– 2 Boxes of Cake Mix plus the ingredients specified on the box
– 4 Round Cake Pans of the same size
– Cake Tray
– Frosting (Chocolate or brown food coloring)
– White Icing
How to Make:
1. Mix and Bake the cakes as directed.
2. Once the cakes are baked place in the freezer for an hour to make them easier to work with.
3. Cut the tops of each cake to make them even.
4. Each Tire is made of two layers of cake. Place on top of each other.
5. This cake has the top two layers slightly hanging over the other making the distinction between both tires.
6. Use Chocolate frosting to cover or add brown food coloring to frosting until color is desired.
7. Spread the tires with frosting.
8. Take the white frosting and add the writing.
9. Going around the tires make the tire track lines at an angle.
That’s it! You are Done!
Topic: Disney Cars Tire Cake Recipe
I know you are singing the song! We all are when we think of Teenage Mutant Ninja Turtles. Below you will find the necessary file and instructions on how to make the TMNT invitations.
What you Need:
How to Make:
Step 1
First gather your paper. You can use construction paper but I prefer cardstock. You can find a large solid color pack at Walmart for $20. Or you can order from Amazon 200 ct for under $11. Price may change.
Step 2
Download the TMNT file here. Use on a cutting machine like a Silhouette.
Step 3
Once your color and shapes are cut out you can proceed to glue are parts together.
That is it! You are done!
Topic: Teenage Mutant Ninja Turtle Invitations

