Rebecca Autry Creations
  • Home
  • Piñata’s
  • Vacation Bible School
  • Wedding
  • Courses
  • Store

How to Make a Fake Palm Tree

January 6, 2020 by rautry

Great addition to Lifeway VBS 2015 “Journey off the Map”. You can also alter the Palm Tree to make it into a Weeping Willow Tree for Shady Grove for crafts.

Since the class the hubby and I did, crafts came to us, so we plan on making a section of our room designated for the craft area. This so much fun and builds so much excitement for the kids. When you get excited, your children will get excited and makes it so much easier to get into the theme and play the part.

Please remember we decorate our rooms with themes simply to make our time together fun while we share the Love of God.

What You Need:

– Carpet Rolls (without the carpet) or Wrapping Paper rolls for smaller trunks

– Brown Packaging Paper

– Packaging Tape

– Mic stands or Tripods (look at Thrift stores or yard sales)

– Green Paper

– Green Streamer

– Straws or umbrellas without the fabric

How to Make:

1. First take your carpet roll or wrapping paper roll  and cover using packaging paper or other brown paper scrunching it up as you go to make a more realistic trunk shape. Use packaging tape to secure.

2. Once your trunk is done slide it over the mic stand or tripod stand.

3. If you are using an umbrella make sure that the fabric is removed. Tape of green leaves that you cut out or use green streamer strips of varying colors and lengths and tape to the umbrella. If you are using straws make sure to tape the straws together so they will not come apart during your VBS week and adds more security.

That is it! You are done!

Just so you know we plan on giving our decorations to another church doing the same theme as we have in the past. Also my oldest son wanted his Theme birthday as Rio 2 so these Palm Trees were also used then as well.

Topic: How to Make a Fake Palm Tree – Journey off the Map Decoration Ideas

Filed Under: Uncategorized

Tangled Branch Tree House Decoration

January 6, 2020 by rautry

You can do tons with cardboard to make a Tree house. What makes a great Roof? A Luau umbrella Cover. Ok well this is originally designed to fit over an existing umbrella but I am using it for my roof. Much like using a umbrella without the fabric for the palm trees I will use straws that hold my cover and have its sticking out from the room.

Last year I made an Evidence Vault in the Corner of the room. This theme I made the Tangled Branch Tree House so we can have our Bible Study time in it. It is much bigger than our Evidence Vault since we will actually be using it.

We anticipate a smaller group for our age group so we have changed rooms. I am now in a much smaller room but still plan on making the most of it. We still make the Tree house but not all four walls. We only made one wall and that is the front opening area with windows.

What you Need:

– Lots of cardboard for the Treehouse

– Packaging tape

– 2 different brown paints

– Black paint

– Green grass skirts found at Dollar Tree

How to Make:

1. First grab your desired large boxes that are for the base of each side. You can cut them down to size.

2. Cut the sides of the window frames for each base. I created two bases that I will attach to the walls. This will be my front of the tree house. The in between the bases will be the door way.

3. Next paint all your pieces both front and back with the light brown.

4. Take the dark drown and swipe all over the boards but leave areas you can see the lighter brown.

5. Take black paint and draw line either horizontal or vertical. Make sure to add some knots in by making them circular.

6. Use cardboard small long pieces to tape to the bends to keep them straight.

7. For the flooring I found this bamboo shade at Goodwill and paid about $.50 for it. There are some holes in it but not too bad. I will cover that with some tape and paint over it.

That is it! Have fun!

Topic: Lifeway Tangled Branch Tree House Decoration

Filed Under: Party Decorations

Journey off the Map Kindergarten Class Decorations

January 6, 2020 by rautry

My hubby and I get the Kindergarten class again this year and how exciting. Last year we had 19 kids in our class but this year we have a smaller group. We know we will have a minimum of 5 so we need to step up the game and invite families and friends.

Because of how our rotation is setup, we have Missions, Crafts and Music come to us. So we learned last year that our kids needed to keep moving all the time or they got bored.

Solution:

Divide the room into 4 sections. I already have 3 tables in the room so I plan to use one for Crafts and the other two will go into our tree house for Bible Study.

Section 1 (Bible Study) Tree House

I plan to make the walls of two sides of the tree house (Bible Study) from cardboard. This will be placed in one corner of the room.

Well that was my plan. Now since we have moved to a smaller room, one half of the room will be the Tree house for Bible Study while the other half will be more of Shady Grove!

Here is one section of my Tree house. There will be a walkway/doorway in the middle. I have attached the sides with tape to the walls. I learned that if you use painters tape and then use a hot glue gun you can easily take it all down at the end of the week without the mess on the walls.

‘

And here is my floor! I actually found 4-5 of these already at the church and thought I could also use some for the walls. I will need 3 for the inside of the Journey off the Map Tree House.

Section 2 Rushing Waters (Music)

I haven’t actually spent time on creating our rushing waters area yet but will put up pictures as we get closer. Our VBS week is not until June 22nd but we will be starting to decorate June 1st. So only a few more days away until you get to see my Journey off the Map Decorations as they go up.

Section 3 Boulder Bridge(Missions)

Section 4 Shady Grove(Crafts)

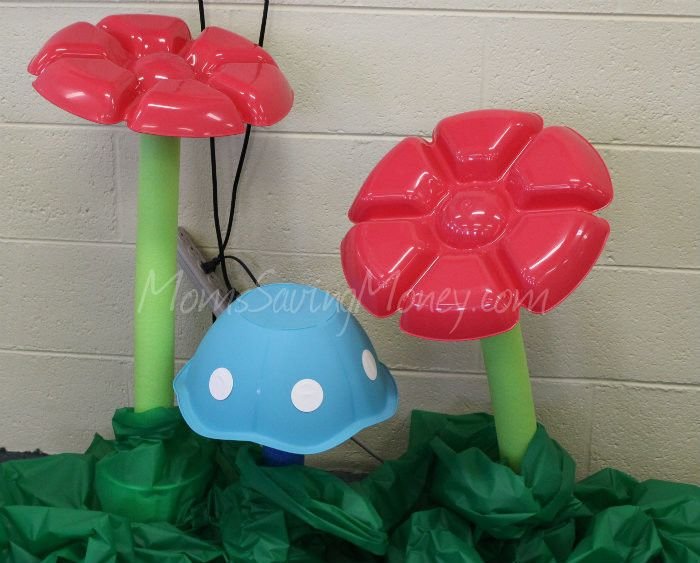
Above you will see the Pool Noodle and Serving platters that we made into flowers and mushrooms. You will need a hot glue gun and some sand. Be sure to check out other Shady Grove decorations.

Outside our room I created this fake wooden panels that read “This is the way – Walk in it” Part of the Journey off the Map theme.

If you are like me and planning is a must here are some helpful resources and downloads from Lifeway to take a look at.

Filed Under: Uncategorized

Journey off the Map Food Ideas

January 6, 2020 by rautry

Very simple in deed! Take Pretzel sticks and simply place a sign in your snack tray or on the tables indicating them as Twigs. You can even refresh the kids memories that as they go about their Journey off the Map they may encounter Twigs along the way!

You can also add a handful to snack size bags with a label “Twig Snack” or variation of that. Be creative and enjoy.

Animal Crackers

Of course if you will be in the jungle or taking a journey through wilderness you might encounter Animals!!! Take a snack bag and fill with a handful of animal crackers. You can find the large bags at Wal-mart or buy them wholesale at Sam’s Club or even Costco.

Photo credit to thebananapolice.com

Strawberry/Banana Worms

So this might not be the best idea for really little ones, because of the stick and because they may not want to eat something that resembles a worm! Simply take strawberries and bananas and cut them in thin slices. Take cab-bob sticks and alternating from Strawberry to banana place them on until you get the length desired. To keep these fresh you will want to freeze them and take them out the morning of the day you want to use them. These are preferably done fresh the day off.

Cucumber Snakes

Again this is probably not the best snack for little ones. Simply take your Cucumber and cut into thin slices. Cut each slice in half. Lay them on the plates as shown above

Palm Trees – Crackers and Apples

These are fun and perhaps you will get some good eaters! Take the long thin crackers you can even use the Club crackers that typically go on sale 2 for $4 at most grocery stores. Lay those on the plate one above the other. Take and apple and slice it into pieces. Arrange them above the crackers to make a Palm Tree affect.

Photo from margaretdilloway.com

Butterfly Snacks

These are to be a sure hit with the little kids. You will need a clothes pins, snack bags, grapes and gold fish or any other little snacks the little ones will love. Fill one half with one snack and the other half with another. Place the clothes pin in the middle and add some eyes and your are done. you can add some antennas to make them extra cool!

Photo credit to cleanandscentsible.com

Apple Frogs

Topic: Journey off the Map Food Ideas

Filed Under: Food, Vacation Bible School

Foam Flowers – Journey off the Map

January 6, 2020 by rautry

Foam Flowers – Journey off the Map

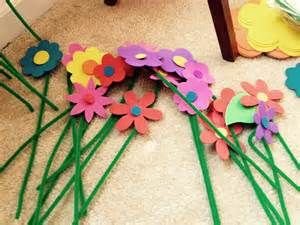
Still need some decoration ideas? Here is a great flower craft that you can get kids involved with.

What you Need:

– Foam Flowers pre- cut or Foam sheets

– Pipe Cleaners

– Glue

%filemane%

How to Make:

1. Get all your supplies together. You will need green pipe cleaners, Foam flowers pre- cut or you can get the foam sheets and cut your own. You can purchase a SVG flower file for $.99 in the party store.

2. Cut and X in the middle of the flower to insert your pipe cleaner. Most pre-cut flowers will already have the X. Simply slide your pipe cleaner in the X and fold slight at a 1 cm. You may want to tape or glue down to have it hold longer.

3. Glue on the circles over the pipe cleaner and opening of the middle of the flower. If you don’t already have these circles you can purchase them with the SVG flower in the party store.

4. Now it is time to make a whole bunch! You will want to line the bottom of the walls or hallway for your Journey of the Map VBS 2015 Week.

That is it! You are done.

Be sure to check out other VBS 2015 decoration ideas – Journey off the Map

Filed Under: Uncategorized

Fake Wooden Sign Tutorial

January 6, 2020 by rautry

Need a large inexpensive decoration idea that won’t take much time. This is it and easy to make. Make wooden panels and write the words “This is the Way – Walk in it.”

What you Need:

– Large Cardboard box

– Drip cloth or plastic bags

– Brown paint and brush or sponge

– Brown and White Marker or Chalk

– Packaging Tape

How to Make:

1. First you will need to lay your drip cloth or plastic bags down on your work area. Plastic tablecloths from Dollar Tree are a nice alternative and inexpensive.

2. Pull your cardboard box apart to lay flat so you can cut long  strips of cardboard to make wooden slats. These wooden slats will soon become your fake wooden sign.

3. You will want to cut your ends to make the jagged edges. Don’t worry they do not need to look perfect.

4. Apply the brown paint to your wooden(cardboard) slats brown. It is important that you go back and forth and not all crazy to make your wooden slats look more natural. Make sure they are dry thoroughly before moving on. You can add random 2nd and 3rd strokes to various parts of the cardboard to look like natural uneven wood. If you are hanging this on a wall you will only need to paint the side that will show. If you plan to have it hang with both sides showing then I advise you paint both sides of the cardboard.You can even create knots in your wood by taking a bit of paint at the end of your brush or sponge and make a small circle on the cardboard in the desired area. I used two different browns to make the wooden look.

4. Use white marker or chalk and write out the words ” This is the Way – Walk in it.” as pictured below.

5. Turn your wooden slats with the face down in order as you want them. You will then tape the slats on the back. Make sure they are secure enough.

That is it! You are done!

Topic: Fake Wooden Sign Tutorial – Journey off the Map ideas

Filed Under: Dollar Tree, Party Decorations

Dragonfly Spoon Craft for Journey off the Map VBS

January 6, 2020 by rautry

These dragon fly spoons are a great craft for Lifeways Journey off the Map VBS or you can use them to help decorate the hallways and make a wonderful colorful and living jungle atmosphere. An alternative Journey off the Map Craft that can be made for pennies per child and lower the cost of crafts especially for those churches and groups unable to afford the expense of the pre-made crafts.

What you Need:

– Plastic Spoons

– Googly Eyes

– Glue

– Paper

– Scissors

– Gems

– Glitter Glue

How to Male:

Step 1

Lay your Spoon face down and place two glue spots on the front of the spoon. Carefully place the googly eyes onto the glue spots and hold down. Allow to dry completely.

Step 2

Cut out your dragon fly wings as desired. I cut an 8 1/2 x 11 sheet in half hamburger side. Then took each half and folded hotdog style. This would get me 4 for each half. I then cut from the fold and made a heart shape without the bottom point ending at the fold. When you unfold this you can clearly see the wings.

Step 3

Glue the wings at the neck of the spoon as shown below.

Step 4

Place your gems using glue if they are not self adhesive as you desire.

Step 5

Trace the edge of the wings with glitter glue. Allow to completely dry before picking up.

That is it! You are done!

These are great to be added to the Journey off the Map Background and flowers.

Topic: Dragon Fly Spoons

Filed Under: Uncategorized

Lifeway Agency D3 VBS 2014 decoration ideas

January 6, 2020 by rautry

This is going to be awesome!

Evidence/Confidential Folders/Envelopes

Take Manilla folders, Cut out the word “EVIDENCE” of “CONFIDENTIAL” or you can use a red marker and glue or write on your folder or envelope. Very cheap and easy to make. You can find a pack of ten Manilla folders or Envelopes at Dollar Tree. Dollar Tree also has red sharpie markers construction paper.

Security Check

Footprints – Agency D3

Take black cardstock and cut out shoe prints and place them on the wall or floor for detective effects to add to the theme.

Spyglass – Agency D3

Cut out several Spy glasses and add to the wall. You can cut out extra and use fishing wire to hang them from the ceiling in the classrooms as well as the hallways.

Secret Agent Wall Decoration

Simple. Take Yellow Paper and cover a wall. Cut out some foot prints and beakers. Use plastic tablecloths or plastic bags to fill the beakers! Cut out some spy glasses and use some of the the Agency D3 Posters. Great way to do a HUGE promotion.

Test Tube

Take clear wedding bubble tubes 8ct from Dollar Tree and empty with top removed. Make sure to dry them out. Take construction paper like neon green, blue, red, fusha or any colors you like. Roll the construction paper and cut to size and insert in the tube. Add some stuffing to the top to make the fissile over flowing look.

Magnify Glasses

Take Ce-ran wrap or window plastic sealer, Popsicle sticks, Black construction paper and black paint. First paint the popsicle sticks black on both sides. Cutout the circle for the magnify base and glue the end to the Popsicle stand. Use double sided tape to attach the plastic to the glass base. These are fun and easy. They are not meant to last longer than the week.

Lab Wall Design – Take Silver tablecloth from Dollar Tree and tape to the walls. Take black streamers and cut strips and tape to the backdrop and make the design. Simple and cheap.

Surveillance Cameras – Are these genius or what. Kuddos to the creator because I would not have thought of this. Take a black square shaped paper plate from Dollar Tree, Black Plant container and 2 stiro phone cups (large) and attach using black duck tape. Spray paint with black.

Paper Towel Clearance Centerpieces

I thought these were very clever and very easy. They got the tissue paper that you would use in fast food restraunts in bulk and then got a roll of paper towels and stood them up in the middle and then made an Agency D3 sign to place in the middle held by a clip. Printed confidential on yellow paper and taped around the paper towel roll.

Evidence Vault – Take Silver tablecloth outline with black streamer for the door. Take a Pie bowl small and 3 sheets of paper and roll each one and tape with duck tape. Staple in the middle and use black or silver ribbon and tie the paper rolls to the bowl to make the vault handle.

Bio Hazard Department

Can’t have a Agency headquarters without having a Bio Hazard Section. We took our Library that has a glass window door and added bright green paper and put it on the back and then made a bio hazard sign to place on the outside.

Now that you have taken a look at Agency D3 Pictures and almost done with your VBS week start planning on 2015 now. Think of ways to make it better and find ways to decorate on the cheap. Check out Lifeways 2015 Journey off the Map Theme.

Topic: Lifeway Agency D3 VBS 2014 decoration ideas

Filed Under: Vacation Bible School

Shady Grove Craft Decoration Ideas – #VBS 2015

January 6, 2020 by rautry

Here are some easy VBS craft ideas you can easily make for Shady Grove on your own for little cost. Your craft room should be just as fun as all the other Lifeway VBS rotations. If you would like to submit your VBS tutorials to be linked simply submit in the comments or by emailing to momssaving1 (@) gmail dot com.

Check out some of the Journey Off The Map Craft Ideas toward the bottom of this post.

Large Flowers and Mushrooms

%filemane%

Simply made from Green Pool Noodles, Chip and dip trays, Plastic serving bowl and green plastic tablecloth. All of these items can be found at Dollar Tree. Each flower is secured in a bucket filled with sand.

Step 1

Cut your pool noodle down to desired size and slant if desired.

Step 2

Place your pool noodle inside the bucket and add sand around the noodle. To keep it extra sturdy add sand in the tube.

Step 3

Take a hot glue gun and add desired amount of glue and attach bowl and chip dish to the pool noodle.

Step 4

For Mushrooms you will do the exact same thing as steps 1 – 3. Cut out white construction paper circles and used double sided take or tacky glue to attach to bowl.

More Journey off the Map Shady Grove Ideas below:

K Cups, Egg Cartons and Grass Skirts

The grass skirt can be purchased at Dollar Tree. This particular skirt I found at Goodwill for 10 cents. I used electric tape in the above picture to hold up the skirt because it is on cinder block. I do not recommend it, it will fall down! I do however recommend using painters tape whenever possible on cinder blocks. You may need to use something stronger but we have learned that duck tape and packaging tape will not work well.

You can also check out the K Cup Hanging Flowers Tutorial.

Cardboard Painted Ground Leaves

Simply take cardboard boxes and lay them flat. Draw using a pencil your grass/leaves. I found paint at church not being used and had my children paint with me. I then took a black permanent marker and retraced the lines and then cut out the tips of the bushes. These are easy Lifeway VBS decorations you can make with VERY little cost to you. You will spend more time than money but it is all worth it.

Foam Leaves and Streamers

You can purchase green streamers in a 2pk at Dollar Tree. Use this to make a droopy limbs hanging from the ceiling. Great for added greenery for trees. We are planning on lining our entire hallways with streamers and green table clothes swooped diagonally from one side to the other side.

Easy VBS Craft Ideas – Alternative Journey off the Map Crafts

Cotton Pocket Drawstring Bags

If your Church is looking for a cheaper alternative for the Drawstring bags you can find these ones on Amazon for around $.40 a piece. Purchase the Journey off the Map stamp and stamp them yourself. Save some money that can be spent elsewhere.

Day 1 Journey off the Map Crafts – Know your Guide (Galatians 4:4-5)

Day 2 Journey off the Map Crafts – Follow your Guide (Daniel 1)

I am a huge fan of Lifeway but every church can’t afford the pre-made kits for crafts so I am always looking for alternatives on how to create similar crafts but less expensive. Here is a dragonfly that can easily be made and you may even be able to get some of the items donated. Check out the Dragonfly Tutorial.

Just as dragonflies follow after their food for daily nourishment we to are to follow our daily nourishment.

How to cut costs on the Campfire Magnet

I am all about cutting costs but still have quality products. If your church has the ability and means to purchase the prepackaged crafts from Lifeway go for it. They are convenient. I on the other hand am looking for ways to expand what I can make for the least amount of money because I can use that money on something else or do more. I like to stretch a dollar as far as I can. Check out how you can make similar campfire magnets at a lower cost. Check out the Campfire Magnet Tutorial.

The campfire is a great way to teach kids

Day 3 Journey off the Map Crafts – Trust your Guide (Daniel 3)

Day 4 Journey off the Map Crafts – Stay on Track (Daniel 6)

Day 5 Journey off the Map Crafts – Keep Watching (Daniel 10)

Toilet Paper Roll Binoculars

Fonts to use for Journey off the Map (FREE Fonts)

1. Wood Stamp

2. Shelton

3. Jawbones Condensed WF

4. Tiki Hut

5. Rough Typewriter

Please don’t hesitate to tell me about your VBS Ideas. I love adding more and more to these posts. You can submit your ideas in the comments or by emailing to momssaving1 (@) gmail dot com

Topic: Shady Grove Craft Decoration Ideas – #VBS 2015 Easy VBS Craft Ideas

Filed Under: Vacation Bible School

K Cup Flowers – Journey off the Map Rebecca Autry Creations

January 6, 2020 by rautry

Need an easy to make but impact-ful flower for your Journey off the Map theme. Add these easy to make flowers and hang them all around your hallways. The best part is you don’t have to spend much. Just get the word out you are looking for empty or already used K Cups. Chances are you will find many of them to donate to you. I have 2 ladies that in the past two months given me around 300 empty K Cups. They must be heavily addicted to coffee!!! I found some tempra paint in our childrens supply room and colored these flowers various colors.

What you Need:

– K Cups empty

– Paint

– Paintbrush

– Newspaper or plastic table cloth

– Small Paper clips

How to Make K Cup Flowers – Journey off the Map:

1. First place the plastic tablecloth down or newspaper to create your work space.

2. If you have not already done so you will need to do the dirty work. Clean out the K Cups. I recommend getting some plastic gloves on and use a double grocery bag to empty the coffee/tea grains into the bag. Rise them well and allow them to thoroughly dry.

3. Pick out the paint you want to use and pour just a little. I used a sponge to cover the k cups. Make sure to allow them to dry fully before adding a second coat.

4. Take Green balloon ribbon or any other color desired and measure around 1 yard. At one end tie a knot. This will be your bottom of the follower strand.

5. Thread your K Cups opening down. You can add 4-5 less or more desired. Allow the top string to be long so you can adjust when you go to hang them. I used 3 because we have low ceilings and to keep them up high enough that the tall people will not get as annoyed!

6. Tie the top of the string to a small paper clip to make it easier to hang from the panel ceiling.

That is it! You are done!

Be sure to ask friends and family for donations. It keeps them out of landfills and you are re-purposing them. These fit well inside each other with the ribbon that you can easily take them down and donate to another church or use for a future theme.

Topic: K Cup Flowers – Journey off the Map

Filed Under: Vacation Bible School

« Previous Page
Next Page »

Products

  • Household Handbook Household Handbook: Your Complete Home Management Binder $21.99 Original price was: $21.99.$9.99Current price is: $9.99.
  • Princess Tiana Tiara Princess Tiana Tiara SVG $0.99
  • Shaun The Sheep SVG Shaun the Sheep SVG Invitation $0.99
  • Super Mario Invite Super Mario SVG Invitation $0.99
  • Minecraft Favor Bag Minecraft Creeper Invitation $0.99
try.hpinstantink.com/cmfvfj

Copyright © 2025 · Genesis Framework · WordPress · Log in