Rebecca Autry Creations
  • Home
  • Piñata’s
  • Vacation Bible School
  • Wedding
  • Courses
  • Store

DIY Canteen “Journey off the Map”

January 6, 2020 by rautry

DIY Canteen “Journey off the Map”

What you Need:

– Cookie Tin

– Brown spray paint

– Small Water bottle – filled

– Drill or box cutter

– Duck Tape

– Leather strap or Duck Tape/Ribbon

– Glue Gun

How to Make:

1. Clean out your cookie tin very well. I got a dozen from a yard sale that they had been stored in a shed for atleast a year maybe more. I used vinegar and baking soda to clean out.

2. Trace the circle of the cap of the bottle on the side you decide to be the top. Use a Utility knife or drill to cut your circle.

3. Lay down either plastic or newspaper and slowly spray pint your tin. Make sure to follow the direction provided on the spray can. Let it air dry fully. And yes please do this outside on a non windy day.

4. Once the tin is completely dry you will want to line the inside with paper. I have tons of scrapbooking paper so I used a cool design and traced two circles to place inside. I used a glue stick to secure them. Cut strip to line the inner sides and glued them down.

5. Insert your water bottle from the inside of the canteen. Take a glue gun and secure around the neck of the bottle so it will not move.

6. Tape your strap on the side of your canteen. I used a thin utility string so I poked hole using a nail and inserted the string and tied a knot and tape them down.

7. Print out the Journey off the Map logo and cut to desired size and glue on the front of the canteen.

That is it! You re done!

Topic: DIY Canteen

Filed Under: Vacation Bible School

Daily Backpack – Vacation Bible School Ideas

January 6, 2020 by rautry

Daily Backpack

One thing I wished we had last year in our class was to have some type of bag that the kids could take their items from the day home in and be easy to carry. These were made with Journey off the Map Vacation Bible School Theme in mind but can easily be used for a Back to School theme or any birthday party favor bag.

You can find all these items at Dollar Tree. The paper bags come in a pack of 50. Dollar Tree also have 10ct favor bags in the colors of green, blue, yellow, red, purple and pink. For $4 you can get the supplies needed and make 50. That averages the cost out to $.08 each. So you may need to make 1 for each kid for each day since they will probably not bring them back the next day.

What you Need:

– Brown Lunch sack

– Glue or double sided tape

– Scrapbooking paper or Construction paper

– Scissors

How to Make:

Step 1 (Daily Backpack)

Cut out your straps, belt and belt latch. Trace the length of the bag on your printed paper for the top bag flap and cut out.

Step 2 (Daily Backpack)

Lay your Paper bag flat with bottom fold facing up. Fold each strap on each end about 3/4 inches and glue or tape those flaps to the bag. Make sure they look symmetrical.

Step 3 (Daily Backpack)

Take the top bag flap and glue that to the top of the bag on the same side of the straps. Remember you will be folding this down so make sure your rounded edge is facing the top.

Step 4 (Daily Backpack)

Fold your top Flap over leaving about 1/2 in on the backside with the straps. Turn your bag over and glue your belt to the top flap. Then add a bit of glue to the belt latch on each end and press down at the desired place to hold down the belt latch. Open up the bag and set it open and re-shut the top flap and belt into the belt latch so it stands up.

That is it! You are done!

Topic: Daily Backpack

Filed Under: Party Decorations

Game On Decorations from Dollar General

January 5, 2020 by rautry

Just a note: I am in no way affiliated with Lifeway. Ideas presented below and in the eBook as well as printables are created by me and are inspired by the 2018 VBS theme.

Topic: Game On Decorations from Dollar General

Filed Under: Vacation Bible School

What I learned about Vacation Bible School as a Teacher

January 5, 2020 by rautry

This was the first year the hubby and I were able to plan ahead for VBS so this is what I learned about Vacation Bible School as a Teacher. However since we were not just given the material the day ahead we still found things that would make the future years run more smoothly.

What I learned:

– Have a paper handle bag with Kids names written on them for each day. This will help to keep their crafts, daily missions and any extra items they take home each day like parent notes and so forth. Easily identify the bags and transport them from one room to the next during rotations. If you get the going home parents ahead of time get each set of bags ready each day as soon as possible.

– Have a designated person to take pictures of all the classes each day and be responsible to make a VBS slide show for the closing program. You can also give Assistant Teachers or Youth helping in each class a disposable camera or even a digital camera (they are so much cheaper now) or you can assign someone with a camera phone to take pictures of their class.

– Have a VBS Closing program. I have been to churches that do this and others that don’t either way, I think its a good practice to have one so parents and teachers and kids are aware of what goes next in a program. This will help everything to keep moving on time.

– Be flexible. Most importantly be flexible. We had to rearrange our room a couple of times because our growing numbers. The highest we got was 19 and our room seemed so cramped, so we moved our tables around and made it more accessible to hold our class better. Always be flexible because you don’t know what you will have to change.

– Cut out all your material. If you saw our room you would have thought I spent hours on our room but actually I only spent 4 hrs on actual decorating our room and about 10 hrs reading the material and cutting out everything and putting all the projects together. We spent each night going over the next days lesson and even though we had gone through it the week before it was still time consuming each night. With work and VBS and cleaning our room each night it was a bit of a hassle.

– Plan for 10 more than you expect. We planned on having around 10 in our group but we were in for a surprise when we had 17 our first day. I had planned on more than 10 and had 12-14 of everything I made for our class including items for the lesson so we were scrambling to make additional copies and kits for our lessons. So next year I have no idea what age group the hubby and I will be doing but I will for now on plan on 10 more than I need.

– Hand out Flyers and post in stores. My Sunday School Class with our families went door to door the Monday before the VBS week and handed bags with flyers and candy and hanged them on the doors. I thought this was great but I felt like we could door more like putting it on both sides of our Church sign as well as asking some businesses if we can put them in the windows.

– Really get into the part. Make your VBS different than others so you will be remembered. Our class this year we played the part of secret agents and we were training cadets. It helped. We had a secret agent who was part of teaching the music for opening and closing and he would come around the rooms and give us secret missions. Anytime he came to our class we had the kids stand to attention and this really helped with the excitement.

–Pre-registration. I would recommend that any church that has pre-registration whether online or on paper before VBS to have a separate table for registration to have parents go to and have their paper check off. Give them an incentive to register early.

–Have your VBS Store Ticket/Bucks bags ready. Label them with the your class participants names as early as you can and designate an area of your room marked clearly, Kids love to see their tickets/bucks they have earned.

–Create your Daily Donation Reminders early. Whatever your theme might be create a shape that goes with the theme and write out each day what participants are to bring the following day. I unfortunately what to the day of to do this and time can be better spent if I had just prepared ahead of time.

This will be an ever growing list as I add more in the coming days as I mule over the week of VBS and what I learned and what will help me in the future.

Thanks for reading.

Topic: What I learned about Vacation Bible School as a Teacher
Check the play pokies online real money games at playpokiesonline.org>

Filed Under: Vacation Bible School

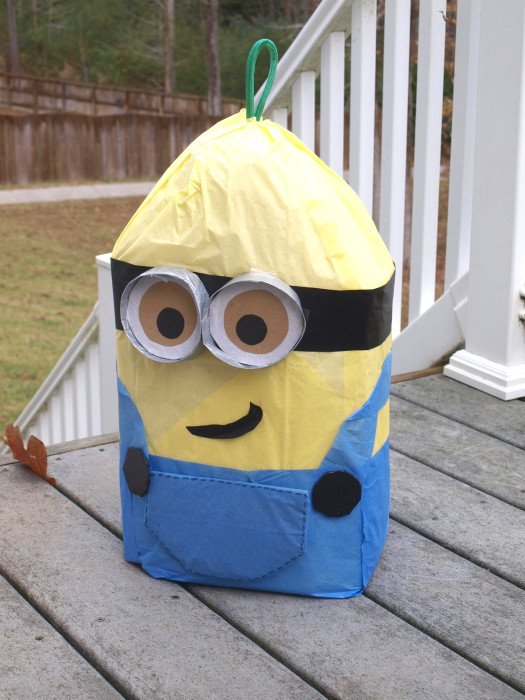
How to make a Minion Pinata Tutorial

December 31, 2019 by rautry

How to make a Minion Pinata Tutorial from Despicable Me

I was seriously trying to talk my son out of a Despicable Me Theme birthday party because I could not think of any ideas for decorations except a million minions!!! However when I finally sat to plan out my party details with my handy Party Planning Printable I was able to come up with many, many Despicable Me Party ideas and can’t wait to make them all and show them off!
Be sure to check out other DIY party supplies.

What you Need:

– Cardboard box

– Packaging tape

– Bungee

– Yellow, White and Blue Tissue paper

– Black Plastic Tablecloth

All of these items can be found at Dollar Tree for $4 total. The cardboard box you can ask if they have any boxes they are getting rid off. You can find boxes at gas stations. Any medium size box will do.

How to Make:

The Base of a Minion Pinata.

1. Take your cardboard box and cut the side so it will lay flat. Go from one side and roll it into a tight overlapping circle. Unroll and do the same from the other end.

2. Tape your box at desired width both inside and outside.

3. Secure the bottom by taping it down inside and outside.

4. Curve the tops of the box and tape into place leaving an area so you can fill it with pinata goodies. I used plastic baggies about halfway added the goodies and then added more plastic bags to the top and help shaped the head area.

5. Close off the top by adding the bungee looped thru a piece of cardboard and attached using tape. Make sure to completely secure the loop.

To Decorate the Minion Pinata.

6. Take white tissue paper and cover the entire Pinata and tape it down. This helps allow the yellow to pop out. Otherwise the yellow will look brownish from the cardboard.

7. Take the yellow tissue paper and wrap the pinata. I used double sided tape to secure it all down.

8. Cut the Blue tissue paper to make it look like a pair of overalls. Include the straps. Secure it on the pinata with tape.

9. Cut a black strip from the plastic tablecloth to fit around the head area for the glasses band. Secure with tape. Cut a halfway U shape out of the black plastic table cloth for the mouth and adhere it to the pinata.

10. Take some cardboard 3/4 in with by 10 -12 inches long and make 2 circles and tape together. These are the goggles. Cover them with grey or silver tissue paper or duck tape.

11. Next cut out 2 cardboard circles that fit just inside your goggles and cover those with white tissue paper.

12. Cut a slightly smaller set of circles from the cardboard, these can remain brown.

13. Cut a set of circles from either black cardstock, construction paper of the black plastic tablecloth. These are the eyes.

14. Put your eyes together the white is the base, then brown and then black. Adjust them accordingly to your desired look.

15. Add the blue pocket to the front of the overalls. Use a piece of cardboard and cut out your pocket shape. I added a few pieces of the plastic table clothe and taped it down. The add the blue over the pocket shape and tape down. Take a blue marker and make your stitches marks, you can also use yellow but it may not show up very well. Adhere the pocket to the pinata. Did you notice mine is upside down!!! I have changed it for the final picture!!!

16. Add buttons to your overalls. You can use real buttons if you have them. I cut out a set of cardboard circles and covered them with black plastic table cloth and secured them with tape to the pinata.

That is it! You are done!

The total cost for me was FREE having done several theme parties, I already had everything on hand, I save colored tissue paper, plastic table cloths, and any paper to reuse for future parties. The only thing I am constantly buying is packaging tape!!!!

Check out my other Despicable Me Decoration Ideas.

Topic: How to make a Minion Pinata Tutorial from Despicable Me.

Filed Under: Party Decorations, Pinatas

Planning a Budget Savvy Wedding?

December 29, 2019 by rautry

Are you planning a Budget Savvy Wedding?

In the case you are or know someone who is be sure to check out the Budget Savvy Wedding Series.

I learned about Tableclothsfactory.com  and they have some great sales and clearance items fit for any wedding and budget savvy conscious bride.

Did you know the going rate on the lesser end for a reception is $30 a plate? Yikes. I bet between Dollar Tree and sites like these you can get your own dishes and style rather cheap for around $500 for 100 that would be $5 a person and then when you add in the food on sale with coupons you can do it for about $10 a person.

So think outside the box and enlist some help for a budget savvy wedding.

Filed Under: Wedding

Submerged Archives – Rebecca Autry Creations

December 29, 2019 by rautry

Filed Under: Uncategorized

What Nobody Tells Newly Married Couples eBook

December 29, 2019 by rautry

This site uses Akismet to reduce spam. Learn how your comment data is processed.

FacebookTwitterGoogle PlusCustom Social

Filed Under: Wedding

Podcast 46 – Reorganizing Your Home Rebecca Autry Creations

December 29, 2019 by rautry

By Rebecca Autry January 8, 2018 January 5, 2018 Director Helps for VBS 2018 Game On Game On VBS Dollar Tree Decorations Part 2

This site uses Akismet to reduce spam. Learn how your comment data is processed.

FacebookTwitterGoogle PlusCustom Social

Filed Under: Uncategorized

Podcast 4 – Galactic Starveyors Wrap Up

December 29, 2019 by rautry

Podcast 4 – Galactic Starveyors Wrap Up

https://rebeccaautry.com/wp-content/uploads/2017/08/Podcast-4-Galactic-Starveyors.mp3

Galactic Starveyors Decoration Ideas that are simple.

How to Decorate for Game On VBS 2018 eBook

FREE Game On SVG File

Filed Under: Vacation Bible School

« Previous Page
Next Page »

Products

  • Household Handbook Household Handbook: Your Complete Home Management Binder $21.99 Original price was: $21.99.$9.99Current price is: $9.99.
  • Princess Tiana Tiara Princess Tiana Tiara SVG $0.99
  • Shaun The Sheep SVG Shaun the Sheep SVG Invitation $0.99
  • Super Mario Invite Super Mario SVG Invitation $0.99
  • Minecraft Favor Bag Minecraft Creeper Invitation $0.99
try.hpinstantink.com/cmfvfj

Copyright © 2025 · Genesis Framework · WordPress · Log in