Rebecca Autry Creations
  • Home
  • Piñata’s
  • Vacation Bible School
  • Wedding
  • Courses
  • Store

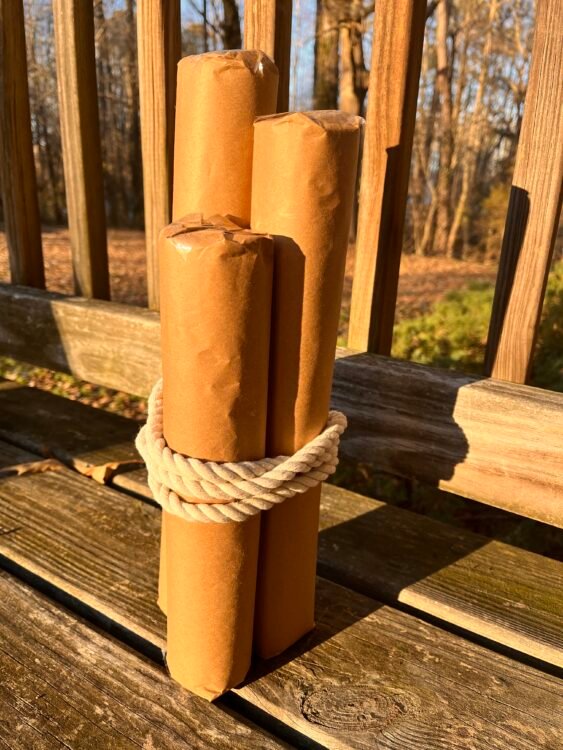
Waves of Creativity: Lifeway’s VBS Inspired DIY Dollar Tree Dock Pilings

January 17, 2024 by rautry

When it comes to creating a captivating beach theme for Lifeway’s VBS Breaker Rock Beach, you don’t need to break the bank. In this tutorial, we’ll dive into the world of DIY Dollar Tree dock pilings, providing a step-by-step guide to bring waves of creativity to your VBS décor. Plus, we’ll explore budget-savvy ideas using pool noodles, nautical-looking rope, hot glue, contact paper, and brown packaging paper, ensuring a stunning transformation without breaking your budget.


Materials Needed:

  1. Pool Noodles:
    • Affordable and versatile, pool noodles form the base of our dock pilings. Your choice of colors should lean towards the lighter colors that complement the beach theme, such as blue or white that are easier to cover with the contact paper or packaging paper.
    • %filemane%
  2. Nautical-Looking Rope:
    • Dollar Tree offers two sizes of nautical-inspired ropes found in the garden section or craft section. Dollar Tree also offers Floral Garden Decorative Ropes. Select the option that best fits your overall theme choice for an authentic look.
    • %filemane% %filemane%
  3. Hot Glue Gun and Glue Sticks:
    • A crafting essential, the hot glue gun will be your best friend throughout this project. Ensure you have enough glue sticks for the entire process.%filemane%
  4. Contact Paper:
    • Mimic the texture of weathered wood with contact paper. Opt for a brown or woodgrain pattern for an authentic appearance.%filemane%%filemane%
  5. Brown Packaging Paper:
    • This cost-effective material will add texture and depth to your dock pilings.

%filemane%

Step 1: Prepare the Pool Noodles

Start by cutting the pool noodles into your desired piling height. Consider varying heights to create a dynamic visual impact. A Tool Bench Camping Knife or Utility Knife work well for this task.

%filemane% %filemane%

Step 2: Wrap with Contact Paper

Measure and cut the contact paper to fit around each pool noodle. Wrap the contact paper around the noodle, securing it with hot glue. This step adds the appearance of weathered wood to your dock pilings.


Step 3: Create Texture with Brown Packaging Paper

Wrap brown packaging paper or use the Brown Wood contact paper to cover the pool noodle. Apply hot glue to the pool noodle and press the paper onto it to keep secure.


Step 4: Wrap with Nautical-Looking Rope

Using hot glue, attach the nautical-looking rope around the pool noodles, spiraling it from the bottom to the top. This step adds a touch of authenticity to your dock pilings.


Step 5: Secure Layers with Hot Glue

Ensure all layers—contact paper, brown packaging paper, and rope—are securely attached with hot glue. This not only enhances the appearance but also ensures the durability of your DIY dock pilings.


Step 6: Customize and Vary Heights

Create visual interest by customizing each piling. Vary the heights, add extra layers of contact paper or rope to some, and experiment with different textures to achieve a realistic, seaside look.


Budget-Savvy Tips:

  1. Dollar Tree Finds:
    • Dollar Tree is a treasure trove for affordable crafting materials. From pool noodles to rope, make the most of their budget-friendly selection when deciding to make your Vacation Bible School Decoration Ideas.
  2. Reuse and Recycle:
    • Get creative with brown packaging paper from your delivered packages. It not only adds texture with different types of paper but also repurposes materials you might already have.
  3. Buy in Bulk:
    • Purchase hot glue sticks and pool noodles in bulk to save on costs. These items are versatile and can be used for various crafting projects.
  4. Mix and Match:
    • Don’t be afraid to mix and match rope styles or experiment with different shades of contact paper. This adds character to your dock pilings without additional expense.


Transforming your VBS space into Lifeway’s Breaker Rock Beach doesn’t have to be a costly endeavor. With a bit of creativity and some budget-savvy choices, you can craft stunning DIY Dollar Tree dock pilings that capture the essence of the seaside. Enjoy the process, involve others in the crafting fun, and watch as waves of creativity wash over your VBS décor, leaving a lasting impression on all who attend.

Filed Under: Dollar Tree, Vacation Bible School

Dollar Tree Submerged VBS Ideas

January 12, 2020 by rautry

By Rebecca Autry November 7, 2012 July 6, 2017

Dollar Tree VBS Ideas

Topic: Dollar Tree VBS Ideas

How I made 156 loads of Laundry Detergent for less than a $1

This site uses Akismet to reduce spam. Learn how your comment data is processed.

FacebookTwitterGoogle PlusCustom Social

Filed Under: Dollar Tree, Vacation Bible School

Paper Plate Turtle Craft Instructions

January 8, 2020 by rautry

Below you will find step by step instructions on how to make a Paper Plate Turtle Craft. Great for an easy decoration for VBS 2016 – Submerged or as an alternative craft. Remember to ask your congregation for donations of green paper plates and green construction paper.

What you Need:

  • Green Paper Plates
  • Scissors
  • Green Construction Paper
  • Double Sided Tape or Glue
  • Fast drying liquid glue

How to Make:

  1. First get all your supplies together. If you are using this as an alternative craft for your VBS week I would suggest that you have all your arms and legs cut out. If you go from room to room make ziplock baggies with arms and legs and googly eyes and paper clip to a plate. This will make being able to give instructions and handing out your craft to each participant quicker.
  2. Cut out your arms and legs from Green Construction Paper. Quick Tip – Fold your paper in half and half again and cut multiple at a time, this will save time and energy.
  3. Take your glue stick or double sided tape and adhere your arms and legs to the back side of the paper plate.
  4. Take your four hexagon shapes and glue to the face part of the plate.
  5. Next you will take your googly eyes and use fast drying glue to adhere to the paper plate. Let sit and dry. You can always just use a black marker to make the eyes but the googly eyes just make it so much more fun.

That is it! You are done!

Topic: Paper Plate Turtle Instructions

Filed Under: Dollar Tree, Party Decorations, Vacation Bible School

Fake Wooden Sign Tutorial

January 6, 2020 by rautry

Need a large inexpensive decoration idea that won’t take much time. This is it and easy to make. Make wooden panels and write the words “This is the Way – Walk in it.”

What you Need:

– Large Cardboard box

– Drip cloth or plastic bags

– Brown paint and brush or sponge

– Brown and White Marker or Chalk

– Packaging Tape

How to Make:

1. First you will need to lay your drip cloth or plastic bags down on your work area. Plastic tablecloths from Dollar Tree are a nice alternative and inexpensive.

2. Pull your cardboard box apart to lay flat so you can cut long  strips of cardboard to make wooden slats. These wooden slats will soon become your fake wooden sign.

3. You will want to cut your ends to make the jagged edges. Don’t worry they do not need to look perfect.

4. Apply the brown paint to your wooden(cardboard) slats brown. It is important that you go back and forth and not all crazy to make your wooden slats look more natural. Make sure they are dry thoroughly before moving on. You can add random 2nd and 3rd strokes to various parts of the cardboard to look like natural uneven wood. If you are hanging this on a wall you will only need to paint the side that will show. If you plan to have it hang with both sides showing then I advise you paint both sides of the cardboard.You can even create knots in your wood by taking a bit of paint at the end of your brush or sponge and make a small circle on the cardboard in the desired area. I used two different browns to make the wooden look.

4. Use white marker or chalk and write out the words ” This is the Way – Walk in it.” as pictured below.

5. Turn your wooden slats with the face down in order as you want them. You will then tape the slats on the back. Make sure they are secure enough.

That is it! You are done!

Topic: Fake Wooden Sign Tutorial – Journey off the Map ideas

Filed Under: Dollar Tree, Party Decorations

Easy Little Bee Craft!

November 10, 2019 by rautry

Here is a itty bitty easy little Bee craft to make!

My sister made these for a Princess Tiana Birthday party for my niece. We made flowers to on the walls on lily pads and put these little bees on them.

%filemane%

What you Need:

– Yellow Pom pom

– Black pipe cleaner

– 2 googly eyes

– White Tissue Paper

– Hot glue gun and glue sticks

How to Make:

1. Take the yellow pom pom and the black pipe cleaner and wrap the pipe cleaner around the pipe cleaner making it looked striped like a bee.

2. Glue on your googly eyes.

3. cut out a tiny set of wings from the white tissue paper and glue to its back.

That’s it very simple and easy and very cute. Just don’t lose him like I did!

Topic: Easy Little Bee Craft

%filemane%

Filed Under: Dollar Tree, Party Decorations

Popcorn Wall Decoration Tutorial

February 9, 2018 by rautry

Pop, pop! Do you smell the butter as the popcorn is popping. Get your concession stand ready and decorated for Life’s Big Game with this Popcorn Wall Decoration for VBS Game On 2018.

Popcorn Wall Decoration

What you Need:

  • Painters Tape
  • Scissors
  • White and Red Plastic Tablecloth
  • Yellow and White Tissue Paper

How to Make:

  1. Take your white plastic tablecloth and cut to size as desired for your popcorn.
  2. Using Painters tape, tape to the wall.
  3. Take the red plastic tablecloth and cut strip in width and length as desired to fit the popcorn bag.
  4. Using painters tape, tape the red strips to the white backdrop starting from one side all the way to the other.
  5. Take various shades of white and yellow tissue paper. I cut each sheet in half, then crumpled it and used painters tape in a roll to adhere the tissue paper to the wall.
  6. Make sure to mix up the yellows and white so they are not all clumped by the same shade.
  7. Print out the Popcorn Sign Printable and tape to the center of the popcorn bag.

That is it! You are done.

Topic: Popcorn Wall Decoration

Filed Under: Dollar Tree, Party Decorations, Vacation Bible School

How to make a Super Mario Pipe Floor Decoration

October 17, 2017 by rautry

Are you having a Super Mario Theme Party? The Mario Brothers have no doubt continued to be popular among children today. This simple Super Mario Pipe Floor Decoration is just a fun addition to any party. Below you will find a list of supplies you need as well as step by step instructions with pictures on how to make a Super Mario Pipe Floor Decoration.

First left me tell you a story about this Pipe!!! I started creating it in my living room as my son’s birthday party approached, I moved the pipe outdoors to work on since it was rather nice outside. The neighbor kids would come over and play with my children. As they saw me working on the pipe they were intrigued by the massive size and when I explained what I was making they asked if they could play with it when I was done. My response, “Of course”. So yes this Super Mario Pipe was a huge success prior to the party, during the party and even a few weeks after. See kids will be just as excited with a box that inspires lots of creative and imaginary play. I have to admit I even enjoyed playing as if I was Mario coming out of the pipe like you do in the game!

How to Make a Super Mario Pipe Floor Decoration

What you Need:

– Large Cardboard box

– Packaging Tape

– Lots of Green Paper or Green Plastic Table Clothe

Most of these items can be purchased at Dollar Tree. The Large Cardboard Box was from Bunk-bed box.


See ALSO:

  • Handmade Super Mario Party Decoration Ideas that are unique and simple to make.
  • Super Mario Mushroom 1 Up Pinata Tutorial.
%filemane%

How to Make:

1. First take your cardboard and cut it in a circle and tape it with packaging tape. Make it as tall as you desire.

%filemane%

2. Next you will make the rim which needs to be about 4-8 inches longer.

3. Cut a cuff rim about 2 inches bigger than your base. You will want to cut out the middle as well.

4. Attach the cuff rim to the base using tape.

5. Then attach the rim using tape to secure tightly.

%filemane%

6. Cover your Pipe with green paper or if easier and more cost effective use green plastic table from Dollar Tree. Below I covered with green shiny material that I got from my sister from a bag she was going to donate after her yard sale.

%filemane%

That is it! You are done!

I used newspaper for stuffing the rim. I also used old flag material I got from my sisters yard sale that didn’t sell. The box I used was a wardrobe moving box. So my Super Mario Pipe Floor Decoration was absolutely FREE for me.

Do you have any DIY Super Mario Party Ideas? Leave your idea in the comments below.

You might be interested in this Super Mario Backdrop

%filemane%

Topic: How to Make a Super Mario Pipe Floor Decoration

Filed Under: Dollar Tree, Party Decorations Tagged With: #Super Mario

10+ Dollar Tree Favor Bag Ideas

October 23, 2016 by rautry

These favor bags come in 10 ct at Dollar Tree in the paper section. They are paper favor bags. Add some colored papers in different shapes and make the custom for your party. Dollar Tree sells them in a variety of colors: Yellow, Red, Blue, Green, Pink and Purple.

%filemane%
%filemane%
%filemane%
%filemane%

1. Minion Favor Bags

You will need yellow favor bags, Black, Brown, Grey, White and Blue Cardstock or Construction paper depending on what your Dollar Tree sells. You will also need glue and a Black Sharpie. Check out other Minion Party Ideas you can easily make for your custom one of a kind Despicable Me Party.

2. Eugene (Tangeled) Favor Bags

Need something for the boys for a Tangled Birthday Party these Eugene Favor Bags are the best. You will need the Blue paper favor bags. You will also need yellow, white, brown and blue cardstock or construction paper for the pieces. You will use glue, scissors and a single hole punch. Open your creative mind with other Disney Tangled Birthday Decoration Ideas.

3. Tangled Flower Favor Bags

4. Dora Backpack Favor Bag

5. Spider-man Favor Bags

6. Kermit Favor Bags

7. Superman Favor Bag

8. Captain America Favor Bags

9. Ninja Turtle Favor Bag

10. Angry Birds Favor Bag

11. Elmo Favor Bag

12. LEGO Block Favor Bag

13. LEGO Head Favor Bag

14. Cookie Monster

15. Mickey Mouse

16. Spongebob

17. Big Bird

18. Beaker Favor Bag

19. Hello Kitty Favor Bag

20. Minecraft Creeper Favor Bag

21. Dr. Who Tardis Favor Bags

22. Baymax Party Favor Bags

Brown or White Paper Bags

1. Brown – Super Mario Toad

2. White – Olaf Favor Bags

Do you have any other suggestions? Please leave a comment below and I will add them to the list.

Topic: 10+ Dollar Tree Favor Bag Ideas

Filed Under: Dollar Tree, Party Decorations

How to Make a Super Mario Red Toad Loot Bag

June 29, 2016 by rautry

Add Super Mario flair with these handmade Super Mario Red Toad loot bags are made from brown paper bags and red cardstock, featuring Toad’s signature white spots.

%filemane%

What You Need:

– Brown Paper Bags

– Red, Beige and Brown Cardstock or Construction paper

– Double Sided Tape or Glue

How to Make Super Mario Red Toad Loot Bags:

1. First take your red cardstock and fold in half and fold in half again. Draw out your top of the Mushroom and then cut.

2. Find something round like the bottom of a cup and trace out your circles onto the beige cardstock. Cut the circles out. Half of the circles will be cut in half.

3. Using Double-sided tape attach a full circle in the middle of the mushroom top. With a cut circle attach them to each side by the middle circle. Cut the excess that overlaps the mushroom top.

4. Take the brown cardstock and fold a couple times and again trace out your patter of a elongated oval. These are the eyes for the Green Toad loot bag.

5. Open up the Brown Paper Bag and fold the top 2 times like you are folding your kids lunch bag. Attach the mushroom top.

5. Using double-sided tape attach the eyes.

That is it! All Done. Super Simple and Easy.

Need more decoration ideas on a Super Mario Party? Check out my ebook below.

Topic: Super Mario Red Toad Loot Bags

Filed Under: Dollar Tree, Party Decorations Tagged With: #DIY, #DIYDecorations, #SuperMario

Super Bowl Food Stadium

August 20, 2015 by rautry

DIY Super Bowl Food Stadiums are very popular so I decided to make my own. I had some extra time and a few dollars and here is my stadium I created in a couple of hours.

I only purchased the green, red and gold tablecloths. Actually I already had the red and gold but if I did purchase them including the small plastic bowls I spent about $5 tops. I already had the snacks since I was planning my festivities already.

Super Bowl Food Stadium

I used boxes from food we already had. I end up using the saltine cracker boxes to make my side stands. Each box made 2. I used 4 boxes. I then used the project poster boards from Dollar Tree that I had on hand to make my smaller sides.

I then covered the one side in gold for the 49ers and the other side red for the Chiefs. I then used a cookie sheet and covered it with green but I still end up putting my dip on the cookie sheet to look like a field.

The food items that where messy I used tin foil to keep the box from getting soaked.

I used the clear packaging tape from Dollar Tree. I always have one or two or three on hand as I like their packaging tape for the creations I make.

That is it! Tell me how I did for my Super Bowl Food Stadium? Who did you want to win in the 58th Super Bowl?

Filed Under: Dollar Tree, Food, Party Decorations

Products

  • Household Handbook Household Handbook: Your Complete Home Management Binder $21.99 Original price was: $21.99.$9.99Current price is: $9.99.
  • Princess Tiana Tiara Princess Tiana Tiara SVG $0.99
  • Shaun The Sheep SVG Shaun the Sheep SVG Invitation $0.99
  • Super Mario Invite Super Mario SVG Invitation $0.99
  • Minecraft Favor Bag Minecraft Creeper Invitation $0.99
try.hpinstantink.com/cmfvfj

Copyright © 2025 · Genesis Framework · WordPress · Log in