Rebecca Autry Creations
  • Home
  • Piñata’s
  • Vacation Bible School
  • Wedding
  • Courses
  • Store

Top Tips to Prep for Classroom Setup

July 24, 2021 by rautry

Here are the top tips to prep for classroom setup

1. Know your room

If at all possible take pictures of your classroom from every possible angle. Believe me you will want to reference these over and over as you prepare to setup your room. Get yourself a notebook and take inventory and be as detailed as possible.

Things to look for:

  • Outlets how many and where they are located
  • Chalkboards/Dry Erase Boards how many and where they are located
  • Promethean Board/TV, where is it located
  • Flag, How is it hung and where is is located
  • Windows, how many and where are they located
  • AC Unit, what kind and where is it located
  • Fire Extinguisher, where is it located
  • Door(s), where is it located and does it have a window, will you need to be able to cover it?
  • Clock, where is it located and is it powered by the school or do you need to add a battery
  • Storage, do you have a storage room, bookshelves, cabinets?
  • Furniture, what furniture is in the room, teacher desk, how many student desks, podium, rolling cart, bookshelves, file cabinets, etc.

Are you seeing a pattern? Make sure you know where everything is located and this is why pictures come in handy because we can’t always remember on our own.

Also take a look at the types of walls. Are they drywall, cinder block, panels? What type of ceiling do you have? Is it a grid, stucco, etc? Personally, go the extra mile and take a measuring tape with you and measure everything, yes everything. So this is the math teacher in me! These measurements come in handy when you are thinking about how you are going to setup and what will fit on your walls.

2. Clean your room.

Yes most schools will have the floors waxed and cleaned during the summer but I also have learned that even just one weeks time of a classroom being cleaned can accumulate dust.

Get yourself a broom and a dust pan and you can pick these up for a few dollars at Dollar Tree. Dollar Tree sells the handle separate from the brush so you will get the complete set for $2.

Make sure to do a complete sweep of your classroom and mop. You can also find a mop sweeper at Dollar Tree as well as the wet and dry pads.

Does your classroom has carpet you will also want to invest in a simple vacuum. Check yard sales or thrift stores. Be sure to test them before you buy. Even if you don’t have carpet you may have a rug in your room you will want to vacuum.

Take some lysol wipes and wipe down all your surfaces, bookshelves, etc. Clean your boards off including your bulletin boards so having a staple remover on hand is a good idea. I have my first day tool kit that includes the following:

  • tape measure
  • broom and dustpan
  • wet and dry mop
  • Lysol wipes
  • disinfectant spray
  • hand sanitizer
  • trash bags
  • hammer
  • staple remover
  • dry erase board cleaner
  • paper towels
  • masking Tape
  • duck tape (I use Black from Dollar Tree)
  • painters tape
  • packaging tape (My favorite is from Dollar Tree)
  • glue gun and glue sticks
  • furniture sliders
  • paint scraper
  • double sided tape
  • exacto knife
  • fishing wire
  • notebook
  • pencil/pen
  • mini fan
  • water
  • light snack
  • air freshener
  • zip ties
  • magnets
  • velcro
  • drop cloth
  • level
  • nail gun and staples
  • Screw driver set
  • Allen wrench
  • sewing kit
  • personal hygiene items (deodorant, feminine items)

Not all these things will be used on the first day but are part of my setup items I need to be prepared to decorate which we all love to do. Many schools turn off the AC during the summer so having a fan of any type will help your sanity and cool you down.

One more thing before we move on. The schools I have taught in have had little critter issues and setting out traps or asking to have the custodial staff spray your room for insects might be a good idea. It is my hope that schools will do this, but to be extra cautious I always ask and put in a request.

Plan to Prep for Classroom Setup

3. Make a plan

Before you start the decorating, make a plan. Having pictures of your classroom you can set-up your classroom visually by loading them into Canva. If you have not already signed up for a free teacher account I highly recommend doing so. This is not sponsored by Canva, I just really like using it for all my images.

Once you have an idea of your walls and floor layout you can then start making your To Do Lists and putting them in order of importance.

You will want to leave the items that are ok to finish during the school year that don’t hinder how your class will run. Save those to the end. Understand some tasks will take you longer than you may think.

Do your best to print, cut, laminate and label before you move into your classroom. These items can be done at home, I know many who prefer to do them at the school during the time they are in the classroom however I prefer to spend my time in the classroom for setup and not the tedious cutting and laminating. *Hint: Label everything! Your items may grow legs and walk off but if you label it then it tends to find its way back to your room. Trust me, label everything no matter how big or how small

Don’t over do your days. Plan out 2-3 major tasks you want to accomplish each day.

My plan is as follows:

Day 1 – Clean my room/move my items from previous room to new room

Day 2 – Put up my wall coverings (I cover 1 wall with brick paper, 2 walls with black fire resistant bedsheets).

Day 3 – Floor layout setup – move furniture

Day 4 – Bulletin boards and wall hangings

Day 5 – Setup my area and minor hanging items

My days are listed as an overall theme but each day does have multiple tasks within them. Lastly, don’t be hard on yourself if you don’t get everything you wanted to accomplish in one day. Remember some tasks may take you longer than you think especially if you are setting up on your own.

Also if you are moving into a classroom that has tons of items left behind this may also be one of your days you want to add to your list. Focus one whole day on going through and organizing items left in your classroom.

4. Be Prepared before you start

So you are ready to get started and to decorate your classroom but I have another tip for you before you start. Make sure you have all your materials you are using to decorate your classroom. The last thing you want to do is have to stop by another store after you leave your classroom for the day to get more material.

Having your measurements of everything you can do some simple math when you are out purchasing items so you don’t over buy. On that note, if you are looking for bins or furniture items check with other teachers that may cleaning out or some schools will have a teacher free area where teachers will place items that are still usable but they are not needed in their classrooms anymore. Also check your local Pay Nothing Groups on Facebook or even the Facebook Marketplace.

Make sure to gather all the tools you may need before you start. I purchased a toolbox from Dollar Tree that I have my screw drivers, allen wrench, level and hammer.

5. Be Flexible

When you start setting up your classroom you will want to take a step back and take a look at many angles of your classroom and consider the following.

When setting up bulletin boards, what is your purpose and what function do they play? Do they need to be readable from all areas of the classroom? This is very important when you are writing on boards as well.

If something is not working right, don’t be afraid to make adjustments. Your room needs to be inviting but also needs to be functional. Your first year you may change things over and over but as you learn what works for your room you will have a better understanding of what is needed for your room.

Topic: Top Tips to Prep for Classroom Setup

Filed Under: Food, Life style Tagged With: #classroomsetup, #Simple

Sugar Cone Christmas Tree Treat #Recipe

January 10, 2020 by rautry

Sugar Cone Christmas Tree Treat #Recipe

What you Need:

– Sugar Cones

– Frosting White

– M&M’s

– Mini Marshmallows

– Green Food Coloring

How to Make:

1. First take your Sugar cone and make sure the opening is as flat as you can get it.

2. Turn your sugar cone with open side facing down.

3. Take your frosting and add a couple of drops green food coloring and mix well. Continue to add more food coloring until the color is what you want is desired. Mix well.

4. Add your frosting to your upside down cone. Make sure to cover the entire cone.

5. Add your desired M&M’s to your tree pressing firmly.

6. Lastly take one mini marshmallow and place on top of your Sugar Cone Christmas Tree Treat.

That”s it! You’re done. 

This is a great and easy treat to let the kids decorate their own treat and eat. Yes it can be messy but its alot of fun. Let kids be kids.

You might also be interested in the Santa Hat Fruit Sticks. Be sure to follow me on Pinterest at Pinterest.com/rebeccaeautry

Topic: Sugar Christmas Tree Treat #Recipe

Filed Under: Food

Grinch Fruit Kabobs Recipe (Healthy and Easy) Kid Approved!

January 10, 2020 by rautry

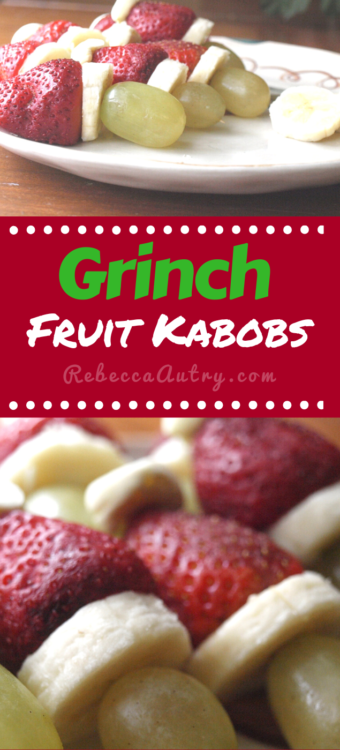
What a great fun way to get kids to each their fruit this Christmas Season. Easy to Make and sure to please. Also great way to make a memorable impression at friends parties. Not everyone is Martha Stewart, but we can all sure make fruit look delicious! Kids will enjoy assembling these Grinch Fruit Kabobs as you prepare Christmas Dinner and need a quick snack for Christmas Break. Parents get a good laugh and enjoy them as well. The best part they are healthy!

*Get more Rebecca Autry Creations Recipes here*

*Pin It* by clicking the PIN button on the image above*

REPIN It here!

Grinch Fruit Kabobs

This is a great Christmas treat that involves no baking and can be made in any quantity as desired. These are great Christmas Treats to Eat! Not to be a Grinch! But I truly love Christmas Decorations, so I have to hold myself back and wait to put up Christmas Decorations until Thanksgiving. If I didn’t feel so ashamed I really would put my Christmas Tree up at the end of September! Really!!! My oldest birthday is at the end of September and so once we are done celebrating his birthday I am really ready for the Christmas season, the smells, everything! But I control myself! I really enjoy pumpkin pie but not all the pumpkins stuff, so I am Ok with skipping over the Fall Decorations. However now that we have our own home, I tend to decorate for more seasons than I ever did.

You might be interested in seeing my attempt for Fall Decorations!

OLYMPUS DIGITAL CAMERA

Don’t they just look yummy, you want to eat them right from the picture! Be sure to pin and share to come back later and make them for yourself.

OLYMPUS DIGITAL CAMERA

  • 24 Strawberries, tops removed
  • 24 Green Grapes
  • 1 Banana cut into 24 slices
  • 24 Mini Marshmallows
  • 24 Toothpicks
  • Lemon Juice
  1. Prepare your strawberries by cutting off the stems and tops
  2. Slice your Banana into 1 cm width slices or 24 slices for 1 banana. Dip in Lemon juice to last longer.
  3. Take your Toothpick and thread the mini marshmallow. The mini marshmallow is the pom pom of the Santa Hat.
  4. Next thread your Strawberry starting with the tip and freshly cut side as your hat base. The Strawberry is the Santa Hat base.
  5. Add a slice of Banana by threading it next. The banana represents the fur.
  6. Add the final touch of the Grape long ways. The Grape is the Grinch’s Head.

That is it! You are done!

Grinch Fruit Kabob princess fun

 Topic: Strawberry, Banana, Grape & Marshmallow Grinch Fruit Kabobs

Filed Under: Food

Birthday Party Punch Recipe

January 10, 2020 by rautry

Looking for a quick birthday punch to wow your guests with? Here it is! This Birthday Party Punch recipe is Legendary and perfect for our birthday parties and yours. My guests have come to expect this party punch. It’s super simple and easy to make. This Birthday party punch is showy and your guest will be intrigued by its fizz and colorful floating sherbet.

How to Make Birthday Party Punch

So I am going to tell you this up front. This is a skeleton of my recipe. Why? because its different every time. I change it up to fit the theme of the party and to what I have on hand! It has the basics but slightly different every time.

SEE ALSO

So here we go. Takes about 5-10 minutes to make. Makes 18-20 Cups.

Ingredients

1. First you need a base. This can be a Fruit punch, Lemonade, or Juice. Decide on 1 and thats is the main part of the drink and the one that you will want the most of.

2. Choose an Add-on spritz. This can be ginger ale, 7-Up, Sierra Mist or Sprite. It needs to be some type of carbonated drink but light in color. Coke will not do!

3. Add a specialty. You can add just about anything here. I added pineapple juice once, I also did strawberries once as well. One time I needed it to be green so I added green fruit punch. (this is what makes it unique) Make it your own!

4. The best part of the finishing touch! Always add Sherbert! Depending on how many your party is for the more you will want. I do 2  cartons for every 25 persons. The foam suds you get is what make the drink fun. Any kind is fine. I once used the orange pineapple which was pretty good.

5. Color with food coloring to fit your theme if desired.

Enjoy and you will get people asking whats in it and they will come back for more! I promise it will seem like it has a buzz but at you can see above there is no alcohol involved!

Topic: How to Make Birthday Party Punch

Filed Under: Food

Disney Cars Tire Cake Recipe

January 10, 2020 by rautry

Disney Cars Tire Cake Recipe

Be inspired with these Disney Car DIY Decorations. Simply click on the image below.

This is a great cake to add to any Disney Cars Theme Party. Be sure to check out other Disney Cars Party Ideas.

What you Need:

– 2 Boxes of Cake Mix plus the ingredients specified on the box

– 4 Round Cake Pans of the same size

– Cake Tray

– Frosting (Chocolate or brown food coloring)

– White Icing

How to Make:

1. Mix and Bake the cakes as directed.

2. Once the cakes are baked place in the freezer for an hour to make them easier to work with.

3. Cut the tops of each cake to make them even.

4. Each Tire is made of two layers of cake. Place on top of each other.

5. This cake has the top two layers slightly hanging over the other making the distinction between both tires.

6. Use Chocolate frosting to cover or add brown food coloring to frosting until color is desired.

7. Spread the tires with frosting.

8. Take the white frosting and add the writing.

9. Going around the tires make the tire track lines at an angle.

That’s it! You are Done!

Topic: Disney Cars Tire Cake Recipe

Filed Under: Food, Party Decorations

Journey off the Map Food Ideas

January 6, 2020 by rautry

Very simple in deed! Take Pretzel sticks and simply place a sign in your snack tray or on the tables indicating them as Twigs. You can even refresh the kids memories that as they go about their Journey off the Map they may encounter Twigs along the way!

You can also add a handful to snack size bags with a label “Twig Snack” or variation of that. Be creative and enjoy.

Animal Crackers

Of course if you will be in the jungle or taking a journey through wilderness you might encounter Animals!!! Take a snack bag and fill with a handful of animal crackers. You can find the large bags at Wal-mart or buy them wholesale at Sam’s Club or even Costco.

Photo credit to thebananapolice.com

Strawberry/Banana Worms

So this might not be the best idea for really little ones, because of the stick and because they may not want to eat something that resembles a worm! Simply take strawberries and bananas and cut them in thin slices. Take cab-bob sticks and alternating from Strawberry to banana place them on until you get the length desired. To keep these fresh you will want to freeze them and take them out the morning of the day you want to use them. These are preferably done fresh the day off.

Cucumber Snakes

Again this is probably not the best snack for little ones. Simply take your Cucumber and cut into thin slices. Cut each slice in half. Lay them on the plates as shown above

Palm Trees – Crackers and Apples

These are fun and perhaps you will get some good eaters! Take the long thin crackers you can even use the Club crackers that typically go on sale 2 for $4 at most grocery stores. Lay those on the plate one above the other. Take and apple and slice it into pieces. Arrange them above the crackers to make a Palm Tree affect.

Photo from margaretdilloway.com

Butterfly Snacks

These are to be a sure hit with the little kids. You will need a clothes pins, snack bags, grapes and gold fish or any other little snacks the little ones will love. Fill one half with one snack and the other half with another. Place the clothes pin in the middle and add some eyes and your are done. you can add some antennas to make them extra cool!

Photo credit to cleanandscentsible.com

Apple Frogs

Topic: Journey off the Map Food Ideas

Filed Under: Food, Vacation Bible School

VBS 2017 Galactic Starveyors Snack Ideas

November 10, 2019 by rautry

#Lifeway VBS 2017 Galactic Starveyors Snack Ideas

Galactic Marshmallow Constellations

To make these a better filling snack replace the topics with pretzel sticks. Provide starveyors with Marshmallows and pretzel sticks along with Constellation patterns they can mimic. All products shown in the above picture were purchased at Dollar Tree.

Galactic Snack Decoration Ideas

1

Galactic Cupcakes

SEE ALSO

Rocket Hotdogs

Galactic Krispies

Be sure to check out other Galactic Starveyors Decoration Ideas


Topic: #Lifeway VBS 2017 Galactic Starveyors Snack Ideas

Filed Under: Food, Vacation Bible School

Transformers Pyramid Cake Recipe

September 11, 2018 by rautry

Transformers Pyramid Cake Recipe

I cannot take credit for this yummy cake. My sister Melissa is the creator.

What you Need:

– 2 Cake Mix (including ingredients on box)

– Graham Cracker Crumbs

– Chocolate pudding

– Autobot Figures!

How to Make:

1. Make your cakes as directed for extra moist add an additional eggs and more milk. Use large rectangle pans you will need 3.

2. Once cake is baked, let cool in freezer for an hour so it easily workable.

3. Take cake out of freezer and begin to cut your layers. The bottom layer is just an uncut rectangle cake.

4. The next piece is a square piece of the cake cut from a rectangle about 2/3 of it.

5. Take your third sheet of cake and cut a slightly smaller square and so on until you have all your height.

6. Cover entire cake with pudding.

7. Sprinkle heavily with Graham crackers.

That is it! You are done!

Topic: Transformers Pyramid Cake Recipe

Filed Under: Food, Party Decorations, Uncategorized

Olaf Treat – Frozen Party Idea Rebecca Autry Creations

May 12, 2016 by rautry

Need a fast treat to give your guests for a Disney Frozen Party? How about, Do you want to Build a Snowman? These Olaf Treat will give excitement to your guests.

What you Need:

– 1 extra large marshmallow

– 2 large marshmallows

– 5 chocolate chips

– 1 candy corn or Wilton Candy creation shapes

– 4 pretzel sticks

– 2 mini marshmallow


How to Make:

1. You can leave them apart and place in little baggies for guest to build on their own. To create them your self first take the extra large marshmallow and place one pretzel stick in the center. Add one large marshmallow over the pretzel with some sticking out to place on the other marshmallow.

2. Place on the other large marshmallow on the pretzel to make it secure as shown below.

3. Stick in the pretzel sticks for the arm to the middle Marshmallow. One of each side of Olaf Snowman for his arms.

Filed Under: Food

Turkey Fruit Tray Recipe

December 24, 2015 by rautry


What you Need:

– Apple or Pear

– 1 Banana

– Strawberries

– Grapes

– Cheese

– 2 Skittles or M&M’s

How to Make:

1. First slice your Pear or Apple in half.

2. Slice your banana.

3. Cut the top stems off the strawberries and then slice in half.

4. Place your Apple or Pear in the center bottom of your tray.

5. Place your strawberries inverted every other one around the apple/pear.

6. Place your banana slices around the strawberries.

7. Place your handful of grapes around the strawberries.

8. Cut your nose and legs from a slice of cheese and put in place.

9. Lastly add your Skittles/M&M’s as eyes.

That’s it! You are done! Enjoy

%filemane%

Hi I am Rebecca Autry and I am a Stay at Home Mom who helps others save money. I have three beautiful children, married to my super hero hubby for over 10 years. I am a frugal living, DIY type of person. I like to make my own Pinatas, Cleaners, and all about reusing and re-purposing anything and everything.

%filemane%
OLYMPUS DIGITAL CAMERA

Filed Under: Food

Next Page »

Products

  • Household Handbook Household Handbook: Your Complete Home Management Binder $21.99 Original price was: $21.99.$9.99Current price is: $9.99.
  • Princess Tiana Tiara Princess Tiana Tiara SVG $0.99
  • Shaun The Sheep SVG Shaun the Sheep SVG Invitation $0.99
  • Super Mario Invite Super Mario SVG Invitation $0.99
  • Minecraft Favor Bag Minecraft Creeper Invitation $0.99
try.hpinstantink.com/cmfvfj

Copyright © 2025 · Genesis Framework · WordPress · Log in