Rebecca Autry Creations
  • Home
  • Piñata’s
  • Vacation Bible School
  • Wedding
  • Courses
  • Store

Shaun the Sheep cuttable Shape

May 12, 2016 by rautry

YOU WILL RECEIVE IMAGES IN THESE FORMATS:

SVG files (for cutting machines)

PDF files (with white backgrounds)

PNG files (with transparent backgrounds)

*FONTS* Fonts are different.  They are fonts you install on your computer and DO NOT include SVG, PDF or PNG

The PDFs and PNGs are high quality with a resolution of 300 dpi.  You will also receive 1 PDF instruction sheet for the SVGs, and 1JPG picture of entire collection for viewing.

THESE ARE DIGITAL FILES ONLY! NO physical product will be mailed to you!

The files come in zip format which will be available to download after purchase.

By downloading our digital files you agree to our License & Copyright information page.

Filed Under: Party Decorations

Despicable Me Minion Treat Bags Tutorial Rebecca Autry Creations

May 12, 2016 by rautry

This is a Step by Step tutorial on how to make a Despicable Me Minion Treat Bags great for a Despicable Me Theme Party. The best part is all the products used can be found at Dollar Tree.
Be sure to check out other DIY Despicable Me Party Ideas.

What you Need:

– 10ct Yellow Paper Bags found near the Party Supplies at Dollar Tree

– Black Paper – I found black paper with white lines that you use the neon gel pens on.

– Blue Construction Paper or some Dollar Trees like mine has scrapbook paper and I happen to found a pack of 20 sheets of jeans print.

– Glue – All purpose Craft Glue

How to Make:

1. First take your sheet of black paper and cut strips of 1 cm. I used 2 sheets to make 20 bags.

2. Glue one strip onto the front of the bag about 3 inches from the top. Fold strips on the side and glue. Repeat on the back of the bag and same on the sides overlapping the flaps on the side.

3. Cut out your Glasses and eyes and attach to the bags.

4. Cut out blue squares and blue stripes to make overalls and attach using glue.

5. Add black dots for buttons.

6. You can use googly eyes instead of paper.

7. Cut very fine stripes of black cardstock and glue to tops of paper bags.

8. Make sure to draw a smile on the paper bag for his mouth.

Shapes for Minion Treat Bags

Be sure to check out other Despicable Me Party Decoration Ideas.

Topic: Despicable Me Minion Treat Bags Tutorial

Filed Under: Party Decorations

Minion Tablecloth Tutorial – Despicable Me Party Rebecca Autry Creations

May 12, 2016 by rautry

Minion Tablecloth Tutorial

This is a Great Despicable Me Table Cover and be sure to check out other DIY Minion Birthday Ideas. Do you have any other Minion Decorated Party Tables Ideas. Leave comment below. I love seeing how creative everyone is.

What you Need:

– 1 of each yellow, blue. black plastic table clothes

– Black Streamer (this is a substitute for the black table clothe)

– tape

– White with silver rim plastic plate (from Dollar Tree wedding section)

– Brown Napkin or cardstock sheet

All items were purchased at Dollar Tree and Walmart. Total cost was $3

How to Make:

1. First place down the yellow plastic tablecloth on the table and cut if needed.

2. Place the Blue plastic tablecloth at one end and overlap as desired and cut.

3. Take a thin strip of blue tablecloth for the overall strap and adhere to the yellow tablecloth with tape.

4. You can either take a strip of black plastic tablecloth or use black streamer add on top of the yellow tablecloth and secure with tape. Cut at desired length.

5. Take the white plastic plate with silver rim and place in the middle of the black strip.

6. Cut out a circle from the brown napkin or cardstock.

7. Cut out a circle from a small piece of plastic table clothe or streamer. Use tape to attach them together and in the middle of the plate.

8. Take a strip of black streamer and curve attaching to the table clothe with tape to make a mouth.

9. Take a strip of streamer and cut in half. Attache with tape to the top of the table at the yellow end making hair. Use a strip of tape on the back of the piece of hair streamer to keep it straight beyond the table.

That’s it! You’re Done!

Check out simple Minion Decorations Parties Ideas.

Topic: Minion Tablecloth Tutorial for a Despicable Me Party

Filed Under: Party Decorations

Frozen (Elsa's) Tiara Tutorial Rebecca Autry Creations

May 12, 2016 by rautry

What you Need:

– Cardstock/cardboard or gift box

– Glitter

– Glue

– Tape

– Pipe cleaners either white or blue

– Gold Paper

How to Make

1. First get your cardstock/cardboard or gift box to trace or cut out with a cutting machine the Tiara Shape. You can find the shape available in the Moms Saving Money Store.

2. Cut out your shape.

3. You can either cover with blue tissue paper and then glue on blue glitter or if you used white cardboard then you can just glue on blue glitter. You can also make it gold with gold paper.

4. Add the gems. You can find gems from other jewelry in the toy section at Dollar Tree. You can also find rather inexpensive gems at thrift stores. Make sure to use a permanent glue to attach the gems. You can also use darker blue or even pink glitter and make the shapes of the gems.

5. Add the pipe cleaner to the sides of the tiara by punching holes on the ends. Pipe cleaners can make it easier to readjust the width as needed for the tiaras.

That is it! You are done!

Topic: Frozen (Elsa’s) Tiara Tutorial

Filed Under: Party Decorations

Olaf Invitation Tutorial – Frozen Rebecca Autry Creations

May 12, 2016 by rautry

Are you have a Frozen party soon? Do your kids love Olaf? He stole the heart of many, didn’t he?  Be sure to check out other awesome Frozen Party Ideas.

You may also be interested in making your very own Olaf Snowman Pinata.

What you Need:

– White Glittery Cardstock

– Black, Brown and Orange Cardstock

– Glue/double sided tape

– Googly eyes (optional)

– Orange Pom Pom (optional)

How to Make:

1. First cut out all your pieces to make your Olaf invitation. The shapes are available in the Moms Saving Money Store.

Take your black base to be ready to have the other pieces added.

2. Take your white Olaf Snowman face and glue onto the black base. Make sure to leave the same amount around of black showing.

3. Take your black Olaf Snowman mouth and thoroughly add glue to the back and position accordingly.

4. Next you will want to add on the eyes. You can exchange the paper eyes for googly eyes to make them extra fun! I personally like the googly eyes on Olaf Snowman Invitations.

5. Glue on your nose. You can exchange the paper nose for an orange pom pom as pictured below.

6. Now add your eyebrows above the eyes. You may even want to tilt them slightly so they will fit on the face and look good!

7. Cut out an extra white face for the back and glue on and write all your information for your party. You can use the print and cut feature on the Cameo Silhouette.

That is it! You are done!

If you would love to have them made for you. 8ct with envelopes are available in the Moms Saving Money Store.

Topic: Olaf Invitation Tutorial – Frozen

Filed Under: Party Decorations

Pixar Inside Out Party Ideas

May 12, 2016 by rautry

Let’s face it we all have joy, fear, disgust, sadness and anger everyday. So why not have a fabulous colorful Disney Pixar Inside Out theme party. Inside my mind, a movie about me!

Pixar Inside Out Invitations

Pixar Inside Out Partyware

Photo Credit – PartyCity.com

Plates and Napkins – Let’s go wild! Pick bright colors in blue, red, purple, yellow and green. Get plates and napkins and mix and match. Have fun!

Pixar Inside Out Wall Decorations

Balloon wall of memories – Air up tons of bright colored balloons and tape to the wall to recreate the Wall or Memories for the Movie Inside Out.

Photo Credit – Catchmyparty.com

Pixar Inside Out Party Printables

Inside out Party Decorations

Visit MrsKathyKing.com

PixarInside Out Food Ideas

Kelloggs came out with Disney Inside Out fruit snacks. Great to have as a favor or to be added into the mix of goodies of your Inside Out Pinata.

Inside Out Cupcakes – Get this fun multi-color cake mix from walmart.

Photo Credit: Fortheloveofpixar.com

Pixar Inside Out Party Favors

Inside Out Fear Playdoh

Inside Out Favor Bags

Photo Credit: Sweet Creations by Su

These are handcrafted Inside Out Favor Bags that can be purchased for $2.50 each

Joy Bags – Not sure what they are called but I like the bag Joy holds in her hands near the wall of memories. So we made them into our favor bags. Take purple paper bags that can be found at Dollar Tree for 10ct. Cut out candy shapes and glue on the favor bags.

Angry Bags – Take red paper favor bags from Dollar Tree. These are probably my favorite ones and so easy to make!

Fear – Take purple paper favor bags from Dollar Tree

Disgust – Take green paper favor bags from Dollar Tree

Sadness Bags – Take blue paper favor bags from Dollar Tree

Pixar Inside Out Pinata

Photo Credit – Worldofpinata.com

I decided on Anger because I thought it to be fitting of relieving stress! Since you hit the pinata and hitting is a form of relieving stress I thought this was great beside Fear would be to long and thin not much to be able to hit!

Pixar Inside Out Thank You Cards

I decided the being Thankful for guests to come and enjoy the celebration of a party that Joy would be the best to make into a Thank You card.

Topic: Disney Inside Out Party Ideas

Filed Under: Party Decorations

Dr. Who Party Ideas

March 23, 2016 by rautry


Photo Credit: Creative Little Stars

Dr. Who Partyware

Photo Credit: Sustaining the Powers

Wall Decorations

Photo Credit: Stephaniewafer.blogspot.com

Table Decorations

Photo Credit: Catch My Party

Dr. Who Party Favors

Photo Credit: Hearts and Craftsy

Dr. Who Food Ideas

Dr. Who Tardis Cake

Photo Credit: Catch My Party

Dr. Who Dalek Pizza

Photo Credit: Mentalfloss.com

Dr. Who Pinata

Photo Credit: Tikkido.com

Happy Planning!

Topic: Dr. Who Party Ideas

Filed Under: Party Decorations

Dora The Explorer Party Ideas

March 23, 2016 by rautry

Check out below all the Dora Explorer Party Ideas I came up with for my little princess. Some were Dora Party items I purchased at Dollar General but none the less they make a great addition to the Dora Explorer theme party.

Table Decorations

Dora Table Pack – Yes this time I did not make my own table decorations. I found this Dora table pack on clearance at Dollar General for $.75

Wall Decorations


Dora Wall Backdrop – I found this wall Backdrop at Dollar General for $1 and it was great to add to my Dora Party.

Fiesta Fans – These are great for any fiesta party. Check out the Fiesta Fan Tutorial.

Party Favors

Party Favors – Always check the clearance items at any store. I got tons of Dora stuff for less than $3 and had plenty for all the guests.

Cake

Boots Cake – I am not a good cake decorator but it was still yummy!

Pinata

Dora Backpack – Simple to make and adds tons of fun to any party. See the Dora Backpack Pinata Tutorial.

Topic: Dora The Explorer Party Ideas

Filed Under: Party Decorations

Shaun the Sheep Party Ideas

March 17, 2016 by rautry

Shaun the Sheep Invitations

%filemane%

These are so simple and made out of black and white cardstock. Use some glue and write your party information on the back. Glue some white pom poms or cotton balls and you are good to go. Check out the Shaun the Sheep Invitation Tutorial.

%filemane%

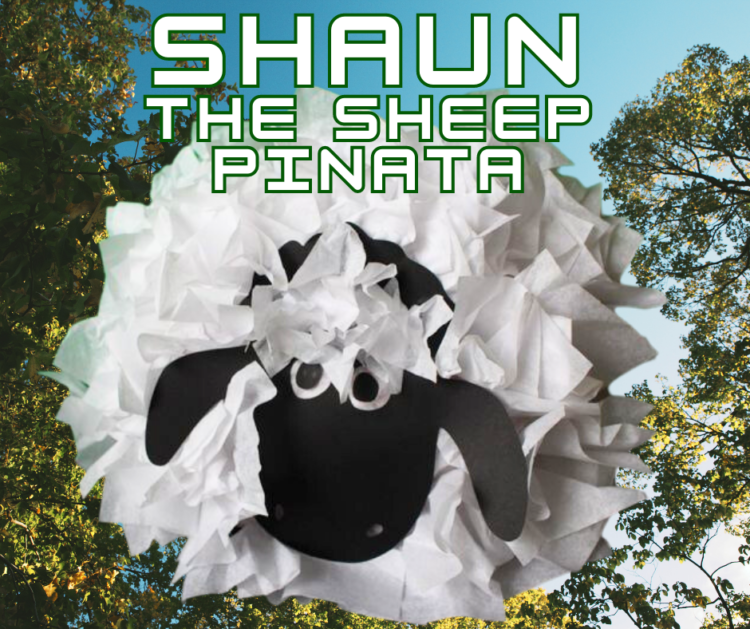
Shaun the Sheep Pinata

A very simple Shaun the Sheep Pinata that can be made from items found at Dollar Tree. You will need the circle lantern, white tissue paper and a bungee cord. Check out the Shaun the Sheep Pinata Tutorial.

Topic: Shaun the Sheep Party Ideas

Hi I am Rebecca Autry and I am a Stay at Home Mom who helps others save money. I have three beautiful children, married to my super hero hubby for over 10 years. I am a frugal living, DIY type of person. I like to make my own Pinatas, Cleaners, and all about reusing and re-purposing anything and everything.

Filed Under: Party Decorations

Captain America Lollipop Tutorial

December 21, 2015 by rautry

What is a party without some candy? Make these Captain America Lollipops as a treat plus part of your decorations.

What you Need:

– Tootsie roll lollipop

– Blue tissue paper

– White, red and blue cardstock or construction paper

– Scotch Tape

How to Make:

1. First take your blue tissue paper and cut 5 inch by 5 inch squares.

2. Take one blue square tissue paper and cover the tootsie roll lollipop.

3. Twist the neck area tightly using scotch tape to secure it around the handle.

4. Take your white paper and cut out the shapes for the mask and circle for the Captain America shield.

That is it! You are done!

The possibilities are endless and you can even make Spider-man, Hulk, Green Lantern and so on.

Topic: Captain America Lollipop Tutorial

Hi I am Rebecca Autry and I am a Stay at Home Mom who helps others save money. I have three beautiful children, married to my super hero hubby for over 10 years. I am a frugal living, DIY type of person. I like to make my own Pinatas, Cleaners, and all about reusing and re-purposing anything and everything.

Filed Under: Party Decorations

« Previous Page
Next Page »

Products

  • Household Handbook Household Handbook: Your Complete Home Management Binder $21.99 Original price was: $21.99.$9.99Current price is: $9.99.
  • Princess Tiana Tiara Princess Tiana Tiara SVG $0.99
  • Shaun The Sheep SVG Shaun the Sheep SVG Invitation $0.99
  • Super Mario Invite Super Mario SVG Invitation $0.99
  • Minecraft Favor Bag Minecraft Creeper Invitation $0.99
try.hpinstantink.com/cmfvfj

Copyright © 2025 · Genesis Framework · WordPress · Log in