Rebecca Autry Creations
  • Home
  • Piñata’s
  • Vacation Bible School
  • Wedding
  • Courses
  • Store

Pin the Eye on the Minion Game Rebecca Autry Creations

December 21, 2015 by rautry

This is a Great Game of Pin the Eye on the Minion and be sure to check out other DIY Despicable Me Party Decoration Ideas.

What you Need:

– Cardboard

– Yellow Cardstock or plastic tablecloth

– Blue Cardstock

– Tape or Glue

– White Cardstock

– Silver glitter or Glitter Glue

– Black Cardstock or plastic tablecoth

– Black Sharpie

How to Make:

1. First Take a long piece of cardboard.

2. Add yellow cardstock or plastic tablecloth and attach with glue or tape.

3. Cut your Minion to size as desired.

4. Add Blue Cardstock in the shape of overalls with glue or tape.

5. With the Black sharpie draw the black buttons for overalls, mouth and hair on the minion.

6. Take a smaller piece of cardboard and add blue cardstock with glue and cut into the shape of the overall pocket.

7. Place pocket onto the middle of the overalls with glue.

8. If desired use the black sharpie and make stitches on pocket and straps. Draw a Circle in the center and outline the G and color in as desired.

9. Add black cardstock or plastic tablecloth in a form of strip for the goggle bands mid top of the minion.

10. Cut out a white Circle and add a black smaller circle in the center with a black sharpie.

11. Add silver glitter or glitter glue to the rim of the eye making the goggle affect.

13. You can use velcro or use tack it over and over glue on the back of the eye.

That is it! You are done.

How to Play:

1. Explain to all particapents that the object is to get as close as possible to attach the eye in the middle of the Minion head on the black band.

2. Blind fold the person whose turn it is and turn them around 3 times and stop them to face the Minion.

3. Let them guide themselves to the Minion and attach the eye where they think is the middle. Repeat for each participant.

4. Attach the Minion to a door or wall first before playing.

That is it! Enjoy and have fun.

5. The Winner is the person who gets the closest to the right spot.

Topic: Pin the Eye on the Minion Game

Filed Under: Party Decorations

Minion Egg Table Decorations Rebecca Autry Creations

December 21, 2015 by rautry

Do you need something quick and easy to make with not much work for the table decorations? These Minion Egg Table Decorations are cute and super easy. Need a quick game? Hunt for Minions!

All these items can be found at Dollar Tree and costs as little as $3 to make depending on how many you want to make. These Minion Eggs are made from the plastic Easter eggs.

This is a Great Despicable Me Minion Egg Table Decorations and be sure to check out other DIY Despicable Me Party Decoration Ideas.

What your Need:

– Yellow Easter Eggs

– Black Ribbon

– Googly eyes

– Glue or double sided tape

– Black Sharpie

– Silver Glitter glue

– Blue Construction paper or cardstock

How to Make:

1. First take the yellow eggs and add glue around and add black ribbon.

2. Glue on googly eye. You can choose to put one eye or two eyes. I personally like the 1 eye Minions.

3. Using the black sharpie draw on the mouth and hair as desired.

4. Take an extra step and add silver glitter glue around the googly eye. You can use black paper instead of ribbon but is much harder to find at Dollar Tree.

5. Take Blue construction paper and cut strips into 1/2 width by 4 inches.

6. Take the double sided tape or glue and make into a circle smaller than the width of the egg. This is to sit the egg in to display on the table so it doesn’t roll!

Varies sizes of Minion eggs are great! Remember you can always make several and do a Minion Hunt! Sounds like a great game, huh! Wish I had thought of it before my Minion Party. For the Minion Egg hunt I would suggest just drawing on the eyes and goggle band with a sharpie instead of using ribbon and a googly eye. They will come off!

You can also change it up and mix the plastic eggs with blue bottoms as the overalls.

That’s it! Your’e Done!

Don’t forget to check out other Minion Birthday Ideas.

Topic: Minion Egg Table Decorations

Filed Under: Party Decorations

Rapunzel Tiara Tutorial

November 20, 2015 by rautry

Make a Tangled/Rapunzel party memorable with Rapunzel Tiara’s. The best part is you can find most of the items at Dollar Tree! To begin check out the list of items you need and collect them before attempting the crown.

What you Need:

– Yellow Curling Ribbon

– Yellow/Gold Pipe Cleaners

– Yellow/Gold Cardstock/Construction Paper

– Gold Glitter Glue

– Rhinestones

– Glue/Double sided Tape

How to Make:

1. Take your Cardstock/construction paper and cut out the Tiara Shape. You can find the Tiara pattern in the Moms Saving Money Store in PDF, PNG and SVG Format. I like using my Cricut or Silhouette to do all the cutting for me!

2. Once you have your Tiara cut out apply glue and outline the front of the Tiara. Apply the Gold Glitter. Instead of using the glue and glitter you can use the Gold Glitter Glue or Glitter Tape found at Dollar Tree.

3. Now for more fun! Glue your rhinestones on! If you do not have rhinestones you can use the red, blue and silver glitter glue from Dollar Tree. Make them even cheaper to make if you already bought the multi-color glitter glue pack!

4. For the area of the large rhinestones use the clear candy wrap or even better Dollar Tree sells Clear Wrapping paper and you can use that and looks cool!

5. Now that your Tiara is all decorated you can now use a hole punch and make one hole on each end of the Tiara to insert the Pipe Cleaner. Make sure to fold inwards about 1/2 inch. Tape it to secure and for safety!

6. Take the Yellow Curling Ribbon and cut Long strands as desired. I recommend at least 10 for each bunch and tie to pipe cleaner. Make sure they are long enough to symbolize Rapunzel’s long hair. You can find different shades of yellow or gold at Dollar Tree.

That’s It! You are Done!

Topic: Rapunzel Headbands Tutorial

Filed Under: Party Decorations

NFL Green Bay Packers Favor Bag

October 24, 2015 by rautry

Below you will find a list of supplies you will need plus step by step in instructions on how to make NFL Green Bay Packers Favor Bag.

What you Need:

How to Make:

Step 1

Step 2

Step 3

Topic: NFL Green Bay Packers Favor Bag

Hi I am Rebecca Autry and I am a Stay at Home Mom who helps others save money. I have three beautiful children, married to my super hero hubby for over 10 years. I am a frugal living, DIY type of person. I like to make my own Pinatas, Cleaners, and all about reusing and re-purposing anything and everything.

Filed Under: Party Decorations

The Good Dinosaur Invitations

October 18, 2015 by rautry

From the makers of comes Disney Pixar The Good Dinosaur. This is a 3D animated adventure about Earth never being hit by an asteroid to which dinosaurs never become extinct. This adventure is about a young Apatosaurus named Arlo that gets separated from his father while he is looking he befriends a human boy that he names Spot.

Below you will see step by step instructions on how to make The Good Dinosaur Arlo.

What you Need:

  • Black, White, Blue and Green Card stock or Construction paper
  • Glue or double sided tape
  • Cutting Machine or scissors for manual cutting

How to Make:

Step 1

First you will need to get The Good Dinosaur Shapes. You can get The Good Dinosaur SVG, PDF, PNG Files here. You will receive a Compressed Zip file that will need to be unzipped in order to use the files. Make sure to divide the layers by doing “To Each Its Own”

Step 2

Once you have your pieces cut you will start with the black base. Take your green dinosaur face and glue that to the black base.

Step 3

Now you are ready to glue in the white eyes and blue eyes on top of the white eyes. Glue on the black eye balls onto the blue.

That is it! You are done!

Check out other The Good Dinosaur Party Ideas

Topic: The Good Dinosaur Invitations

Filed Under: Party Decorations

Cookie Monster Favor Bags

October 11, 2015 by rautry

Go the extra mile and make these fun Cookie Monster Favor Bags that are so simple and just add an extra touch to your Muppet Party.

Below you will find the supplies you need plus step by step instructions on how to make the Cookie Monster Favor Bags.

What you Need:

– Red, Yellow and Black Cardstock

– Blue Favor Bags

– Glue

How to Make:

Step 1

To make a Cookie Monster Favor Bag first take your blue paper favor bag and lay flat. You can purchase 10ct at Dollar Tree.

Step 2

Cut our the Black mouth and eye balls and pieces on the cookies. Cut out the white circles for the eyes. Cut out the brown cookie.

Step 3

Glue on the mouth and eyes. You can use the googley eyes to make them even more unique!

Step 4

Glue on the cookie and chocolate spots.

That is it! You are done!

Topic: Cookie Monster Favor Bags

Filed Under: Party Decorations

Disney Frozen Pretzel Sticks

September 30, 2015 by rautry

What a great treat to give to your guests. These are so simple and easy to make, you can even have your guest make their own. The chocolate will dry fast and not too messy either!

What you Need:

– Large Pretzel Sticks

– Blue Chocolate Melts

– Melter

– Spatula

How to Make:

Step 1

Take your Melter and add chocolate melts and turn on.

Step 2

Stir your spatula and move it around until smooth.

Step 3

Take your pretzel sticks and dip into the chocolate.

Step 4

Let them dry until chocolate has harden.

Optional – Place them in a upright open Plastic Container to display.

That is it! You are done!

Topic: Disney Frozen Pretzel Sticks

Hi I am Rebecca Autry and I am a Stay at Home Mom who helps others save money. I have three beautiful children, married to my super hero hubby for over 10 years. I am a frugal living, DIY type of person. I like to make my own Pinatas, Cleaners, and all about reusing and re-purposing anything and everything.

Filed Under: Food, Party Decorations

Rapunzel’s Tower Piñata

September 27, 2015 by rautry

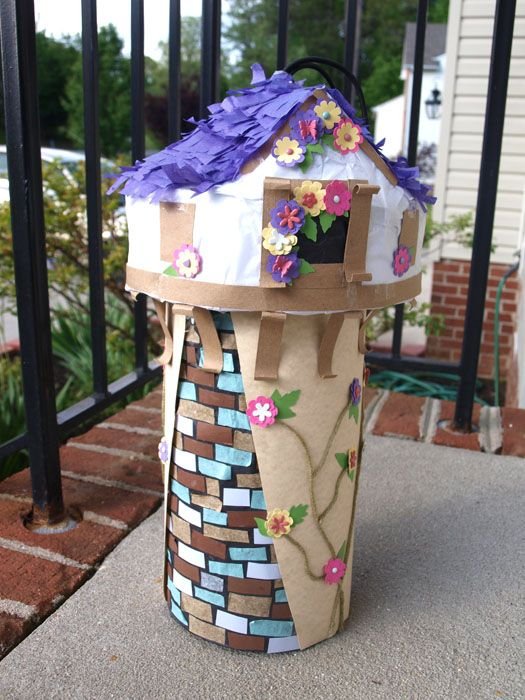
Embark on a journey to create a magical centerpiece for your next celebration with our Rapunzel’s Tower Piñata tutorial. Inspired by the enchanting world of Disney’s Tangled, this DIY project is not only budget-friendly but also promises to elevate your party to new heights of whimsy and wonder. Imagine the delight on your guests’ faces as they encounter Rapunzel’s iconic tower, intricately crafted by your hands.

In this step-by-step guide, we’ll unravel the secrets to crafting a show-stopping Rapunzel Tower Pinata that will steal the spotlight at any Disney-themed party. From the silver or grey tissue paper that drapes the tower with elegance to the meticulous construction of its pointed crown, each detail is designed to capture the essence of Rapunzel’s magical abode.

The journey begins with a simple yet crucial step – wrapping the paper towel rolls in silver or grey tissue paper, creating the foundation for your tower. This readily available material, often found at Dollar Tree in the party section, sets the stage for the transformation that follows.

As you proceed, you’ll learn how to fashion a pointed top by skillfully rolling paper into a cone shape and enhancing it with white cardstock or construction paper. The tower’s window, a symbol of the magic within, is meticulously cut from black cardstock or construction paper, offering a peek into the enchanting world you’re creating.

For those seeking an extra touch of charm, an optional step awaits – adding yarn braids to your Rapunzel Tower Piñata. This subtle yet impactful detail brings Rapunzel’s iconic hairstyle to life, ensuring your creation truly captures the spirit of this beloved Disney tale.

Join us on this crafting adventure and unlock the secrets to making Rapunzel’s Tower Pinata a reality. Let your creativity soar, and get ready to host a celebration that transports everyone to the magical realm of Disney’s Tangled. The journey begins now!

I bet you can have at least 2 if not more Paper Towel rolls by the end of the week with just normal home routine so the point is you can easily make this Rapunzel’s Tower Piñata.

%filemane%

Don’t forget to check out 11+ Disney Tangled Birthday Decoration Ideas.

Are you ready to bring the enchanting world of Disney Tangled to life at your next celebration? In this comprehensive guide, we’ll show you how to create Rapunzel’s Tower Piñata – a whimsical and budget-friendly DIY project that will add a touch of magic to your Disney-themed party. Plus, don’t miss out on 11+ Disney Tangled Birthday Decoration Ideas to make your celebration truly unforgettable.

Materials Needed:

  • Silver or Grey Tissue Paper
  • White and Black Cardstock or Construction Paper
  • Glue or Double Sided Tape
  • Yarn (Optional)

Step-by-Step Tutorial:

Step 1: Wrap in Elegance Begin by taking silver or grey tissue paper, I ended up using a beige resume paper and black cardstock, easily available at Dollar Tree in the party section. Cover the paper towel rolls using glue or double-sided tape. Exercise caution with liquid glue to avoid stickiness.

Step 2: Crown the Tower Fashion a pointed top by rolling paper into a cone shape. Enhance it by covering with white cardstock or construction paper to create the tower’s pinnacle.

Step 3: Window to the Magic Using black cardstock or construction paper, cut out a window for the tower. Consider pre-cutting one or adding it on the outside of the paper towel roll. Secure it tightly with tape for a seamless finish.

Step 4: Braid in Beauty (Optional) Take your Rapunzel tower to the next level by adding some yarn braids for an extra wow factor. This optional step brings an additional layer of charm to your creation.

And there you have it – your very own Rapunzel’s Paper Towel Tower! This simple yet captivating DIY project is sure to be a hit at your Disney Tangled-themed party. Get creative, involve the kids, and watch as the magic unfolds. Don’t forget to explore our 11+ Disney Tangled Birthday Decoration Ideas for more inspiration to make your celebration truly magical. Craft, create, and let the enchantment begin!

That is it! You are done!

Topic: Rapunzel’s Tower Piñata

Filed Under: Party Decorations, Pinatas

Baymax Invitations Tutorial

September 21, 2015 by rautry

This is a tutorial on how to make Baymax Invitations. These are so simple but add so much to your Super Hero 6 theme birthday party.

What you Need:

  • Black Cardstock
  • White Cardstock
  • Glue
  • Scissors or a Cutting Machine

How to Make:

Step 1

Step 2

Step 3

That is it! You are done!

Topic: Baymax Invitations Tutorial

Other Baymax Party Ideas


Hi I am Rebecca Autry and I am a Stay at Home Mom who helps others save money. I have three beautiful children, married to my super hero hubby for over 10 years. I am a frugal living, DIY type of person. I like to make my own Pinatas, Cleaners, and all about reusing and re-purposing anything and everything.

Filed Under: Party Decorations

LEGO Door Tutorial

September 14, 2015 by rautry

Are you have a LEGO theme party? This is a quick and simple decoration that costs less than $2 to make.

What you Need:

– Plastic Tablecloth

– Large paper plates

– Packaging Tape

How to Make:

1. First you will need to choose the same color of the tablecloth and paper plates.

2. Hang and attach the plastic tablecloth to the door. Trim as needed.

3. Take the packaging tape and roll it and tape the paper plates to mimic a LEGO block in rows of two.

That is it! You are done!

Topic: LEGO Door Tutorial

Hi I am Rebecca Autry and I am a Stay at Home Mom who helps others save money. I have three beautiful children, married to my super hero hubby for over 10 years. I am a frugal living, DIY type of person. I like to make my own Pinatas, Cleaners, and all about reusing and re-purposing anything and everything.

Filed Under: Party Decorations

« Previous Page
Next Page »

Products

  • Household Handbook Household Handbook: Your Complete Home Management Binder $21.99 Original price was: $21.99.$9.99Current price is: $9.99.
  • Princess Tiana Tiara Princess Tiana Tiara SVG $0.99
  • Shaun The Sheep SVG Shaun the Sheep SVG Invitation $0.99
  • Super Mario Invite Super Mario SVG Invitation $0.99
  • Minecraft Favor Bag Minecraft Creeper Invitation $0.99
try.hpinstantink.com/cmfvfj

Copyright © 2025 · Genesis Framework · WordPress · Log in