Rebecca Autry Creations
  • Home
  • Piñata’s
  • Vacation Bible School
  • Wedding
  • Courses
  • Store

Super Mario Party Ideas

January 10, 2020 by rautry

Super Mario Birthday Party Ideas


Invites

I created Super Mario Invitations. You can check out the tutorial for the Super Mario Invitations.

SEE ALSO:

Wall Decorations

Super Mario Coins. I made Gold Coins to place on the Wall to place on my Super Mario World Sky. Check out the Super Mario Coins Tutorial for a step by step guide. Simple and Easy to make.

Princess Peach Castle.  I used large cardboard boxes for the frame and covered it with white material. You can easily use white table plastic tablecloths from Dollar Tree. I then used duck tape to make the bricks. I used red cardstock for the roofs and blue flag material for the sky. These were all items I had on hand. You can used blue plastic tablecloth for the sky. I used Fishing wire to hold everything up.


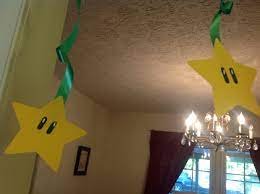
Star Dangles. These are super simple. Simply cut out yellow stars and add some white and black eyes. Use green curling ribbon to hang them. Very simple. Check out the Star Dangles Tutorial.
%filemane%

Floor Decorations

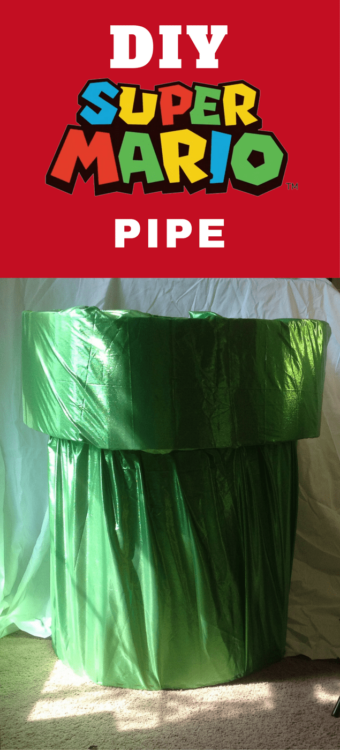
Super Mario Tube. This was fun and made from cardboard and green flag material that was going to be tossed out. I am good at re-purposing items. I used newspaper to stuff the rim. I also made an opening on the back so kids can play in and out of it. Check out the Super Mario Tube Tutorial.
Party Favors

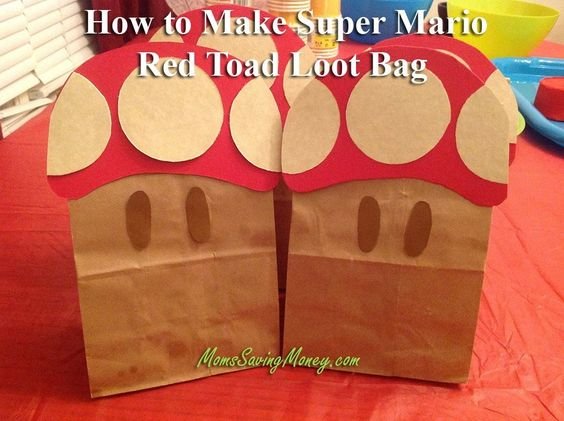
Super Mario Toad Loot Bags. These are very simple and easy to make. Take brown paper lunch bags from Dollar Tree and use red construction paper or cardstock and cut out the Toad head along with white circles. Tape or glue together. Very simple and easy and you can color on eyes. Check out the Step by Step tutorial Super Mario Toad Loot Bags.
%filemane%

Cake

Super Mario Mushroom Cupcakes. Make cupcakes as directed by cake mix directions. Use icing and add blue or green as desired for color. Add White marshmallow fondant circles to mushroom spots. Check out the Marshmallow Fondant tutorial.


Pinata

1 Up Mushroom Pinata. This was fun to make. Took a bit of time trying to figure out how to make, but check out the 1 Up Mushroom Pinata Tutorial for you to make it quickly.
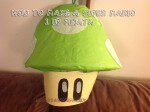
%filemane%

Check out other Theme Party Ideas

Topic: Super Mario Birthday Party Ideas

Filed Under: Party Decorations

Disney Cars Hwy 66 Invitation Tutorial

January 10, 2020 by rautry

Disney Cars Hwy 66 Invitation

Be inspired with these Disney Car DIY Decorations. Simply click on the image below.

OLYMPUS DIGITAL CAMERA

What you Need:

– Black Cardstock

– White Cardstock

– Glue/Double sided tape

How to Make

1. Cut your shapes with these Route 66 Invitation Shapes available in the Route 66 SVG File.

2. Glue or tape your white back to the Black base.

3. Add your White front pieces to the black base.

That is it! You are done!

Topic: Disney Cars Hwy 66 Invitation Tutorial

Filed Under: Party Decorations

Disney Cars Stop Light Tutorial

January 10, 2020 by rautry

Disney Cars Stop Light Tutorial

Stop Lights – Make a Rectangle box and cover with black paper. Add a yellow, green and red circles for the lights. Great to place hanging from a walkway. Add some streamers and some balloons and you have yourself a simple Disney Cars decoration.

Be inspired with these Disney Car DIY Decorations. Simply click on the image below.

What you Need:

– Rectangle cardboard box

– Black, yellow, green and red cardstock or construction paper

– Tape

– Glue

How to Make:

1. First take your rectangle box and tape black paper to cover it entirely.

2. Cut out 2 circles for each side of each color for the lights.

3. Tape the lights on the rectangle box.

That is it! You are done!

You can hang the stop light from a doorway in the walk path of the party. Add some streamers and balloons to add to the theme of the party.

Topic: Disney Cars Stop Light Tutorial

Filed Under: Party Decorations

LEGO Wall Decoration Tutorial

January 10, 2020 by rautry

Have you ever stepped on a LEGO? I have and it hurts. Does your little one want a LEGO party? Are you having a hard time coming up with some decoration ideas? This simple LEGO Wall Decoration Tutorial is easy to follow and makes for an easy decoration but makes for a big splash.

LEGO Wall courtesy of my friend Laurie Anne who is so creative and made a great party for her son’s 6th birthday.

You might like these for a LEGO Party. Our friend make the tart candy with this LEGO tray.

What you Need:

– Construction paper or Poster Board

– Painters Tape

– Scissors

SEE ALSO

How to Make:

Step 1

Grab your Construction paper or poster board and Cut each block as a Rectangle.

Step 2

Cut the tops of the rectangles with 4 sets of round tops like the LEGO image.

Step 3

Here is a hint to not have to do so much work! Only cut the round tops for those that you put on the top and are visible. The others are not necessary to cut since they won’t be visible to guests.

Step 4

Start at the bottom of the wall and place your bricks one by one side by side and then stacking with overlay as if you were really stacking LEGO’s. Using painters tape will help keep your poster board up and will keep your walls from getting pasty from the tape. This will also not take your paint off the walls!

Do you have any simple and cheap LEGO Decorations you’ve seen or made? Leave them in the comments below and be sure to share this post.

That is it! You are done!

Topic: LEGO Wall Decoration Tutorial

Filed Under: Party Decorations

Paper Plate Turtle Craft Instructions

January 8, 2020 by rautry

Below you will find step by step instructions on how to make a Paper Plate Turtle Craft. Great for an easy decoration for VBS 2016 – Submerged or as an alternative craft. Remember to ask your congregation for donations of green paper plates and green construction paper.

What you Need:

  • Green Paper Plates
  • Scissors
  • Green Construction Paper
  • Double Sided Tape or Glue
  • Fast drying liquid glue

How to Make:

  1. First get all your supplies together. If you are using this as an alternative craft for your VBS week I would suggest that you have all your arms and legs cut out. If you go from room to room make ziplock baggies with arms and legs and googly eyes and paper clip to a plate. This will make being able to give instructions and handing out your craft to each participant quicker.
  2. Cut out your arms and legs from Green Construction Paper. Quick Tip – Fold your paper in half and half again and cut multiple at a time, this will save time and energy.
  3. Take your glue stick or double sided tape and adhere your arms and legs to the back side of the paper plate.
  4. Take your four hexagon shapes and glue to the face part of the plate.
  5. Next you will take your googly eyes and use fast drying glue to adhere to the paper plate. Let sit and dry. You can always just use a black marker to make the eyes but the googly eyes just make it so much more fun.

That is it! You are done!

Topic: Paper Plate Turtle Instructions

Filed Under: Dollar Tree, Party Decorations, Vacation Bible School

Tangled Branch Tree House Decoration

January 6, 2020 by rautry

You can do tons with cardboard to make a Tree house. What makes a great Roof? A Luau umbrella Cover. Ok well this is originally designed to fit over an existing umbrella but I am using it for my roof. Much like using a umbrella without the fabric for the palm trees I will use straws that hold my cover and have its sticking out from the room.

Last year I made an Evidence Vault in the Corner of the room. This theme I made the Tangled Branch Tree House so we can have our Bible Study time in it. It is much bigger than our Evidence Vault since we will actually be using it.

We anticipate a smaller group for our age group so we have changed rooms. I am now in a much smaller room but still plan on making the most of it. We still make the Tree house but not all four walls. We only made one wall and that is the front opening area with windows.

What you Need:

– Lots of cardboard for the Treehouse

– Packaging tape

– 2 different brown paints

– Black paint

– Green grass skirts found at Dollar Tree

How to Make:

1. First grab your desired large boxes that are for the base of each side. You can cut them down to size.

2. Cut the sides of the window frames for each base. I created two bases that I will attach to the walls. This will be my front of the tree house. The in between the bases will be the door way.

3. Next paint all your pieces both front and back with the light brown.

4. Take the dark drown and swipe all over the boards but leave areas you can see the lighter brown.

5. Take black paint and draw line either horizontal or vertical. Make sure to add some knots in by making them circular.

6. Use cardboard small long pieces to tape to the bends to keep them straight.

7. For the flooring I found this bamboo shade at Goodwill and paid about $.50 for it. There are some holes in it but not too bad. I will cover that with some tape and paint over it.

That is it! Have fun!

Topic: Lifeway Tangled Branch Tree House Decoration

Filed Under: Party Decorations

Fake Wooden Sign Tutorial

January 6, 2020 by rautry

Need a large inexpensive decoration idea that won’t take much time. This is it and easy to make. Make wooden panels and write the words “This is the Way – Walk in it.”

What you Need:

– Large Cardboard box

– Drip cloth or plastic bags

– Brown paint and brush or sponge

– Brown and White Marker or Chalk

– Packaging Tape

How to Make:

1. First you will need to lay your drip cloth or plastic bags down on your work area. Plastic tablecloths from Dollar Tree are a nice alternative and inexpensive.

2. Pull your cardboard box apart to lay flat so you can cut long  strips of cardboard to make wooden slats. These wooden slats will soon become your fake wooden sign.

3. You will want to cut your ends to make the jagged edges. Don’t worry they do not need to look perfect.

4. Apply the brown paint to your wooden(cardboard) slats brown. It is important that you go back and forth and not all crazy to make your wooden slats look more natural. Make sure they are dry thoroughly before moving on. You can add random 2nd and 3rd strokes to various parts of the cardboard to look like natural uneven wood. If you are hanging this on a wall you will only need to paint the side that will show. If you plan to have it hang with both sides showing then I advise you paint both sides of the cardboard.You can even create knots in your wood by taking a bit of paint at the end of your brush or sponge and make a small circle on the cardboard in the desired area. I used two different browns to make the wooden look.

4. Use white marker or chalk and write out the words ” This is the Way – Walk in it.” as pictured below.

5. Turn your wooden slats with the face down in order as you want them. You will then tape the slats on the back. Make sure they are secure enough.

That is it! You are done!

Topic: Fake Wooden Sign Tutorial – Journey off the Map ideas

Filed Under: Dollar Tree, Party Decorations

Daily Backpack – Vacation Bible School Ideas

January 6, 2020 by rautry

Daily Backpack

One thing I wished we had last year in our class was to have some type of bag that the kids could take their items from the day home in and be easy to carry. These were made with Journey off the Map Vacation Bible School Theme in mind but can easily be used for a Back to School theme or any birthday party favor bag.

You can find all these items at Dollar Tree. The paper bags come in a pack of 50. Dollar Tree also have 10ct favor bags in the colors of green, blue, yellow, red, purple and pink. For $4 you can get the supplies needed and make 50. That averages the cost out to $.08 each. So you may need to make 1 for each kid for each day since they will probably not bring them back the next day.

What you Need:

– Brown Lunch sack

– Glue or double sided tape

– Scrapbooking paper or Construction paper

– Scissors

How to Make:

Step 1 (Daily Backpack)

Cut out your straps, belt and belt latch. Trace the length of the bag on your printed paper for the top bag flap and cut out.

Step 2 (Daily Backpack)

Lay your Paper bag flat with bottom fold facing up. Fold each strap on each end about 3/4 inches and glue or tape those flaps to the bag. Make sure they look symmetrical.

Step 3 (Daily Backpack)

Take the top bag flap and glue that to the top of the bag on the same side of the straps. Remember you will be folding this down so make sure your rounded edge is facing the top.

Step 4 (Daily Backpack)

Fold your top Flap over leaving about 1/2 in on the backside with the straps. Turn your bag over and glue your belt to the top flap. Then add a bit of glue to the belt latch on each end and press down at the desired place to hold down the belt latch. Open up the bag and set it open and re-shut the top flap and belt into the belt latch so it stands up.

That is it! You are done!

Topic: Daily Backpack

Filed Under: Party Decorations

How to make a Minion Pinata Tutorial

December 31, 2019 by rautry

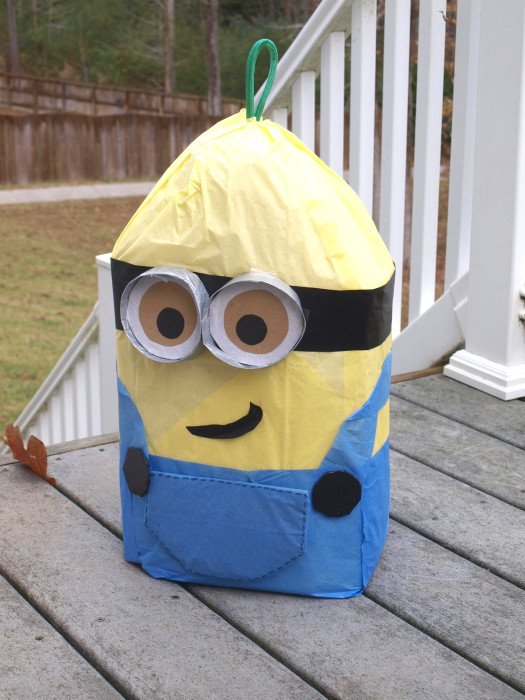
How to make a Minion Pinata Tutorial from Despicable Me

I was seriously trying to talk my son out of a Despicable Me Theme birthday party because I could not think of any ideas for decorations except a million minions!!! However when I finally sat to plan out my party details with my handy Party Planning Printable I was able to come up with many, many Despicable Me Party ideas and can’t wait to make them all and show them off!
Be sure to check out other DIY party supplies.

What you Need:

– Cardboard box

– Packaging tape

– Bungee

– Yellow, White and Blue Tissue paper

– Black Plastic Tablecloth

All of these items can be found at Dollar Tree for $4 total. The cardboard box you can ask if they have any boxes they are getting rid off. You can find boxes at gas stations. Any medium size box will do.

How to Make:

The Base of a Minion Pinata.

1. Take your cardboard box and cut the side so it will lay flat. Go from one side and roll it into a tight overlapping circle. Unroll and do the same from the other end.

2. Tape your box at desired width both inside and outside.

3. Secure the bottom by taping it down inside and outside.

4. Curve the tops of the box and tape into place leaving an area so you can fill it with pinata goodies. I used plastic baggies about halfway added the goodies and then added more plastic bags to the top and help shaped the head area.

5. Close off the top by adding the bungee looped thru a piece of cardboard and attached using tape. Make sure to completely secure the loop.

To Decorate the Minion Pinata.

6. Take white tissue paper and cover the entire Pinata and tape it down. This helps allow the yellow to pop out. Otherwise the yellow will look brownish from the cardboard.

7. Take the yellow tissue paper and wrap the pinata. I used double sided tape to secure it all down.

8. Cut the Blue tissue paper to make it look like a pair of overalls. Include the straps. Secure it on the pinata with tape.

9. Cut a black strip from the plastic tablecloth to fit around the head area for the glasses band. Secure with tape. Cut a halfway U shape out of the black plastic table cloth for the mouth and adhere it to the pinata.

10. Take some cardboard 3/4 in with by 10 -12 inches long and make 2 circles and tape together. These are the goggles. Cover them with grey or silver tissue paper or duck tape.

11. Next cut out 2 cardboard circles that fit just inside your goggles and cover those with white tissue paper.

12. Cut a slightly smaller set of circles from the cardboard, these can remain brown.

13. Cut a set of circles from either black cardstock, construction paper of the black plastic tablecloth. These are the eyes.

14. Put your eyes together the white is the base, then brown and then black. Adjust them accordingly to your desired look.

15. Add the blue pocket to the front of the overalls. Use a piece of cardboard and cut out your pocket shape. I added a few pieces of the plastic table clothe and taped it down. The add the blue over the pocket shape and tape down. Take a blue marker and make your stitches marks, you can also use yellow but it may not show up very well. Adhere the pocket to the pinata. Did you notice mine is upside down!!! I have changed it for the final picture!!!

16. Add buttons to your overalls. You can use real buttons if you have them. I cut out a set of cardboard circles and covered them with black plastic table cloth and secured them with tape to the pinata.

That is it! You are done!

The total cost for me was FREE having done several theme parties, I already had everything on hand, I save colored tissue paper, plastic table cloths, and any paper to reuse for future parties. The only thing I am constantly buying is packaging tape!!!!

Check out my other Despicable Me Decoration Ideas.

Topic: How to make a Minion Pinata Tutorial from Despicable Me.

Filed Under: Party Decorations, Pinatas

Minion Party Cups Tutorial #Despicable Me

December 15, 2019 by rautry

Minion Party Cups Tutorial #Despicable Me

These are Great Despicable Me Minion Party Cups and be sure to check out other DIY party supplies.

What you Need:

– Yellow Paper Cups

– Black Cardstock or Black Paper

– Googly Eyes

– Glue or Scrapbook double-sided tape

How to Make:

1. Take your Yellow Paper Cup. These can be purchased at Walmart for $.97 or Dollar Tree for $1 for 12ct.

2. Take a Sheet of black paper and cut into 1/2 inch strips by 8 1/2 inches.

3. Take a strip and add glue or scrapbook double-side tape and then wrap around the soon to be minion party cup. Make sure the ends meet and cut the overlapped piece. It is best to either start and end at the seam or start and end on the opposite side.

4. Place glue on the googly eye and place on the seam or where the ends meet.

5. Draw the hair and mouth.

6. Add silver glitter glue around the googly eye to make the silver goggle look.

That’s it! You are done!

You May also Like:

Topic: Minion Party Cups Tutorial #Despicable Me

Filed Under: Party Decorations

« Previous Page
Next Page »

Products

  • Household Handbook Household Handbook: Your Complete Home Management Binder $21.99 Original price was: $21.99.$9.99Current price is: $9.99.
  • Princess Tiana Tiara Princess Tiana Tiara SVG $0.99
  • Shaun The Sheep SVG Shaun the Sheep SVG Invitation $0.99
  • Super Mario Invite Super Mario SVG Invitation $0.99
  • Minecraft Favor Bag Minecraft Creeper Invitation $0.99
try.hpinstantink.com/cmfvfj

Copyright © 2025 · Genesis Framework · WordPress · Log in