Rebecca Autry Creations
  • Home
  • Piñata’s
  • Vacation Bible School
  • Wedding
  • Courses
  • Store

How to Make a Princess Castle Pinata

November 10, 2019 by rautry

How to Make a Princess Castle Pinata

What you Need:

– Square Box atleast 8×8 inches

– Smaller Cardboard box 4×4 inches

– 4 Paper Towel Rolls (No Paper Towels)

– Tissue Paper in the colors you want the castle to be.

– Bungy Cord or Thick Rope

– Duck Tape

– Candy

– Filler Paper (Newspaper or Tissue Paper is fine)

– 2 sheets of Card Stock

– Glue

How to Make:

1. Take the smaller Box the 4×4 inches and determine the middle for the top. This will be where you put the bungy cord or thick String as a loop to hold the pinata on the cord to move from side to side and up and down.

2. Attach the bungy on the box and secure it.

3. Attach this smaller box on top of the larger box using the Duct Tape.

4. Take the 4 Paper Towel Rolls and Cut a slit vertical on each. Attach each one to the 4 corners of the larger box using Duck Tape.

5. Take the 2 Sheets of Card Stock and cut in half short ways.

6. Make each slice of paper into a cone and attach to the top of each corner using Duck Tape.

7. It is not necessary to fill in the gaps of each rounded corner but it helps to keep its shape. Use the extra filler paper to do this.

8. Close up the bottoms of each corners using Duck Tape.

9. Draw on windows and doors where you want them at. This is where you get to be creative.

10. Cut your tissue papers into about 1 inch squares and attach to the coordinating colors where you want them at.

11. I had some left over princess valentines cards and just cut out the princesses and placed them in the window areas on my castle.

12. It took time but it was all worth it for my little princess. You could just cover the box with the tissue paper being flat instead of the little squares.

Good Luck! And have Fun! Sorry I did not have pictures for each step, I created mine over 3 yrs ago and I wasn’t blogging then.

Check out these other Pinata Tutorials

Filed Under: Pinatas

Sombrero Pinata Tutorial

November 10, 2019 by rautry

Below you will find step by step instructions on how to make a Sombrero Pinata. Most items can be found and purchased at Dollar Tree.

What you Need:

Christmas Cardboard Boxes

Tissue Paper

Glue

Packaging Tape

Bungee Cord

How to Make:

Step 1

Step 2

Step 3

That is it! You are done!

Topic: Sombrero Pinata Tutorial

Filed Under: Pinatas

Elmo Favor Bags Rebecca Autry Creations

November 10, 2019 by rautry

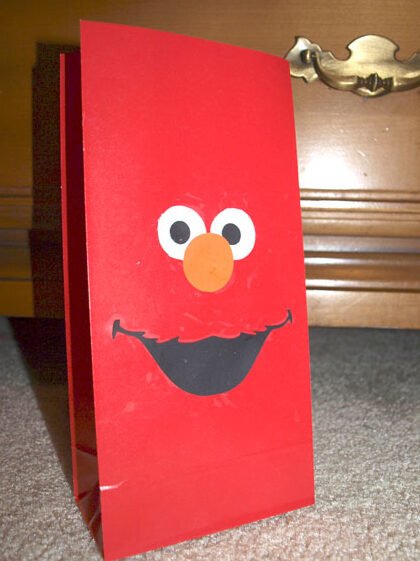
Did you watch Sesame Street as a kid? I bet you did! How about your children have you introduced Sesame Street? These simple Elmo Favor Bags will be a great additon to a Sesame Street theme party.

SEE ALSO

Simple Elmo Favor Bags

OLYMPUS DIGITAL CAMERA

Below you will find the supplies you need plus step by step instructions on how to make the Elmo Favor Bags.

What you Need:

– White, Orange and Black Cardstock

– Red Favor Bags

– Glue

How to Make:

1. Cut all your pieces for the Elmo Face.

2. Lay your Red Favor Bag down flat. Dollar Tree has these available in a 10ct package.

3. Glur your white base for the eyes. Glue on the black eyeballs.

4. Glue on the nose.

5. Glue on the Mouth.

That is it! You are done!

Topic: Elmo Favor Bags

Filed Under: Party Decorations

Easy Little Bee Craft!

November 10, 2019 by rautry

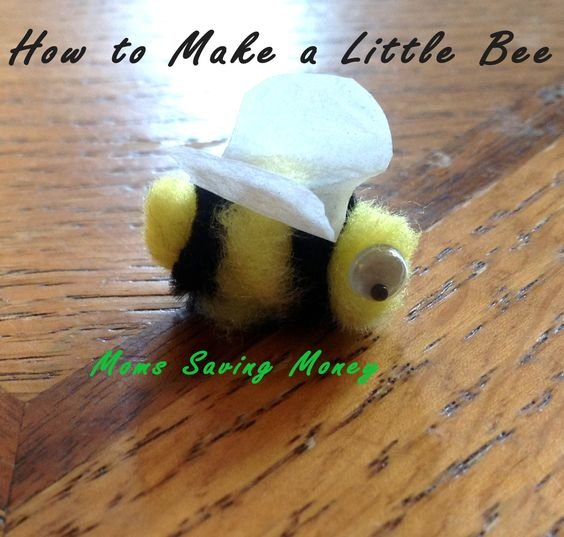
Here is a itty bitty easy little Bee craft to make!

My sister made these for a Princess Tiana Birthday party for my niece. We made flowers to on the walls on lily pads and put these little bees on them.

%filemane%

What you Need:

– Yellow Pom pom

– Black pipe cleaner

– 2 googly eyes

– White Tissue Paper

– Hot glue gun and glue sticks

How to Make:

1. Take the yellow pom pom and the black pipe cleaner and wrap the pipe cleaner around the pipe cleaner making it looked striped like a bee.

2. Glue on your googly eyes.

3. cut out a tiny set of wings from the white tissue paper and glue to its back.

That’s it very simple and easy and very cute. Just don’t lose him like I did!

Topic: Easy Little Bee Craft

%filemane%

Filed Under: Dollar Tree, Party Decorations

Charlie Brown Piñata Tutorial

November 10, 2019 by rautry

Snoopy Dog House Pinata that is pretty simple to make. Below you will find a list of supplies you will need plus step by step instructions with pictures on how to make a Charlie Brown Pinata.

What you Need:

– Cardboard boxes

– Bungee Cord

– Red, White, Black Tissue Paper

– Packaging Tape

– Glue

How to Make:

Step 1

First you need to make your cardboard box into the shape of a dog house. Tape the edges tightly secured. I used 2 different boxes. One was a book box about the size of 6 inches on the side by 10 inches. I placed it on the side to make the other box cut apart as the roof of Snoopy’s Dog house.

Step 2

Next you will want to put in your bungee cord as your loop and tape down very securely. This needs to be the strongest part of your pinata.

Step 3

Completely cover the entire cardboard dog house shape piñata with red tissue paper or you can use red wrapping paper that can be found at Dollar Tree.

Step 4

Now take a black sharpie marker and draw on the lines to make it look like wooden pieces.

Step 5

Using black cardstock cut out the door shape to be glued on one side of the dog house. You can add a white arc using white construction paper and using your black sharpie write SNOOPY and glue just above the door shape of the dog house.

That is it! You are done!

Topic: Charlie Brown Pinata – Peanuts Pinata

Filed Under: Pinatas

R2D2 Table Decoration Tutorial

November 10, 2019 by rautry

– White Cardstock

– Large Easter Eggs

– White Tissue paper or Duck Tape

How to Make:

1. First gather your materials. If you have 8 1/2 by 11 paper you will need to cut 2 inches off the short side.

2. Cut your paper in half short side. Tape the ends together to make a Circle.

3. Pull your egg apart and use one half for the top. Snugly add it to the paper circle you already created. Be sure to secure with tape.

4. Chances are you are not using White eggs so you will need to cover the egg with white tissue paper covering it fully and tape down.

5. Cut out all your pieces for the R2D2 Markings. You can find the shapes I used in the Moms Saving Money Store.

6. Tape or glue all your pieces down.

7. Now to add the arms. To make them move you can use brads or you can just glue them down to stay in place.

That is it! You are done!

Topic: R2D2 Table Decoration Tutorial

Filed Under: Party Decorations

How to Make a Graduation Smiley Face Pinata

November 10, 2019 by rautry

How to Make a Graduation Smiley Face Pinata

Are you graduating? Do you know someone who is graduating? Don’t you ever get the feeling when you have accomplished something that has taken so long to complete it would feel great to bash something like a Pinata? Here is a simple and easy way to make a Pinata and that is also budget friendly.

What you Need:

– Large Balloon

– Yellow and Black tissue paper

– Glue or Flour and Water Mix

– Newspaper

– Graduation Cap (paper ones can be found at Dollar Tree for $1)

– Bungee Cord

– Packaging Tape

– 2 Bowls

How to Make:

1. First blow air into the balloon until it is as big as you desire and place standing with base into one of the bowls.

2. Make the flour and water paste mix into one of the bowls.

3. Shred your Newspapers into 2 inch width by 6-8 inches in length.

4. Slide the Newspaper strips one at a time through the flour and water paste mix covering both sides of the newspaper.

5. Place the moist strip to the balloon. Repeat until the entire balloon is covered with 1 layer.

6. Let it sit until dry. For quicker drying methods you can use a hair dryer but stand a good distance away to not over heat the paste and balloon. You can also use a fan and turning the balloon until all sides are dry.

7. Continue with the second layer and drying and repeating until it is as thick as you want. I prefer 8-10 layers. This can take anywhere from 4-8 hrs depending on how many layers you want and how fast each layer dries.

8. Take your Bungee cord and slip a loop through a small 4 by 4 inch piece of cardboard and tape down. add this to the inside of the pinata and secure it with tape. This is the handle that the pinata hangs from.

9. Cut a 2 inch by 2 inch squares in both yellow and black tissue paper.

10. Using the eraser tip end of a pencil place 1 square of tissue paper and dip into flour and water paste. Repeat this until your entire pinata is covered.

11. Make sure to draw your patter on the pinata so you know which colors correspond the the pinata. Make sure to add your pinata party favors before closing up the hole.

Check out these other Pinata Tutorials

Treasure Chest, Mario 1Up Mushroom, Tinkerbell Flower, Frog Prince, Blues Clues, Spider-man, Optimus Prime,

Lightening McQueen, Batman, Power Rangers, Transformers, Princess Castle, Dora’s Backpack, Minion, Donald Duck, Handy Manny Measuring Tape

You might also be interesting in Budget Friendly Graduation Announcements and How to Plan a Graduation Party along with Party Planning Checklist Printable (FREE)

Topic: How to Make a Graduation Smiley Face Pinata

Filed Under: Pinatas

Angry Birds Favor Bags

November 10, 2019 by rautry

Angry Birds are all the hype lately. Have you played the Angry Birds game? These Angry Birds Favor Bags are very simple to make and won’t take you much time to make them.

Angry Birds Favor Bags

Do you have an Angry Bird fan in your home? Be careful with these Angry Birds Favor Bags the may want to chuck them through the air and see how much damage they can in flick on your home!!! Hopefully not and they are just wonderful additions to an Angry Bird Theme Party.

Be sure to check out 11+ Dollar Tree Inspired Favor Bag Ideas

What you Need:

– Red, Orange, White and Black Cardstock/Construction Paper

– Red Favor Bags

– Glue

How to Make:

1. Cut out your Shapes for the Angry Bird face. You can find the SVG file for $.99 in the Moms Saving Money Store.

2. Lay your red favor bag down flat, un-opened.

3. Start by gluing the black Angry Bird foundation onto the red bag.

4. Glue the White eye base and then the black round eyes on top of the white base. Next glue on the orange beak and the added white part near the beak.

That is it! You are done!

Looking for ideas for other Themed Parties check out the Handmade pinatas inspired by Dollar Tree.

Topic: Angry Birds Favor Bag

Filed Under: Party Decorations

Baymax Favor Bags Tutorial

November 10, 2019 by rautry

Made from items from Dollar Tree! Yes that is right I made 10 favor bags from Dollar Tree products for less than $2. Below you can make your own Baymax Favor Bags.

Paid $1 for construction paper and $1 for red paper favor bags. You can’t get any better. As always when new movies come out it is always difficult to find theme decorations until it gets popular.

What you Need:

  • Red Favor Bags
  • White, Black Card Stock or Construction Paper
  • Glue or double sided tape

How to Make:

Step 1

First you will need to cut out your shapes for Baymax favor bag. You can get the Baymax Favor bag shapes here in SVG, PDF, PNG format. The file will download as a compressed zip file. You will need to unzip the folder in order to use the files.

Step 2

Once your shapes are cut out you will then need to get your red favor bags. You can find these at Dollar Tree for 10 count for $1.

Step 3

Glue or double side tape your shapes starting with the black base and then adding the white.

That is it! You are done!

Check out other Big Hero 6 Party Ideas

Topic: Baymax Favor Bags Tutorial

Filed Under: Party Decorations

BB-8 Piñata Tutorial

November 10, 2019 by rautry

Have you seen Star Wars: The Force Awakens? If not you will want to soon. You will fall in love with BB-8. It cannot be a Star Wars movie without introducing you to another robot. You will see C3PO and R2D2 but this little guys will steal your heart.

My son was so excited to see the movie and now his birthday party will be themed after Star Wars. So came the idea of making BB-8 into a Pinata.

What you Need:

  • Grey, White, Black and Orange Tissue Paper
  • Packaging Tape
  • Paper Circle Lanterns one of each size large and small
  • Bungee Cord

How to Make:

  1. First you will need to take your larger of the two paper circle lanterns and add tissue paper to make it full. Add Packaging tape to the bottom to keep it from falling out.

2. Add your goodies into the middle and continue stuffing. You can use newspaper crunched up instead of tissue paper.

3. Close up the top of the pinata and tie on the bungee cord and secure.

4. Cover the paper circle lantern with white tissue paper and tape down. Add orange where appropriate to make it look like BB-8.

5. Add the gray in the same matter.

6. Add the black to the face as well.

7. Combine both circle lanterns and secure well.

That is it! You are done!

Topic: BB-8 Pinata Tutorial

Filed Under: Pinatas

« Previous Page
Next Page »

Products

  • Household Handbook Household Handbook: Your Complete Home Management Binder $21.99 Original price was: $21.99.$9.99Current price is: $9.99.
  • Princess Tiana Tiara Princess Tiana Tiara SVG $0.99
  • Shaun The Sheep SVG Shaun the Sheep SVG Invitation $0.99
  • Super Mario Invite Super Mario SVG Invitation $0.99
  • Minecraft Favor Bag Minecraft Creeper Invitation $0.99
try.hpinstantink.com/cmfvfj

Copyright © 2025 · Genesis Framework · WordPress · Log in