Rebecca Autry Creations
  • Home
  • Piñata’s
  • Vacation Bible School
  • Wedding
  • Courses
  • Store

Pokemon Birthday Decoration Ideas

June 24, 2019 by rautry

Pokemon Go is all the craze however if you go to Walmart you will not find any party decorations. Have no fear. Below are some great inexpensive alternative ideas to help spruce up your theme party for the Pokemon Go player. You will want to come back to get ideas as you plan your Pokemon Celebration. Here are some Pokemon Birthday Decoration Ideas.

Pokemon Invitations

%filemane%

You can download for purchase the Pokemon Ball SVG, PDF, PNG files. . You will need red, black and white card stock or construction paper.

You can also go with this Pokemon Go Invitation we created for my sons birthday

Pokemon Wall Decorations

You can print our the words (Gotta catch ’em all!) in a pdf format from searching on google free printable.

Poke Stop Wall Decoration

%filemane%

Take light blue construction paper or printing paper and cut out half circles. I printed out a poke stop outline and then made it into a transparency and used a thing to increase the size. I then placed the papers on the wall and traced the shaped and then cut them out. I then used painters tape to attach the shapes to the wall to make the life size poke stop in my living room as well as my kitchen to go along with the Pokémon theme.

Poke Ball Wall Decoration

%filemane%

I used a hanger, pencil, red and white butcher paper. Draw the circle by using the hanger, Center it in the middle of your paper. With a finger in one end of the bottom triangle and the pencil on the other end of the bottom triangle draw in a circle all the way around until complete. Take your scissors and cut both circles out. You can then fold each circle in half and cut on the folded line. This will make two poke balls. I used black streamer for the middle. I used painters tape to attach them to my walls so they don’t mess up the paint. I used a white paper plate for the middle poke ball button.

Pokemon Table Decorations

Pokemon Food Ideas

%filemane%

Pokemon Drinks

Pokemon Favors

%filemane%

Use the paper favor bags from Dollar Tree. They come in a 10pk for $1. I used yellow, red and blue paper favor bags. I measured the bags for the bottom half and used white copy paper. Glue the paper to the bottom half. I then used black copy paper (you can also use construction paper) to cut circles for the poke button on the balls. I used white for the middle, glued the pieces together and then glued onto the bags. On the yellow paper bags I added a black strip up the middle. On the blue bags I used red paper to make the side stripes.

Pokemon Training Certificate

%filemane%

Pokémon Trainer Certificates make a great favor your guests can take home. Personalize them by printing their names on them and have them ready when your guests arrive. Have a little award ceremony and your guests will feel just as special as your birthday child.

Pokemon Plastic Balls

These simple to make poke balls are made from ping pong balls. You can get a pack of 12 from Dollar Tree. All you need is red and blue dry erase markers. Black permanent maker. The dry erase markers dry quicker and don’t rub off easily. You will first want to draw your front circle of the poke ball and then color in with red or blue on one half of the ball. Then using the black permanent marker outline half the poke ball. For the great ball take your red after the blue is completely dry and add the red stripes.

Pokemon Great Ball Pinata

Pokemon Ball Toss Pinata

Pokemon Ball Birthday Cake

%filemane%

Topic: Pokemon Birthday Ideas

Filed Under: Party Decorations

Tangled Star Flower Lanterns Tutorial Rebecca Autry Creations

September 11, 2018 by rautry

%filemane%

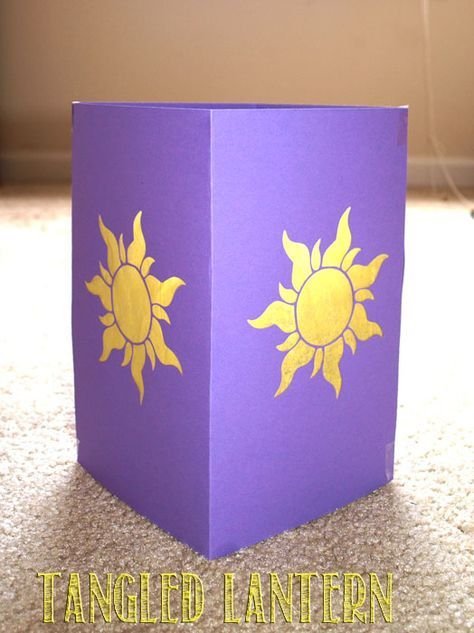
These Tangled Star Flower Lanterns are so simple to make and you will never guess that you can make these out of Wrapping paper from Dollar Tree. Yes you can use cardstock or even construction paper, but what I like about the wrapping paper all that is involved to make 2 is cutting 2 directions and folding 3 times and then taping!


Tangled Star Flower Lanterns

See Also

Be sure to check out other cool Disney Tangled Birthday Decorations simply by clicking on the image below.

What you Need:

  • Purple Wrapping paper or Construction/Cardstock Paper
  • Yellow Tissue paper
  • Glue stick
  • Fishing Wire
  • Tape

How to Make:

1. First determine what purple paper you are using whether it is wrapping paper, construction paper or cardstock. If you are using the later two then you will need two sheets each per lantern.

2. If you are using wrapping paper you can determine the dimension you want your lantern to be. I feel 5 inches is a great width so your lantern will need to be cut 20 inches length and at least 8 inches height unless you want them taller or shorter.

3. Using Construction/Cardstock you will fold in half like a sandwich.

4. I used my Silhouette Cameo to cut out the flower shape you can attempt to cut out by tracing it on or tracing the yellow tissue paper and adding it on. I personally like the cut out and then just gluing the yellow tissue paper on the inside of the lantern. I cut out the flower on all four sides.

5. Tape the side together at the edges and inside of the middle. If using wrapping paper connect the ends together and tape.

6. Take fishing wire and cut the desired length. Tape on each ends of the Lantern to make a loop.

You can then take a long strip of fishing wire and tape in your party room from one end of the room to the other and slide on your lanterns. You can also vertically add fishing wire and tape to the ceiling make them all different heights similar to the movie scene. Be creative and have fun!

That is it! You are Done!

Topic: Disney Tangled Star Flower Lanterns

Filed Under: Party Decorations

Arendelle Banner Tutorial (Disney Frozen)

September 11, 2018 by rautry

Arendelle Banner Tutorial (Disney Frozen)

I have become consumed with Disney Frozen and have created party ideas to include in a Frozen Theme party including these Arendelle Flags that you see at the beginning of the movie when Anna sings and dances when the gates of the Castle are opened for Elsa’s Coronation. These are simple including Elsa’s Silhouette.

%filemane%

What you Need:

– Purple, Green, and yellow cardstock

– Double sided tape or Glue

How to Make:

1. First you will need to get your shapes. You can find the shapes for the Arendelle Flag Crests in the Store.

2. Take your purple and glue or tape to your green base.

3. Next you will glue or tape your yellow silhouette to the middle of the Arendelle banner. Some speculate the silhouette is the girls mother while others say it is Elsa. Either way these are a great addition as a table decoration or even banners to hang for a Disney Frozen Party.

That is it! You are done!

Topic: Arendelle Banner Tutorial (Disney Frozen)

Filed Under: Party Decorations

Thing 1 Thing 2 Costume Tutorial

September 11, 2018 by rautry

Dr. Seuss Birthday is just around the corner and isn’t it nice to celebrate someone who was so excited about young readers expanding their knowledge. Does your kids school celebrate Dr. Seuss birthday? Ours kids school does so I made this Thing 1 and Thing 2 Costumes Tutorial.

SEE ALSO:

Dr. Seuss Cat In the Hat Pinata step by step tutorial.

Check out Thing 2 stole Dr. Seuss’s Cat In the Hat.

Thing 1 Thing 2 Costumes Tutorial

What you Need:

– Red Shirts or turtle necks

– Black Sharpie Marker

– White Material

– Fabric Glue

How to Make:

1. Take your White material and cut your circles. I used a paper plate for the shape and traced. Cut out your circles.

2. Take your black sharpie and trace the circle to make a ring.

3. Write THING 1 and THING 2 separately on the circles.

4. Add fabric glue to the back and pat down to the shirt.

That is it! You are done!

Topic: Thing 1 and Thing 2 Costumes Tutorial

Filed Under: Party Decorations

Transformers Pyramid Cake Recipe

September 11, 2018 by rautry

Transformers Pyramid Cake Recipe

I cannot take credit for this yummy cake. My sister Melissa is the creator.

What you Need:

– 2 Cake Mix (including ingredients on box)

– Graham Cracker Crumbs

– Chocolate pudding

– Autobot Figures!

How to Make:

1. Make your cakes as directed for extra moist add an additional eggs and more milk. Use large rectangle pans you will need 3.

2. Once cake is baked, let cool in freezer for an hour so it easily workable.

3. Take cake out of freezer and begin to cut your layers. The bottom layer is just an uncut rectangle cake.

4. The next piece is a square piece of the cake cut from a rectangle about 2/3 of it.

5. Take your third sheet of cake and cut a slightly smaller square and so on until you have all your height.

6. Cover entire cake with pudding.

7. Sprinkle heavily with Graham crackers.

That is it! You are done!

Topic: Transformers Pyramid Cake Recipe

Filed Under: Food, Party Decorations, Uncategorized

How to Make a Spider-Man Piñata

September 11, 2018 by rautry

How to Make a Spider-Man Piñata

Not the traditional First Birthday Party but the most memorable one for me! My hubby is a Huge Spiderman 99 Comic Book Fan so I thought this would make the perfect theme for our first born child.

As you may have realized we made a huge party of all kinds of Spider-man simple DIY decorations. Make sure to make a visit to your nearest Dollar Tree, the other day I saw partyware including a Spiderman Mylar balloon.

Photo Credit: BargianswithBrittanie.com

Check out the Spider-man Party Decorations by clicking on the link below.

What you Need:

– Cardboard box/Large balloon

– Tissue Paper (red, black, white)

– Bungy Cord

– Packaging Tape or Duck Tape

– Flour

– Warm Water

– Glue

– Scissors

– Pencil

– 2 inch strips of paper preferably notebook paper or newspaper

– Candy and piñata fillings (be creative and have items that connect to the theme)

How to Make:

1. First take your balloon and air it up to the desired size. Tie it off.

2. Take your paper and shred into 2 inch strips if not already done.

3. Make a paste of flour and warm water.

4. Carefully take a strip of paper and dip into paste, add it to the balloon. Cover the entire balloon in one layer.

5. let it sit and dry you can use a hair dryer on a lower setting to dry faster. Depending on how wet the paste is the longer it takes to dry.

6. Repeat steps 4 and 5 until ballon is covered and dry with desired amount of layers. Easy to break piñatas 4-5 layers, harder to break 10 layers.

7. Once the piñata is very dry you can pop the balloon inside if it has not already popped. Cut out a 4 inch by 4 inch area on 3 side to allow it to flap open, this is the entry way for the candy.

8. Reinforce handle (bungy cord) with cardboard and tape. Create a hole at the top of the piñata for the handle just enough the bungy cord can fit thru. Secure with tape.

9. Now the fun part! Time to decorate! First draw on the piñata your pattern to follow. Cut tissue paper in small squares about 2 inches by 2 inches.

10. Use the pencil, eraser side and place in the middle of a tissue paper. Dip in a glob of glue and place on the piñata in the desired area according to your pattern. Do this for entire piñata.

11. Before securing the open flap be sure to place your piñata candy and party filling favors. Secure the open flap with tape and then cover with tissue paper.

Congrats, You Did It!

Don’t forget to check out other Spiderman Birthday party decoration ideas you can make yourself from products at Dollar Tree.

Check out these other Pinata Tutorials

Treasure Chest, Mario 1Up Mushroom, Tinkerbell Flower, Frog Prince, Blues Clues, Optimus Prime,

Lightening McQueen, Batman, Power Rangers, Transformers, Princess Castle, Dora’s Backpack, Minion, Smiley Face, Donald Duck, Handy Manny Measuring Tape

Topic: How to Make a Spider-Man Piñata

Filed Under: Pinatas

Popcorn Wall Decoration Tutorial

February 9, 2018 by rautry

Pop, pop! Do you smell the butter as the popcorn is popping. Get your concession stand ready and decorated for Life’s Big Game with this Popcorn Wall Decoration for VBS Game On 2018.

Popcorn Wall Decoration

What you Need:

  • Painters Tape
  • Scissors
  • White and Red Plastic Tablecloth
  • Yellow and White Tissue Paper

How to Make:

  1. Take your white plastic tablecloth and cut to size as desired for your popcorn.
  2. Using Painters tape, tape to the wall.
  3. Take the red plastic tablecloth and cut strip in width and length as desired to fit the popcorn bag.
  4. Using painters tape, tape the red strips to the white backdrop starting from one side all the way to the other.
  5. Take various shades of white and yellow tissue paper. I cut each sheet in half, then crumpled it and used painters tape in a roll to adhere the tissue paper to the wall.
  6. Make sure to mix up the yellows and white so they are not all clumped by the same shade.
  7. Print out the Popcorn Sign Printable and tape to the center of the popcorn bag.

That is it! You are done.

Topic: Popcorn Wall Decoration

Filed Under: Dollar Tree, Party Decorations, Vacation Bible School

How to Make a Super Mario 1 Up Piñata

October 21, 2017 by rautry

How to Make a Super Mario 1 Up Piñata

Complete your Super Mario Party with a 1 Up Pinata. Sure to please a crowd! Everyone likes taking a swing at pinatas. Budget friendly and easy to make.

What you Need:

– Cardboard box

– Tissue Paper (green, black, white, cream )

– Bungy Cord

– Packaging Tape or Duck Tape

– Scissors

– Pencil

– Candy and piñata fillings (be creative and have items that connect to the theme)

How to Make:

1. First take your your cardboard and cut it into a triangle by making the top center 1 inch by 4 inches and folding the box in triangle. Tape the slits.

2. Take your bungy and tie it. Take the loop thru a piece of cardboard. Tape down securely. Tape the inside of the top of your mushroom top.

3. Take your candy and pinata filler and put it in the mushroom top while it is facing upside down. Fill with tissue paper or newspaper like I did (this helps to keep its shape but easy to hit and break).

4. Cut a circle to fit the bottom of the mushroom and tape it to the top mushroom closing it completely.

5. Take cream paper and make the shape of a mushroom bottom. Attach with tape to the bottom of the mushroom top. Use tissue paper to fill and close shut.

6. Starting from the top use green tissue paper and tape to secure. Wrap around the entire mushroom top. Take the cream tissue and cover the stem/bottom of the mushroom.

7. Cut out White circles of tissue paper and attach to the top of the green mushroom top.

8. Cut our black elongated ovals and white smaller elongated ovals and attach to the stem/bottom.

Congrats, You Did It!

Check out these other Pinata Tutorials

Treasure Chest, Tinkerbell Flower, Frog Prince, Blues Clues, Spider-man, Optimus Prime,

Lightening McQueen, Batman, Power Rangers, Transformers, Princess Castle, Dora’s Backpack, Minion, Smiley Face, Donald Duck, Handy Manny Measuring Tape

Topic: How to Make a Super Mario 1 Up Piñata

Filed Under: Pinatas

How to make a Super Mario Pipe Floor Decoration

October 17, 2017 by rautry

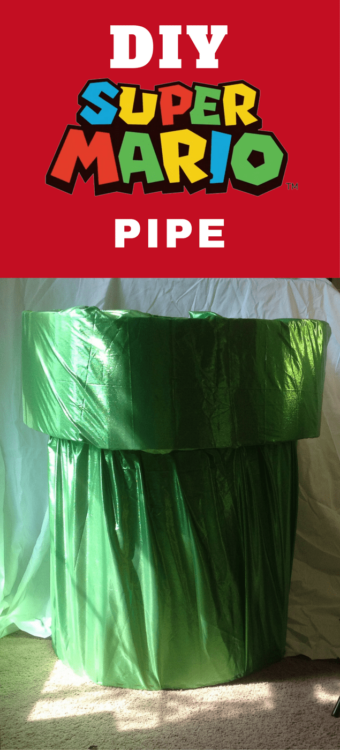
Are you having a Super Mario Theme Party? The Mario Brothers have no doubt continued to be popular among children today. This simple Super Mario Pipe Floor Decoration is just a fun addition to any party. Below you will find a list of supplies you need as well as step by step instructions with pictures on how to make a Super Mario Pipe Floor Decoration.

First left me tell you a story about this Pipe!!! I started creating it in my living room as my son’s birthday party approached, I moved the pipe outdoors to work on since it was rather nice outside. The neighbor kids would come over and play with my children. As they saw me working on the pipe they were intrigued by the massive size and when I explained what I was making they asked if they could play with it when I was done. My response, “Of course”. So yes this Super Mario Pipe was a huge success prior to the party, during the party and even a few weeks after. See kids will be just as excited with a box that inspires lots of creative and imaginary play. I have to admit I even enjoyed playing as if I was Mario coming out of the pipe like you do in the game!

How to Make a Super Mario Pipe Floor Decoration

What you Need:

– Large Cardboard box

– Packaging Tape

– Lots of Green Paper or Green Plastic Table Clothe

Most of these items can be purchased at Dollar Tree. The Large Cardboard Box was from Bunk-bed box.


See ALSO:

  • Handmade Super Mario Party Decoration Ideas that are unique and simple to make.
  • Super Mario Mushroom 1 Up Pinata Tutorial.
%filemane%

How to Make:

1. First take your cardboard and cut it in a circle and tape it with packaging tape. Make it as tall as you desire.

%filemane%

2. Next you will make the rim which needs to be about 4-8 inches longer.

3. Cut a cuff rim about 2 inches bigger than your base. You will want to cut out the middle as well.

4. Attach the cuff rim to the base using tape.

5. Then attach the rim using tape to secure tightly.

%filemane%

6. Cover your Pipe with green paper or if easier and more cost effective use green plastic table from Dollar Tree. Below I covered with green shiny material that I got from my sister from a bag she was going to donate after her yard sale.

%filemane%

That is it! You are done!

I used newspaper for stuffing the rim. I also used old flag material I got from my sisters yard sale that didn’t sell. The box I used was a wardrobe moving box. So my Super Mario Pipe Floor Decoration was absolutely FREE for me.

Do you have any DIY Super Mario Party Ideas? Leave your idea in the comments below.

You might be interested in this Super Mario Backdrop

%filemane%

Topic: How to Make a Super Mario Pipe Floor Decoration

Filed Under: Dollar Tree, Party Decorations Tagged With: #Super Mario

Shaun the Sheep Invitations

November 24, 2016 by rautry

How to Make Shaun the Sheep Invitations

Are you a Shaun the Sheep fan or Wallace and Gromet? My kids get a kick out of the movies and shows. I do sometimes enjoy the British humor of these claymation shows but sometimes it seems to carry on and very slow.

What you Need:

  • Black Cardstock
  • White Cardstock
  • Glue
  • Pen
  • Cotton Balls or White Pom Poms

How to Make:

Step 1

Cut out the Shaun the Sheep Shape for invitations that can be purchased in the Party Store. This shape can also be enlarged for the pinata and other decorations you can think of! The download will come in a compressed zip file. You will need to unzip the file in order to use the files for the cutting machine. You can always print of the copy and manually cut the shapes out.

Step 2

Glue your Black (base) Shaun the Sheep face to the White base. Make sure it is glued down and dry before moving on to the next step.

Step 3

Glue the White wool shape to the black face.

Step 4

Glue the Black Eyes in the middle of the white eye cut out.

Step 5

To make your Shaun the Sheep Invitations to pop out glue on either White Pom Poms or cotton balls.

That is it! You are done!

Topic: Shaun the Sheep Invitations

Filed Under: Party Decorations

« Previous Page
Next Page »

Products

  • Household Handbook Household Handbook: Your Complete Home Management Binder $21.99 Original price was: $21.99.$9.99Current price is: $9.99.
  • Princess Tiana Tiara Princess Tiana Tiara SVG $0.99
  • Shaun The Sheep SVG Shaun the Sheep SVG Invitation $0.99
  • Super Mario Invite Super Mario SVG Invitation $0.99
  • Minecraft Favor Bag Minecraft Creeper Invitation $0.99
try.hpinstantink.com/cmfvfj

Copyright © 2025 · Genesis Framework · WordPress · Log in