Rebecca Autry Creations
  • Home
  • Piñata’s
  • Vacation Bible School
  • Wedding
  • Courses
  • Store

Handy Manny Measuring Tape Piñata

January 19, 2020 by rautry

Handy Manny Measuring Tape Pinata

Get ready to party with the Handy Manny Measuring Tape Piñata! Perfect for any Handy Manny fan or DIY enthusiast, this piñata is sure to add some fun to your celebration. Fill it with candy and goodies, then take a swing at it to release the surprises inside.

%filemane%

What you Need:

– Cardboard box

– Packaging Tape

– Purple Tissue Paper

– White Tissue Paper

– File Folders

– Bungee

How to Make:

1. Take your cardboard preferably a rectangle box.

2. Take your bungee and make a loop go thru a hole of a piece of cardboard. Secure with duck tape.

3. Tape the bungee with loop on the outside to the top of the box.

4. Make sure to add all your pinata fillings with candy and goodies and close it up.

5. Add the eyes by using  rolled up into a ball plastic bags. Cover with tape to make the shape.

6. Take your purple tissue paper and cover entire pinata and tape down.

7. Cover the eyes with white tissue paper.

8. Add the white mouth and purple forehead.

9. Add red tongue and black circles for eyes.

That’s it! You are Done!

Check out these other Pinata Tutorials

Topic: Handy Manny Measuring Tape Pinata

Filed Under: Pinatas Tagged With: #HandyManny, #Party Decorations, #Pinata

Olaf Pinata Tutorial

January 19, 2020 by rautry

Olaf Pinata Tutorial

Olaf Snowman Pinata is great for Disney Frozen theme party. Olaf the Snowman from Frozen has made the movie a wonderful theme to recreate for any young child. Get your birthday child excited by making a custom Frozen theme with this Olaf Pinata Tutorial just perfect for your little one celebrating another year of life. My Gallery Frozen Olaf Pinata is steadily increasing. This is my first pinata that I have made more than just one! See the gallery below. These are 100% Frozen Olaf homemade pinatas.

Be sure to check out other Disney Frozen Party Decoration Ideas.

%filemane%

What you Need:

– Cardboard box (I used Christmas gift boxes)

– Packaging tape

– White tissue paper

– Black, brown, orange construction/cardstock paper

How to Make:

1. First you need to decide how big you want and if you are doing Olaf’s entire body or just the head like me. Trace the head out making a front and back. Cut the head out. Cut long strips about 2 1/2 inches wide. These strips are for the side.

2. Slowly tape the edges of the front and back to the strips to make a 3D box of Olaf. Make sure to reinforce the sides with tape.

3. Take your bungee cord and another small piece of cardboard and punch a hole thru to slide bungee loop thru. Secure down with tape.  Slide the bungee loop thru a hole in the middle top of Olaf’s head. Secure with tape preferably duck tape. This has to be the most secure so your Olaf will continue to hang thru the entire bashing celebration.

4. Cover the entire box with white tissue paper.

5. Cut out the pieces to go on the head. You can find them in the Moms Saving Money Store. Glue on the mouth, eyes and eye brows.

6. Make a cone nose as desired height using a sheet of paper. Cover with Orange tissue paper or you can just cut it out of Orange cardstock. Secure to Olaf’s face with tape.

Topic: Olaf Pinata Tutorial

Filed Under: Pinatas

Handy Manny Favor Bag Tutorial

January 11, 2020 by rautry

Below you will find a list of supplies you will need plus step by step in instructions on how to make Handy Manny Favor Bag.

What you Need:

  • Favor Bags
  • Double sided tape or Glue
  • Cutting Machine or scissors for manual cutting

How to Make:

Step 1

Step 2

Step 3

That is it! You are done!

Topic: Handy Manny Favor Bag Tutorial

Filed Under: Party Decorations

Super Mario Star Dangles

January 11, 2020 by rautry

%filemane%

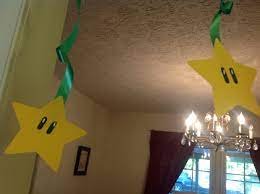
Need a quick and easy decoration for your Super Mario theme party? Look no further this Super Mario Star Dangles are very simple, cheap and great to make for your party. Below you will find instructions on how to make them. You will also be directed to download the SVG file.


Super Mario Star Dangles

What you Need:

  • – Yellow Construction paper or cardstock
  • – Green Curling Ribbon
  • – Black Construction paper or cardstock
  • White Construction paper or cardstock
  • – Glue or Double sided Tape

SEE ALSO:

How to Make:

1. Gather your materials needed.

2. Take the Yellow paper and cut out stars. You can find the Star shape I used in the Store for FREE. Click to get download the Super Mario Star Dangle File.

3. Take the Black paper and cut out eyes. You can find the oval shape that I use for the eyes with the Super Mario Star Dangles download.

4. Glue the white oval to the black oval. Glue the black eyes on to the yellow star.

5. Now cut the Green curling ribbon to desired length and use double sided tape to attach to the back of the star.

Optional: Add eyes on both sides of the stars. Use scissors to curl the green ribbon as desired. Be sure to leave the ribbon long enough to adjust length when hanging up the Super Mario Star Dangles.

That’s it! You are done!


Do you have other simple Super Mario party decoration ideas? Please share or link in the comments below. I like to hear about your creations.

Topic: Super Mario Star Dangles

Filed Under: Party Decorations

How to Make a Lightening McQueen Car Piñata

January 10, 2020 by rautry

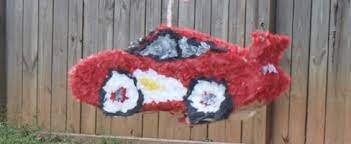
How to Make a Lightening McQueen Car Piñata

My kids absolutely adore Disney Cars. This was a great Lightening McQueen Car Pinata to have fun break apart.

%filemane%

What you Need:

– Cardboard box/Large balloon

– Tissue Paper (red, black, white)

– Bungy Cord

– Packaging Tape or Duck Tape

– Glue

– Scissors

– Pencil

– Candy and piñata fillings (be creative and have items that connect to the theme)

How to Make:

1. First take your cardboard box and draw out the shape of the side of the Lightening McQueen. You will need to to cut out, one for each side.

2. Then determine the width you want the care to be and cut out the hood, back, ceiling and windows. Match them up and tape them securely to the sides. Make sure to keep an opening to add the pinata toys and candy.

3. Add the bungy cord to a piece of cardboard and secure it with tape. Add it from the inside of the pinata to the top as the hook loop.

4. Now the fun part, Get your tissue paper and cut into 1 1/2 inch squares. Use the top of the pencil to place a tissue paper on, Dip in glue and place on desired area of the pinata. Make sure you fully cover the pinata.

5. Add the pinata fillings such as small toys and candy. Close securely and cover.

Congrats, You Did It!

Check out these other Pinata Tutorials

Treasure Chest, Mario 1Up Mushroom, Tinkerbell Flower, Frog Prince, Blues Clues, Spider-man, Optimus Prime, Batman, Power Rangers, Transformers, Princess Castle, Dora’s Backpack, Minion, Smiley Face, Donald Duck, Handy Manny Measuring Tape

Topic: How to Make a Lightening McQueen Car Piñata

Filed Under: Pinatas

LEGO Juice Boxes Tutorial

January 10, 2020 by rautry

LEGO Juice Boxes Tutorial

What you Need:

– Juice Boxes (Unopened)

– Red, Blue, Green, Yellow Cardstock or Wrapping paper

– Double Sided Tape

– Scissors

– Ruler

– Pencil

– Circle Shape (cutable shape or you can trace and cut out)

How to Make:

1. Make sure your juice boxes are filled and unopened. First you will need to measure your juice box height and length on all four sides added together. Take your straw off but leave it unopened if possible.

2. Measure your paper using a ruler and pencil for the rectangle shape to cover the juice box. Use your scissors to cut it out. You can save time by using a paper cutter if you already have one on hand.

3. Take your double-sided tape and place at the bottom and top of the juice box. Line up your paper and press down. Wrap all the way round and place two more pieces of tape to complete the wrap.

4. Take your circle shape to trace and cut out the circles or cut the circles on your cutting machine. You can either use the double sided tape to place your circles on in two rows or you can use the Foam Dots that can be found in the scrap-booking section of a Craft store. The foam circles will create a 3D effect.

That is it! You are done!

Topic: LEGO Juice Boxes Tutorial

Filed Under: Party Decorations

Disney Cars Street Signs

January 10, 2020 by rautry

Disney Cars Street Signs

Stop, Yield and Speed your way thru a fantastic Disney Cars Party with these fun and easy decorations.  Products used to create these street signs can be found at Dollar Tree.

Be inspired with these Disney Car DIY Decorations. Simply click on the image below.

Wall Signs/Street Signs – Make some stop signs, yield, countries to place all over the party rooms. You can find the letters for the signs in the Moms Saving Money Store. Use your imagination and create your own. The sky is the limit! See the Wall Signs Tutorial.

What you Need:

– Black, Yellow, Red, White, Blue, Green Construction Paper or Cardstock

– Tape/Glue

How to Make:

1. Take your cardstock and cut out the shapes and letters for the signs. You can find the letters and shapes in the Moms Saving Money Store.

2. For the Yield sign take the yellow base and glue the black rim on using double sided tape, glue or glue dots. Glue the letters to the word yield.

3. Stop Sign. Take your red base and glue the white rim and letters to the word Stop.

4. Speed Limit Sign. Glue your black rim shape and black letters and number to your white base.

That is it! You are done!

For added fun attach them to poles or cardboard so they can be hand held and the kids can play with as traffic conductors.

Topic: Disney Cars Street Signs

Filed Under: Party Decorations

Disney Cars Road Walkway Tutorial

January 10, 2020 by rautry

Disney Cars Road Walkway Tutorial

Road Walkway – Simple and cheap. Do you have children that love Disney Cars? Race around the party on this Road/Walkway. A fun and exciting activity and will only cost you $2 at Dollar Tree. Be sure to check out other Dollar Tree DIY Tutorials. Do you need Disney Cars inspiration for your theme party?

Be inspired with these Disney Car DIY Decorations. Simply click on the image below.

If you are really feeling inspired you can make Orange Caution Cones with 2 sheets of construction paper.

What you Need:

– Black Plastic Tablecloth

– Yellow Duck Tape

– Scissors

How to Make:

1. Take a black plastic tablecloth and yellow duck tape all from Dollar Tree.

2. Cut the plastic long ways in half.

3. Tape down on each side with the Duck tape on the floor.

4. Make yellow strips and place in the middle of the road to separate the lanes.

That is it! You are done!

Topic: Disney Cars Road Walkway Tutorial

Filed Under: Party Decorations

Disney Cars Tire Cake Recipe

January 10, 2020 by rautry

Disney Cars Tire Cake Recipe

Be inspired with these Disney Car DIY Decorations. Simply click on the image below.

This is a great cake to add to any Disney Cars Theme Party. Be sure to check out other Disney Cars Party Ideas.

What you Need:

– 2 Boxes of Cake Mix plus the ingredients specified on the box

– 4 Round Cake Pans of the same size

– Cake Tray

– Frosting (Chocolate or brown food coloring)

– White Icing

How to Make:

1. Mix and Bake the cakes as directed.

2. Once the cakes are baked place in the freezer for an hour to make them easier to work with.

3. Cut the tops of each cake to make them even.

4. Each Tire is made of two layers of cake. Place on top of each other.

5. This cake has the top two layers slightly hanging over the other making the distinction between both tires.

6. Use Chocolate frosting to cover or add brown food coloring to frosting until color is desired.

7. Spread the tires with frosting.

8. Take the white frosting and add the writing.

9. Going around the tires make the tire track lines at an angle.

That’s it! You are Done!

Topic: Disney Cars Tire Cake Recipe

Filed Under: Food, Party Decorations

Teenage Mutant Ninja Turtle Invitations

January 10, 2020 by rautry

I know you are singing the song! We all are when we think of Teenage Mutant Ninja Turtles. Below you will find the necessary file and instructions on how to make the TMNT invitations.

What you Need:

  • Green, blue, black and pink paper
  • TMNT SVG file for cutting

How to Make:

Step 1

First gather your paper. You can use construction paper but I prefer cardstock. You can find a large solid color pack at Walmart for $20. Or you can order from Amazon 200 ct for under $11. Price may change.

Step 2

Download the TMNT file here. Use on a cutting machine like a Silhouette.

Step 3

Once your color and shapes are cut out you can proceed to glue are parts together.

That is it! You are done!

Topic: Teenage Mutant Ninja Turtle Invitations

Filed Under: Party Decorations

Next Page »

Products

  • Household Handbook Household Handbook: Your Complete Home Management Binder $21.99 Original price was: $21.99.$9.99Current price is: $9.99.
  • Princess Tiana Tiara Princess Tiana Tiara SVG $0.99
  • Shaun The Sheep SVG Shaun the Sheep SVG Invitation $0.99
  • Super Mario Invite Super Mario SVG Invitation $0.99
  • Minecraft Favor Bag Minecraft Creeper Invitation $0.99
try.hpinstantink.com/cmfvfj

Copyright © 2025 · Genesis Framework · WordPress · Log in