Rebecca Autry Creations
  • Home
  • Piñata’s
  • Vacation Bible School
  • Wedding
  • Courses
  • Store

How to Make a Donald Duck Piñata

November 10, 2019 by rautry

How to Make a Donald Duck Piñata

Do you have a Mickey Mouse fan? How about a Donald Duck Fan? This Donald Duck Pinata was a huge hit for a Mickey Mouse Clubhouse Theme Birthday Party.

What you Need:

– Cardboard box/Large balloon

– Tissue Paper (blue, yellow, black, white)

– Bungy Cord

– Packaging Tape or Duck Tape

– Yellow Cardstock

– Flour

– Warm Water

– Glue

– Scissors

– Pencil

– 2 inch strips of paper preferably notebook paper or newspaper

– Candy and piñata fillings (be creative and have items that connect to the theme)

How to Make:

1. First take your balloon and air it up to the desired size. Tie it off.

2. Take your paper and shred into 2 inch strips if not already done.

3. Make a paste of flour and warm water.

4. Carefully take a strip of paper and dip into paste, add it to the balloon. Cover the entire balloon in one layer.

5. let it sit and dry you can use a hair dryer on a lower setting to dry faster. Depending on how wet the paste is the longer it takes to dry.

6. Repeat steps 4 and 5 until ballon is covered and dry with desired amount of layers. Easy to break piñatas 4-5 layers, harder to break 10 layers.

7. Once the piñata is very dry you can pop the balloon inside if it has not already popped. Cut out a 4 inch by 4 inch area on 3 side to allow it to flap open, this is the entry way for the candy.

8. Reinforce handle (bungy cord) with cardboard and tape. Create a hole at the top of the piñata for the handle just enough the bungy cord can fit thru. Secure with tape.

9. Now the fun part! Time to decorate! First draw on the piñata your pattern to follow. Cut tissue paper in small squares about 2 inches by 2 inches.

10. Cut your yellow beak out of card stock and secure onto the piñata using tape at desired place according to your pattern.

11. Use the pencil, eraser side and place in the middle of a tissue paper. Dip in a glob of glue and place on the piñata in the desired area according to your pattern. Do this for entire piñata.

12. Before securing the open flap be sure to place your piñata candy and party filling favors. Secure the open flap with tape and then cover with tissue paper.

Congrats, You Did It!

Thanks for reading. You can also find more Mickey Mouse Party Ideas.

Check out these other Pinata Tutorials

Treasure Chest, Mario 1Up Mushroom, Tinkerbell Flower, Frog Prince, Blues Clues, Spider-man, Optimus Prime,

Lightening McQueen, Batman, Power Rangers, Transformers, Princess Castle, Dora’s Backpack, Minion, Smiley Face, Handy Manny Measuring Tape

Topic: How to Make a Donald Duck Piñata (Mickey Mouse Clubhouse)

Filed Under: Pinatas

How to Make Old School Batman Piñata

November 10, 2019 by rautry

How to Make a Old School Batman Piñata

Pinatas are fun and lets face it they don’t come cheap when it comes to crushing it to pieces. This easy and budget friendly tutorial will alleviate the stress of spending tons of money of something that will not last very long. Let get to it with your very own Batman Pinata.

What you Need:

– Cardboard box/Large balloon

– Tissue Paper (blue, black, white)

– Bungy Cord

– Packaging Tape or Duck Tape

– Flour

– Warm Water

– Glue

– Scissors

– Pencil

– 2 inch strips of paper preferably notebook paper or newspaper

– Candy and piñata fillings (be creative and have items that connect to the theme)

How to Make:

1. First take your balloon and air it up to the desired size. Tie it off.

2. Take your paper and shred into 2 inch strips if not already done.

3. Make a paste of flour and warm water.

4. Carefully take a strip of paper and dip into paste, add it to the balloon. Cover the entire balloon in one layer.

5. let it sit and dry you can use a hair dryer on a lower setting to dry faster. Depending on how wet the paste is the longer it takes to dry.

6. Repeat steps 4 and 5 until ballon is covered and dry with desired amount of layers. Easy to break piñatas 4-5 layers, harder to break 10 layers.

7. Once the piñata is very dry you can pop the balloon inside if it has not already popped. Cut out a 4 inch by 4 inch area on 3 side to allow it to flap open, this is the entry way for the candy.

8. Reinforce handle (bungy cord) with cardboard and tape. Create a hole at the top of the piñata for the handle just enough the bungy cord can fit thru. Secure with tape.

9. Now the fun part! Time to decorate! First draw on the piñata your pattern to follow. Cut tissue paper in small squares about 2 inches by 2 inches.

10. Use the pencil, eraser side and place in the middle of a tissue paper. Dip in a glob of glue and place on the piñata in the desired area according to your pattern. Do this for entire piñata.

11. Before securing the open flap be sure to place your piñata candy and party filling favors. Secure the open flap with tape and then cover with tissue paper.

Congrats, You Did It!

What other Batman Party Ideas can you think of?

Check out these other Pinata Tutorials

Treasure Chest, Mario 1Up Mushroom, Tinkerbell Flower, Frog Prince, Blues Clues, Spider-man, Optimus Prime,

Lightening McQueen, Power Rangers, Transformers, Princess Castle, Dora’s Backpack, Minion, Smiley Face, Donald Duck, Handy Manny Measuring Tape

Topic: How to Make a Old School Batman Piñata

Filed Under: Pinatas

How to Make a Transformers Piñata

November 10, 2019 by rautry

Are you an Autobot or a Decepticon Fan? No Matter which you like best we all like to take a swing at pinatas, even if they are Transformers in disguise!

What you Need:

– Cardboard box/Large balloon

– Tissue Paper (red, black, white)

– Bungy Cord

– Packaging Tape or Duck Tape

– Glue

– Scissors

– Pencil

– Candy and piñata fillings (be creative and have items that connect to the theme)

How to Make:

1. First take your cardboard box and cut your pattern of the Autobot Transformers sybol. I made the same pattern for both front and back and decided on a 4 inch width for the sides.

2. Take your duck tape and tape the sides to both the front and back until all is covered and taped together.

3. Cut out a 4 inch by 4 inch area on 3 sides (on the side width)  to allow it to flap open, this is the entry way for the candy.

4. Reinforce handle (bungy cord) with cardboard and tape. Create a hole at the top of the piñata for the handle just enough the bungy cord can fit thru. Secure with tape.

5. Now the fun part! Time to decorate! First draw on the piñata your pattern to follow. Cut tissue paper in small squares about 2 inches by 2 inches.

6. Use the pencil, eraser side and place in the middle of a tissue paper. Dip in a glob of glue and place on the piñata in the desired area according to your pattern. Do this for entire piñata.

7. Before securing the open flap be sure to place your piñata candy and party filling favors. Secure the open flap with tape and then cover with tissue paper.

Congrats, You Did It!

Check out these other Piñata Tutorials

%filemane%
%filemane%
%filemane%
%filemane%
%filemane%
%filemane%
%filemane%
%filemane%
%filemane%
%filemane%
%filemane%
tinkerbell flower pinata
%filemane%
%filemane%
%filemane%
%filemane%
%filemane%
%filemane%

Topic: How to Make a Transformers Piñata

Filed Under: Pinatas

Fish Pinata Tutorial

November 10, 2019 by rautry

What you Need:

  • Cardboard box
  • Scissors
  • Bungee Cord
  • Yellow Plastic Table cloth
  • Ribbon
  • Easter plastic egg
  • Silver or different color table cloth or tissue paper

How to Make:

Step 1

Take a Cardboard box and cut your side of the fish and trace onto the 2nd to make a matching side.

Step 2

Take a 2 – 3 inch strip of cardboard and tape to one side until all the way around the Fish side. Repeat as you attach the other side. Make sure to specify your center for the bungee cord handle.

Step 3

Locate where you will put the bungee cord handle and create a hole. For better strength and protection add a second layer of the bungee cord and tape down.

Step 4

Fill your Fish Pinata with goodies. Tape shut

Step 5

Cover your Fish Pinata with the yellow plastic table cloth and tape well.

Step 6

Make your fish fins out of cardboard and cover with a second color of your choice. Attach fins to the side of the fish.

Step 7

Take your ribbon and trace the edges of the fish and glue or tape down.

Step 8

Take a plastic Easter Egg and split in half and use to secure it to the sides of the fish.

That is it! You are done!

Topic: Fish Pinata Tutorial

Filed Under: Pinatas

Big Hero 6 Party Ideas

September 10, 2019 by rautry

From the creators of Tangled, Wreck-it Ralph and Frozen comes an all new Disney Animation called Big Hero 6 designed after a Marvel Comic.

Can’t find Big Hero 6 Party Decorations at a reasonable cost? You came to the right place! If you are looking for inexpensive easy ideas you can make quickly to make an epic Big Hero 6 Party here are some great ideas you can make on your own.

Make your Big Hero 6 Birthday Party customized with these suggestions below without the high cost.


See Also:

Big Hero 6 Invitations

Baymax Invitations -You can make either Baymax Marshmallow type invitations as pictured above or you can make the Baymax Mask invitations like the ones below.

Using Red, White and Black cardstock you can make Baymax Red Mask Invitations to build excitement to your Big Hero 6 Party.

Big Hero 6 Party-ware

Baymax Cups – Take Red paper cups that you can find at Dollar Tree for 8ct for $1. If you plan ahead you can find red paper cups on clearance after Christmas for the fraction of the cost. (My kind of shopping!) I used White paper cups as shown above and used a black sharpie and drew on the eyes to make Baymax. Either way makes for a great addition to a Big Hero 6 birthday party.

Baymax Plates – Take White Party plates and instead of writing or gluing on the black for his eyes on the front of the plate, turn the plate over and glue or draw them on the back. Lay them facing down around your party table to give the effect of Baymax. These are so simple and easy to make. You can get 20ct white dinner paper plates for $1 at Dollar Tree. Use either black construction paper or a black sharpie.

Baymax Napkins – Use White napkins you can 24ct for $1 at Dollar Tree and wrap them around the plasticware as you would normally and tie them with white or red ribbon. Draw on them the black eyes with the permanent marker. Beware the marker will bleed through the napkin so be careful.

You can also grab some red napkins and tie as normal and add the mask from cardstock as your napkin holder!

Baymax Favor Bags (Baymax Loot Bags)

Take red paper favor bags, you can get a 10 pack at Dollar Tree for a $1 or $.33 each at Wal-mart. Using white  cardstock you can add the necessary parts to make the mask. You can also use White paper bags found in the snack bags in the grocery isle. Just use black cardstock to cut the circles or make it a bit easier and draw them with a black sharpie.

Honey Lemon Favor Bags

After watching the Big Hero 6 over and over, I realized we can make some fashionable Honey Lemon favor bags for the girl guests of your party.

Baymax Masks – Use red and white felt. The eyes will be cut out as the black part so no need for them. All you will need to do is draw a black line in the middle. Take a yellow or gold paper bag and add purple hearts on each side. Add a purple bear face to the one side and add a bead string for a handle.

Honey Lemon Accessories

Yellow Hair Band – Make these easy Yellow Hair bands that resemble the ones Honey Lemon wears in Big Hero 6.

Pink Glasses – Honey Lemon also wears big pink glasses.

Big Hero 6 Wall Decorations

Baymax Christmas Ornaments – Use White or Clear Christmas Ornaments

Baymax Balloons

Photo credit – unable to be found yahoo image search

Big Hero 6 Party Games

Balloon Animals – This is a must. Either learn how to make your own by watching You Tube videos or find someone who can make them for you because this will be an absolute hit for any kids party.

Food Ideas


Big Hero 6 Marshmallow Treat – You will need 1 Jumbo Marshmallow, 5 Regular size and toothpicks to pull these cool treats off!

Big Hero 6 Cupcakes – Make cupcakes as directed according to package. Take White frosting and cover the top. Take Cool Whip and lather a clump and add a Jumbo Marshmallow to the top.

Baymax Cake

Picture credit – The Baking Sheet

Baymax Popcorn Balls – Take popped popcorn and melt some marshmallows and make your popcorn balls. While they are still warm slightly place in your chocolates for the eyes.

Check out the Big Hero 6 Recipes

Baymax Cake pops

Picture Credit – craftsy.com

Baymax Accessories

Baymax Masks – Use Red, purple and white cardstock to make your Baymax Masks, boys love these.

Big Hero 6 Thank You Card

Big Hero 6 Pinata

In keeping with the awesome theme you can easily make Big Hero 6 Pinata by either taking a balloon and using paper mache to cover it or you can use a cardboard box (my favorite) and shape it accordingly to Big Hero 6 head. I like to use Christmas boxes because they are thick and sturdy enough to withstand several kids but thin enough to manipulate. Check out Baymax Pinata tutorial.

Topic: Big Hero 6 Party Ideas

You Might also be interested in from the makers of Frozen and Tangeled:

Filed Under: Party Decorations

Tinkerbell Party Ideas

September 10, 2019 by rautry

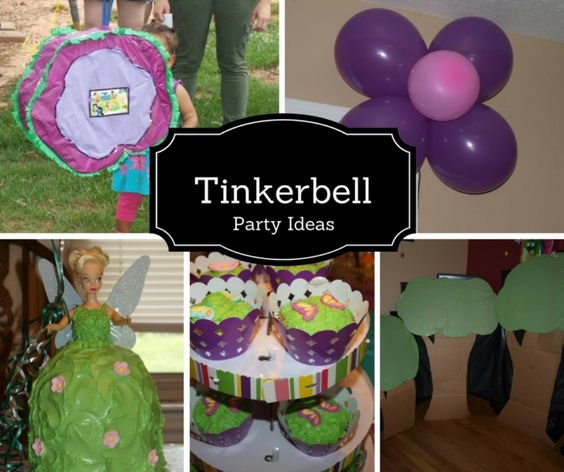
Everyone wants to stay a kid forever, right? These Tinkerbell Party Ideas will help you create a unique Tinkerbell party that will give your birthday child a great party.

Tinkerbell Ideas

Tinkerbell Party Ideas

Have a great fairy party with Tinkerbell and her friends. Little girls just love these little fairies.

Tinkerbell Invites

Tinkerbell invitation

Tinkerbell Invitations – I used the Tinkerbell Cartridge for the Cricut Machine to cut the shapes to make the Tinkerbell Invitations. Check out the Tinkerbell Invitation Tutorial.

Table Decorations

Tinkerbell table decorations

Paper cup Flowers are great additions to any table top and especialy for a Tinkerbell Party. Check out the Tutorial.

SEE ALSO:

Wall Decorations

Balloon Flowers – Easy to make. Simply air up 4 of one color and one of another and tie together in the shape of a flower.

Cardboard Trees – Take Cardboard and cut into shape as a Tree. Add green to the tops of the trees and secure with tape. This is a nice large background prop great for photo opps.

Party Favors

Fairy Wands – Take Silver Stars and glue to wand. Use ribbon to cover the stick and tape. So much fun to make for fairy guests.

Tinkerbell Food Ideas

Tinkerbell Cake

Tinkerbell birthday cake

Tinkerbell Barbie Cake – Again I cannot take credit for this cake. My sister made this wonderful Tinkerbell cake.

Butterfly Cupcakes – Great addition to the cake so you won’t have to destroy the cake!

Tinkerbell Piñata

Tinkerbell pinata

Tinkerbell Flower Piñata – Making a Tinkerbell Flower Piñata was simple and lots of fun. Check out the Tinkerbell Flower Pinata Tutorial

Thank You Cards

Check out other Theme Party Ideas.

Topic: Tinkerbell Party Ideas

Filed Under: Party Decorations

Homemade Party Ideas and Piñata’s

September 8, 2019 by rautry

%filemane%
%filemane%
%filemane%
%filemane%
%filemane%
%filemane%
tinkerbell flower pinata
%filemane%
%filemane%
%filemane%
OLYMPUS DIGITAL CAMERA
%filemane%
%filemane%
%filemane%
%filemane%

Filed Under: Party Decorations

Hello Kitty Party Ideas

June 24, 2019 by rautry

There are so many theme patterns for Hello Kitty but as always I like to add my own splash and create a party that is one of a kind. My little princess and I had so much fun with this Hello Kitty theme.

Hello Kitty Invitations

Made from black, white and pink cardstock. You can purchase the SVG, PDF, PNG file in the Party Store. These are so simple and easy to make Hello Kitty Invitations. I added some glitter glue to the pink bow to give some sparkling to the invitation.

Hello Kitty Partyware

1. Hello Kitty Partyware from Birthdayinabox.com

These plates can be found at Wal-mart for the same price but with Birthdayinthebox.com you don’t have to waste time calling up the store or driving from store to store to make sure you have enough plates and cups and other matching partyware. The work is done for you, simply select a party pack that fits your needs and order. And it will be on its way and you don’t have to leave your house. My kind of shopping! I added the hard plastic plates underneath for added support for those like parents that tend to stand behind their kids at parties. It also makes the plates pop a little more and you have more of a focal point. I really like the bright colors, gives you additional colors to work with for the overall theme, especially if you only have a few of each colors!

I am very impressed with how sturdy and bright colors these plates have. Simply add volume by using a teal, green or black plastic tablecloth as the background to make these plates pop if you don’t have slightly larger plates that compliment the colors.

2. Hello Kitty Serving Plates

These cute kitty serving plates are so awesome and easy to make. I was going to use them to hold our veggies and fruits on the food table. I got the idea from allcraftypants.com and encourage you to take a look at the other kitty ideas she has as well. Very talented and simple to make ideas.

3. Hello Kitty Cups

I am all about saving some money! I am also all about coordinating with the colors as well, so I picked up some black paper cups from Dollar Tree to accent the plates. These also pop out from the backdrop of the tablecloth. I simply cut several bows from the Hello Kitty Invite shapes that you can find in the party store. I glued the bows onto the cups opposite of the seams and I think they came out rather well. What do you think?

4. Hello Kitty Tablecloth

Use a pink plastic tablecloth you can find these at Dollar Tree for $1 or $.97 at Wal-mart. I already had a white cloth tablecloth so I wasn’t able to make it to the store in time for the party to grab one.

5. Hello Kitty Bow Napkins

These are so simple. You can either use Hot pink napkins that can be found at Wal-mart or you can use the polka dotted napkins as featured above. By the way these are from Dollar Tree. Simply fold in half and take a 1 inch strip of black or pink or any coordinating color paper to wrap around the center to make the bow. Use double sided tape to adhere the center strip.

Here is another idea you can do with napkins.

Hello Kitty Favors

1. Hello Kitty Favor Bags

Picture credit – DIY Inspired

I made my own from regular white paper bags that I purchased at Dollar Tree but unfortunately I somehow did not take a picture of them! They are very similar to those pictured above with the exception of the pink bow. I used the pink bows I cut from the Hello Kitty party invites featured at the top of this page.

2. Hello Kitty Hair Bands

I am so excited to make the bows! I was going to originally use the streamer bows I made to add to my table decorations but then I remembered I have those $.25 rolls of pink tule I got from Wal-mart Christmas Clearance that I can make both tutu’s as well as the bows for the Headbands. I still used white felt to cut the ears and glued on the pink glittery bows. I think they came out fantastic.

3. Hello Kitty Printables

Picture Credit – printabletreats.com

Have a printer and paper? Check out these cool Hello Kitty printables from printabletreats.com. I used the ideas to make my own Welcome to the party sign but if you are strapped for time, these are great alternatives.

4. Hello Kitty Tutu’s

Not that long ago we were finishing up Christmas and then everything went on clearance. I love clearance. Well this Christmas Wal-mart had $1 rolls of Tule that came in green, pink, purple or blue. Well by the time I got to the clearance I paid $.25 each one. I was hesitant to buy so many because I wasn’t quit sure what I would use them for and then I had an AWE moment. I can make pink Tutu’s for this awesome Hello Kitty theme party! Yay me and the cost is low!!! I’m still waiting for the picture to post. I simply took an elastic band you would find in a pair of legging pants and tied strips of the tulle on the elastic band all the way around the tutu until it was full. I used roughly 1 and 1/2 of these rolls I got at Wal-mart. They also had black for $2.50 but were 2/3 bigger then the small ones. You could easily alternate the colors.

5. Hello Kitty Party Hats

I took black cardstock and traced an already made party hat I had from another party and cut it out. I used the bow from the Hello Kitty Invitations I made featured above. You can also use Pink or White Cardstock. Add the Hello Kitty Shape Invitation. The SVG file for cutting machines can be purchased in the Party Store.

Hello Kitty Table Decorations

1. Hello Kitty Crepe Paper Bows

Use Pink or Black Streamers and roll out a strip of about 4 inches, using your hand wrap around until you have gone around 4-6 times so it will stay sturdy and then cut and tape your end in the middle of the back of the bow. Then take a strip cut about 1 in or half of the width of the streamer and wrap around the center as you scrunch the middle to make the bow like shape. Wrap until desired and tape to secure.

2. Hello Kitty Tablecloth

You can purchase the White plastic tablecloth from Dollar Tree or Walmart for $1 or under. You can use the rectangle and just cut it circular on the table you will use. Lay on a round or oval table. Cut your black whiskers using Black streamer. Also cut the eyes and nose from the black streamer and tape down. Use on of your pink bows from above or create a larger one from card stock. Use White Card stock to cut the ears and tape to the end of the table you are using as the top.

Or you can do what I did for the food serving table and used a white plastic table cloth from Dollar Tree and added pink canvas wrap I found for less than $1 at Goodwill and laid it over the center of the table and then added my cake platforms and used my kitty serving plates for the veggies and fruits.

3. Hello Kitty Centerpieces

These are cute, quick and just awesome addition to a Hello Kitty Party. Direct your guests to the center of a table with the Hello Kitty Rainbow Table Centerpiece from Birthdayinabox.com. Not only are they inexpensive you don’t have to call around to various stores asking if they have Hello Kitty decorations and you don’t have to go from store to store potentially lucking out. You get the large Hello Kitty Centerpiece with two smaller versions as pictured below.

Hello Kitty Wall Decorations

1. Hello Kitty Lanterns

Use the Hello Kitty Silhouette shape and cut in on each side of a pink cardstock when its folded in half. Tape two cardstock sheets together to make a lantern. You can add a tea light candle in the middle and use as a centerpiece or you can add several together to hang around the room as a garland. I like both ideas!

2. Hello Kitty Banner

I love this banner. It is 10 ft long and that is long! This is from birthdayinabox.com an you can purchase it for less than $6. I highly recommend this. Large and sturdy and can be used several times.

Hello Kitty Games

1. Pin the Bow on Hello Kitty Game

picture credit – cinsarah

You can use the same Hello Kitty Party Invitation as featured at the top of this page or check out cinsarah for a FREE printable to play pin the bow on Hello Kitty. Easy and fun game to add to your party.

Hello Kitty Food Ideas

1. Hello Kitty Cake

Picture credit to Betty Crocker

I am not great at making cakes but if you have the Hello Kitty cake mold it can’t be that hard right? Since I keep my birthday parties at a low cost I prefer to make as much as I can so I don’t go over in cost. We actually went for Chocolate cupcakes my little princess’ favorite so I did not have the joy of making this cake shown above by Betty Crocker.

2. Hello Kitty Drinks

If you have clear cups you can easily pour some milk and mix Strawberry syrup to make Strawberry milk. Add a black and White straw with a pink bow to add to the party.

Hello Kitty Pinata

Hello Kitty Pinata is made from Christmas Gift boxes, white tissue paper, black, yellow cardstock and pink ribbon. Be sure to check out the Hello Kitty Pinata Tutorial.

Hello Kitty Thank You Cards

picture credit – Roots and Wings

I simply made enough Hello Kitty Invitations to use as Thank you cards but I wanted to give you another cute idea to make the Thank you cards a bit different.

Don’t forget the balloons. Parties have to have some balloons.We had many pink, purple and black balloons. The best part was when my little princess saw the HUGE Hello Kitty Balloon.

Topic: Hello Kitty Party Ideas

Filed Under: Party Decorations

Blues Clues Party Ideas

June 24, 2019 by rautry

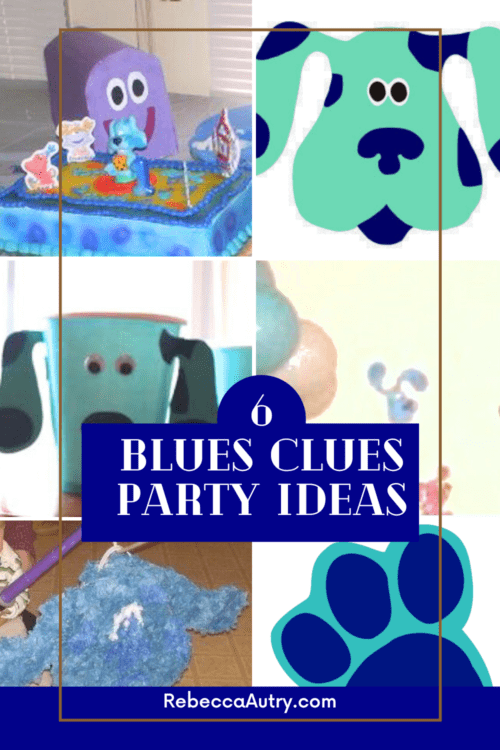
Do you remember Blues Clues? I’m sure you are already singing the song! Check out below the Blues Clues Party Ideas that are simple and inexpensive to make.

See Also:

Blues Clues Birthday Party Ideas

Use two shapes of blues for your party area including streamers and plastic ware.

Invitations

Blues Clues Invitation – Take two shades of blue and cut out Blue’s Head and glue together. Check out the Blues Clues Invitation Tutorial.

Floor Decorations

Blues Clues Paws – great to line the party walkway with Blue’s Clues Paws. See the Blue’s Clue Paws Tutorial.

Table Decorations

Mailbox – Use 3 sheets of purple paper, red, black and white to make a Mailbox, great to hold all the birthday cards. Take a look at the Step by Step Blue’s Clue’s Mailbox Tutorial.

Party Favors

Piñata

Blues Clues Head Piñata – Made from a Cardboard box and blue, white and black tissue paper. Rather easy to make and lots of fun for a Blue’s Clues party. Check out the Blue’s Clues Pinata Tutorial.

Filed Under: Party Decorations

Pokemon Ball SVG File

June 24, 2019 by rautry

Pokemon Go is all the rave. Turn your child’s Pokemon birthday into  custom fun party with easy and simple decorations like these Pokemon Balls. By purchasing you will be given a link to download the Zip file containing the Pokemon Ball SVG, PDF, PNG files. You will need to unzip the files in order to use the SVG file in a cutting software to be used on a cutting machine like a cameo silhouette. Be sure to separate the images by “To Each Their Own”. Combined same color shapes to cut easier.

%filemane%

Once purchased you will have a limit of 3 downloads in 72 hours. Products are for

personal use and not to be combined to create products for sale. For more information on License and Copyright click here.

To purchase the SVG file click here – Pokemon Ball Invitation SVG

You May also like:

Pokemon Party Decoration Ideas and Pokemon Trainer Certificate.

FacebookTwitterGoogle PlusCustom Social

Filed Under: Party Decorations

« Previous Page
Next Page »

Products

  • Household Handbook Household Handbook: Your Complete Home Management Binder $21.99 Original price was: $21.99.$9.99Current price is: $9.99.
  • Princess Tiana Tiara Princess Tiana Tiara SVG $0.99
  • Shaun The Sheep SVG Shaun the Sheep SVG Invitation $0.99
  • Super Mario Invite Super Mario SVG Invitation $0.99
  • Minecraft Favor Bag Minecraft Creeper Invitation $0.99
try.hpinstantink.com/cmfvfj

Copyright © 2025 · Genesis Framework · WordPress · Log in