Rebecca Autry Creations
  • Home
  • Piñata’s
  • Vacation Bible School
  • Wedding
  • Courses
  • Store

How to Make Blues Clues Piñata

May 13, 2016 by rautry

Not a traditional first birthday party but fun just as well! You can make this easy Blues Clues Pinata without the high cost of a store bought pinata.

What you Need:

– Cardboard box

– Tissue Paper (blue, black, white)

– Bungy Cord

– Packaging Tape or Duck Tape

– Glue

– Scissors

– Pencil

– Candy and piñata fillings (be creative and have items that connect to the theme)

How to Make:

1. First take your cardboard box and cut your pattern of Blue. I made the same pattern for both front and back and decided on a 4 inch width for the sides.

2. Take your duck tape and tape the sides to both the front and back until all is covered and taped together.

3. Cut out a 4 inch by 4 inch area on 3 side to allow it to flap open, this is the entry way for the candy.

4. Reinforce handle (bungy cord) with cardboard and tape. Create a hole at the top of the piñata for the handle just enough the bungy cord can fit thru. Secure with tape.

5. Now the fun part! Time to decorate! First draw on the piñata your pattern to follow. Cut tissue paper in small squares about 2 inches by 2 inches.

6. Use the pencil, eraser side and place in the middle of a tissue paper. Dip in a glob of glue and place on the piñata in the desired area according to your pattern. Do this for entire piñata.

7. Before securing the open flap be sure to place your piñata candy and party filling favors. Secure the open flap with tape and then cover with tissue paper.

Congrats, You Did It!

Check out these other Pinata Tutorials

Treasure Chest, Mario 1Up Mushroom, Tinkerbell Flower, Frog Prince, Spider-man, Optimus Prime,

Lightening McQueen, Batman, Power Rangers, Transformers, Princess Castle, Dora’s Backpack, Minion, Smiley Face, Donald Duck, Handy Manny Measuring Tape

Topic: How to Make a Blue Clues Piñata

Posted in Pinata and tagged balloons, birthday decorations, birthdays, cardboards, cheap, decorations, DIY projects, do it yourself, do it yourself decorations, frugal ideas, Frugal Living, homemade decorations, mexican pinata, money saving ideas, party decorations, pinata, pinatas, saving money, theme birthdays, theme parties, thrifty living..

Filed Under: Pinatas

How to Make a Dora Backpack Piñata

May 13, 2016 by rautry

Everyone needs a Dora Backpack Pinata  for their Dora Theme Party! This is easy to make and budget friendly.

What you Need:

– cardboard

– packaging tape

– scissors

– pencil

– bungy cord

– curling ribbon

– Purple Tissue Paper

– Purple, yellow, red and light purple Cardstock

How to Make:

1. Take your pencil and eyeball your backpack or you can take a current backpack and use that as a pattern and trace it.

2. Take your scissors and cut out the piece. Take that cut out and trace another matching piece.

3. Determine the width of your pinata and cut strips to go around the backpack. Using the tape attach all pieces together.

4. Cut out a square and puncture a hole in the middle.

5. Slide the bungy cord thru the whole and tie opposite end. Tape the bungy cord down to keep it secure.

6. Attach the cord to the pinata at the top and secure it tightly.

7. Make sure to cut a hole to add candy and pinata items later.

8. Attach purple tissue paper using tape to secure.

9. Use the dark purple cardstock to make the backpack flap and attach to the top of the backpack.

10. Use Dark purple Cardstock to cut out the side pockets and attach using tape.

11. Cut out the eyes using the dark purple and light purple to make a layered look.  Cut out eyebrows from yellow cardstock and attach.

14. Use the dark purple and red cardstock to make the lips and attach.

16. Final step attach purple backpack straps from cutting 2 in strips length will vary to desired length.

All done, go and enjoy!

Check out these other Pinata Tutorials

Treasure Chest, Mario 1Up Mushroom, Tinkerbell Flower, Frog Prince, Blues Clues, Spider-man, Optimus Prime,

Lightening McQueen, Batman, Power Rangers, Transformers, Princess Castle, Minion, Smiley Face, Donald Duck, Handy Manny Measuring Tape

Topic: How to Make a Dora Backpack Pinata

Posted in Pinata and tagged balloons, birthday decorations, birthdays, cardboards, cheap, decorations, DIY projects, do it yourself, do it yourself decorations, frugal ideas, Frugal Living, homemade decorations, mexican pinata, money saving ideas, party decorations, pinata, pinatas, saving money, theme birthdays, theme parties, thrifty living..

Filed Under: Pinatas

Olaf Balloon Tutorial

May 13, 2016 by rautry

Don’t you agree Olaf from Disney Frozen stole the show? I bet the kiddos in your life fell in love with Olaf. Olaf the snowman is all the craze lately and is stealing the hearts of many. Make your Disney Frozen party one of a kind with these simple DIY Frozen decoration ideas including the Olaf Balloon Tutorial below.

You may even want to see how you can make your own Olaf Pinata

What you Need:

– White Balloons

– Black Sharpie

– Orange paper (I used Napkins since it thinner)

– Black Napkin/tissue paper or plastic tablecloth

How to Make:

1. First you will need to air your white balloon to desired amount. Make sure to tie off your balloon so your air will not escape!

2. Take your Black Sharpie Marker and draw your eyes, eyebrows.

3. Take your black napkin/tissue paper or plastic tablecloth and cut out the desired size of Olaf’s mouth. Make sure to include the indent for the tooth! Glue the back and attach to the balloon, make sure smooth out any edges you see bubble up. Allow to dry.

4. Take your orange napkin and cut a carrot shape and glue the back. Attach to the balloon and smooth out the bubbles. Allow to dry.

That is it! You are done!

Topic: Olaf Balloon Tutorial

Filed Under: Party Decorations

Power Rangers Birthday Invites

May 13, 2016 by rautry

Day 3 out of 10 days to plan a fabulous Birthday with little to no money.

Yesterday while cleaning and organizing I found 2 Free product coupons for Kroger pourable dressing ( I’ll get ranch) and the other for Frozen Vegetables (I was thinking carrots but then it occurred to me I could get broccoli and cauliflower instead and then pay for carrots since they are cheaper).

I also finally got the invites and thank you cards made.

Here is the Invites

Here is the Thank You Cards

Now onto making the piñata. so far I haven’t spent anything. I’m still trying use what I have already. I did find tape so I don’t need to buy any!

You can also see my Day 1 and Day 2

Topic: Power Rangers Birthday Invites

Filed Under: Party Decorations

Power Rangers Samurai Birthday Preparations

May 12, 2016 by rautry

power rangers samurai birthday

In less than a week I will be throwing a Double Birthday Party for two very special young men who turn 5 within a week of each other. They are not twins but cousins.

Today I finally started on the piñata. I used to start the month before and made them out of paper mache but because I seem to wait to the last minute lately I don’t have the ability to wait for it to dry so I do it differently now. A lot of tape and cardboard. Although this time I did not do cardboard but used the brown roll from the Christmas Wrapping paper insides!

You can read How to Make a Power Ranger Samurai Pinata, Moms Saving Money Style!

While I was finishing up the invites and Thank you cards I got the idea of making Power Rangers Samurai Masks. When I did my oldest son’s birthday he wanted Jake and the Neverland pirate party so I did Captain hats instead of the traditional Birthday hats. I used my Cricut to make the cuts and you can read all about it at the link in this paragraph.

So still so far. I have yet to go to the store and buy anything new.

Thanks for reading this post. Again if you have any additional suggestions on how I can add to the decorations feel free to post below in the comments. I might just use your suggestion.

topic: power rangers samurai birthday

Filed Under: Party Decorations

Minecraft Creeper Pinata

May 12, 2016 by rautry

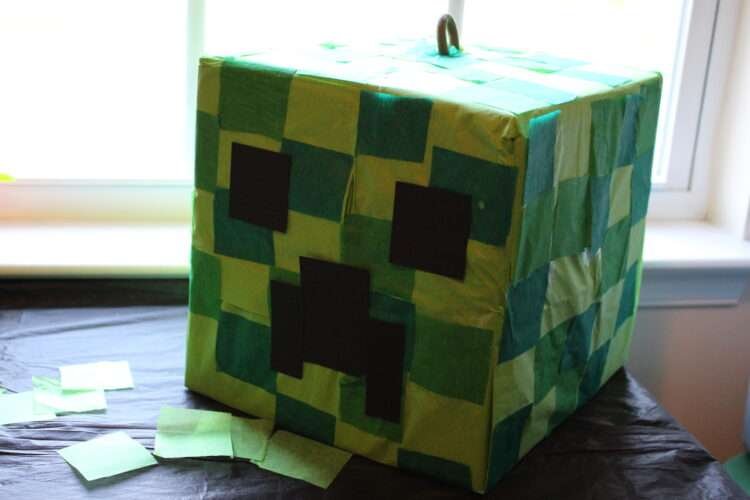
My sons are great at picking out their favorite theme for their birthdays and some odd ones like Rio and Blue’s Clues and others much easier like Avengers. Well Minecraft is the first birthday theme my boys have just gotten so excited that they are making decorations for me for the birthday. I love the help and the excitement. My son is about to turn 9 and even though he has not yet played much of Minecraft he is so excited it makes this party fun to decorate.

First off Minecraft Creepers are green blacks that have black faces. My son and his friends had a blast with this pinata. This is one of the simplest and most inexpensive pinatas I have ever made.

What you Need:

  • Square Cardboard Box
  • Various shade of Green Tissue paper
  • Black Tissue Paper
  • Packaging Tape
  • Bungee Cord
  • Pinata Fillings

How to Make:

Step 1

You will need a bungee cord tied in a knot and slipped through a hole in  piece of thick cardboard. Make sure to tape it thoroughly that it is very secure and then punch it through the top of the pinata. Tape that portion down as well so it is very secure. This is the are of the pinata that needs to be the strongest. The rest of the pinata can be flimsy and easy to break for your guests.

Make sure you have a small opening that your hand fits through to add your bundgee cord handle. In the center of the box push the bungee cord through the opening.

Step 2

Tape the bungee cord down

Step 3

Tape the bottom very securely

Step 4

Cover with green tissue paper

Step 5

Cute 2 inch by 2 inch squares of various shades of green. Use a glue stick to glue the squares on. I first started overlapping them and then I got wiser by making it a checkered board design and glue less squares.

That is it! You are done!

Topic: Minecraft Creeper Pinata

Filed Under: Pinatas

How to Make Super Mario Wall Coins Rebecca Autry Creations

May 12, 2016 by rautry

What you Need:

– Yellow Cardstock

– Cardboard

– Tape/glue

How to Make:

1. First take your cardboard and draw a oval shape as desired size. Cut it out and make as many as desired.

2. Take your yellow cardstock and cut out the same shapes as your cardboard coins.

3. Tape or Glue your yellow coin to the cardboard coin.

4. Take a darker yellow or orange marker and ad the shadow dimple.

That is it! You are done!

A Very simple clever Super Mario Decoration for Super Mario Parties.

Topic: How to Make Super Mario Wall Coins

Filed Under: Party Decorations

Tinkerbell Party Invites Tutorial Rebecca Autry Creations

May 12, 2016 by rautry

Below you will find the supplies you need plus step by step instructions on how to make the Tinkerbell Party Invite.

What you Need:

– Black, White, Yellow, Blue, Red Cardstock

– Double sidedtape/glue

How to Make:

Step 1

Cut out your shapes. You can find the shapes available in the Moms Saving Money store.

Step 2

Glue your black base to your white base.

Step 3

Glue your tan face on and then your

That is it! You are done!

Topic:Tinkerbell Party Invites Tutorial

Filed Under: Party Decorations

Mickey Mouse Clubhouse Words Tutorial

May 12, 2016 by rautry

Everyone loves Disney’s Creation of Mickey Mouse. Although Mickey Mouse has had many faces over the years, Mickey Mouse still continues to be a HUGE influence. Mickey Mouse has change house animation has come to what it is today.

Perhaps you are planning a Disney Frozen Party soon as well. Check out the Disney Frozen Birthday Party Ideas by clicking on the image below.

What you Need:

– Red, Yellow, Blue, Green Cardstock

– Tape

How to Make:

1. First you need to cut all the shapes first. You can find the font at dafont.com and the “O” House/Door Shape at Moms Saving Money Store.

2. Once all your shapes are cut out you will want to put together the House/Door Shape.

3. You can attach them to the wall or you can string them together using curling ribbon.

That is it! You are done!

Have you seen the Minions? Easy steps to making a Minion Pinata.

Topic: Mickey Mouse Clubhouse Words Tutorial

Filed Under: Party Decorations

Disney Princess Wall Castle Tutorial Rebecca Autry Creations

May 12, 2016 by rautry

Below you will find the items you need to make as well as step by step instructions on how to make a Disney Princess Wall Castle.

What you Need:

– Yellow, Pink, Purple Plastic Tablecloth

– Packaging Tape

– Cardboard Boxes that are tall like Refrigerator Boxes

– White Wrapping paper

How to Make:

1. Cut out your Cardboard boxes to desired shape.

2. Cover entirely with white wrapping paper. You can use the back of Christmas wrapping paper the you already have alot of! Use packaging tape to secure.

3. Cover with pink and purple as your base with tape to secure.

4. Use yellow for the bricks and purple for the roofs as desired.

5. Draw the bricks on roofs and castle base. Add trimmings as desired like purple ribbon.

That is it! You are done!

This is a simple to make large party piece, easy and cheap to make. Makes for a great picture backdrop.

Topic: Disney Princess Wall Castle Tutorial

Filed Under: Party Decorations

« Previous Page
Next Page »

Products

  • Household Handbook Household Handbook: Your Complete Home Management Binder $21.99 Original price was: $21.99.$9.99Current price is: $9.99.
  • Princess Tiana Tiara Princess Tiana Tiara SVG $0.99
  • Shaun The Sheep SVG Shaun the Sheep SVG Invitation $0.99
  • Super Mario Invite Super Mario SVG Invitation $0.99
  • Minecraft Favor Bag Minecraft Creeper Invitation $0.99
try.hpinstantink.com/cmfvfj

Copyright © 2025 · Genesis Framework · WordPress · Log in