Rebecca Autry Creations
  • Home
  • Piñata’s
  • Vacation Bible School
  • Wedding
  • Courses
  • Store

Handy Manny Measuring Tape Piñata

January 19, 2020 by rautry

Handy Manny Measuring Tape Pinata

Get ready to party with the Handy Manny Measuring Tape Piñata! Perfect for any Handy Manny fan or DIY enthusiast, this piñata is sure to add some fun to your celebration. Fill it with candy and goodies, then take a swing at it to release the surprises inside.

%filemane%

What you Need:

– Cardboard box

– Packaging Tape

– Purple Tissue Paper

– White Tissue Paper

– File Folders

– Bungee

How to Make:

1. Take your cardboard preferably a rectangle box.

2. Take your bungee and make a loop go thru a hole of a piece of cardboard. Secure with duck tape.

3. Tape the bungee with loop on the outside to the top of the box.

4. Make sure to add all your pinata fillings with candy and goodies and close it up.

5. Add the eyes by using  rolled up into a ball plastic bags. Cover with tape to make the shape.

6. Take your purple tissue paper and cover entire pinata and tape down.

7. Cover the eyes with white tissue paper.

8. Add the white mouth and purple forehead.

9. Add red tongue and black circles for eyes.

That’s it! You are Done!

Check out these other Pinata Tutorials

Topic: Handy Manny Measuring Tape Pinata

Filed Under: Pinatas Tagged With: #HandyManny, #Party Decorations, #Pinata

Olaf Pinata Tutorial

January 19, 2020 by rautry

Olaf Pinata Tutorial

Olaf Snowman Pinata is great for Disney Frozen theme party. Olaf the Snowman from Frozen has made the movie a wonderful theme to recreate for any young child. Get your birthday child excited by making a custom Frozen theme with this Olaf Pinata Tutorial just perfect for your little one celebrating another year of life. My Gallery Frozen Olaf Pinata is steadily increasing. This is my first pinata that I have made more than just one! See the gallery below. These are 100% Frozen Olaf homemade pinatas.

Be sure to check out other Disney Frozen Party Decoration Ideas.

%filemane%

What you Need:

– Cardboard box (I used Christmas gift boxes)

– Packaging tape

– White tissue paper

– Black, brown, orange construction/cardstock paper

How to Make:

1. First you need to decide how big you want and if you are doing Olaf’s entire body or just the head like me. Trace the head out making a front and back. Cut the head out. Cut long strips about 2 1/2 inches wide. These strips are for the side.

2. Slowly tape the edges of the front and back to the strips to make a 3D box of Olaf. Make sure to reinforce the sides with tape.

3. Take your bungee cord and another small piece of cardboard and punch a hole thru to slide bungee loop thru. Secure down with tape.  Slide the bungee loop thru a hole in the middle top of Olaf’s head. Secure with tape preferably duck tape. This has to be the most secure so your Olaf will continue to hang thru the entire bashing celebration.

4. Cover the entire box with white tissue paper.

5. Cut out the pieces to go on the head. You can find them in the Moms Saving Money Store. Glue on the mouth, eyes and eye brows.

6. Make a cone nose as desired height using a sheet of paper. Cover with Orange tissue paper or you can just cut it out of Orange cardstock. Secure to Olaf’s face with tape.

Topic: Olaf Pinata Tutorial

Filed Under: Pinatas

How to Make a Lightening McQueen Car Piñata

January 10, 2020 by rautry

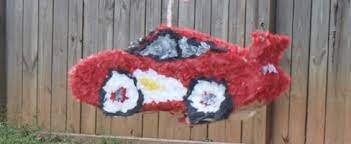
How to Make a Lightening McQueen Car Piñata

My kids absolutely adore Disney Cars. This was a great Lightening McQueen Car Pinata to have fun break apart.

%filemane%

What you Need:

– Cardboard box/Large balloon

– Tissue Paper (red, black, white)

– Bungy Cord

– Packaging Tape or Duck Tape

– Glue

– Scissors

– Pencil

– Candy and piñata fillings (be creative and have items that connect to the theme)

How to Make:

1. First take your cardboard box and draw out the shape of the side of the Lightening McQueen. You will need to to cut out, one for each side.

2. Then determine the width you want the care to be and cut out the hood, back, ceiling and windows. Match them up and tape them securely to the sides. Make sure to keep an opening to add the pinata toys and candy.

3. Add the bungy cord to a piece of cardboard and secure it with tape. Add it from the inside of the pinata to the top as the hook loop.

4. Now the fun part, Get your tissue paper and cut into 1 1/2 inch squares. Use the top of the pencil to place a tissue paper on, Dip in glue and place on desired area of the pinata. Make sure you fully cover the pinata.

5. Add the pinata fillings such as small toys and candy. Close securely and cover.

Congrats, You Did It!

Check out these other Pinata Tutorials

Treasure Chest, Mario 1Up Mushroom, Tinkerbell Flower, Frog Prince, Blues Clues, Spider-man, Optimus Prime, Batman, Power Rangers, Transformers, Princess Castle, Dora’s Backpack, Minion, Smiley Face, Donald Duck, Handy Manny Measuring Tape

Topic: How to Make a Lightening McQueen Car Piñata

Filed Under: Pinatas

How to make a Minion Pinata Tutorial

December 31, 2019 by rautry

How to make a Minion Pinata Tutorial from Despicable Me

I was seriously trying to talk my son out of a Despicable Me Theme birthday party because I could not think of any ideas for decorations except a million minions!!! However when I finally sat to plan out my party details with my handy Party Planning Printable I was able to come up with many, many Despicable Me Party ideas and can’t wait to make them all and show them off!
Be sure to check out other DIY party supplies.

What you Need:

– Cardboard box

– Packaging tape

– Bungee

– Yellow, White and Blue Tissue paper

– Black Plastic Tablecloth

All of these items can be found at Dollar Tree for $4 total. The cardboard box you can ask if they have any boxes they are getting rid off. You can find boxes at gas stations. Any medium size box will do.

How to Make:

The Base of a Minion Pinata.

1. Take your cardboard box and cut the side so it will lay flat. Go from one side and roll it into a tight overlapping circle. Unroll and do the same from the other end.

2. Tape your box at desired width both inside and outside.

3. Secure the bottom by taping it down inside and outside.

4. Curve the tops of the box and tape into place leaving an area so you can fill it with pinata goodies. I used plastic baggies about halfway added the goodies and then added more plastic bags to the top and help shaped the head area.

5. Close off the top by adding the bungee looped thru a piece of cardboard and attached using tape. Make sure to completely secure the loop.

To Decorate the Minion Pinata.

6. Take white tissue paper and cover the entire Pinata and tape it down. This helps allow the yellow to pop out. Otherwise the yellow will look brownish from the cardboard.

7. Take the yellow tissue paper and wrap the pinata. I used double sided tape to secure it all down.

8. Cut the Blue tissue paper to make it look like a pair of overalls. Include the straps. Secure it on the pinata with tape.

9. Cut a black strip from the plastic tablecloth to fit around the head area for the glasses band. Secure with tape. Cut a halfway U shape out of the black plastic table cloth for the mouth and adhere it to the pinata.

10. Take some cardboard 3/4 in with by 10 -12 inches long and make 2 circles and tape together. These are the goggles. Cover them with grey or silver tissue paper or duck tape.

11. Next cut out 2 cardboard circles that fit just inside your goggles and cover those with white tissue paper.

12. Cut a slightly smaller set of circles from the cardboard, these can remain brown.

13. Cut a set of circles from either black cardstock, construction paper of the black plastic tablecloth. These are the eyes.

14. Put your eyes together the white is the base, then brown and then black. Adjust them accordingly to your desired look.

15. Add the blue pocket to the front of the overalls. Use a piece of cardboard and cut out your pocket shape. I added a few pieces of the plastic table clothe and taped it down. The add the blue over the pocket shape and tape down. Take a blue marker and make your stitches marks, you can also use yellow but it may not show up very well. Adhere the pocket to the pinata. Did you notice mine is upside down!!! I have changed it for the final picture!!!

16. Add buttons to your overalls. You can use real buttons if you have them. I cut out a set of cardboard circles and covered them with black plastic table cloth and secured them with tape to the pinata.

That is it! You are done!

The total cost for me was FREE having done several theme parties, I already had everything on hand, I save colored tissue paper, plastic table cloths, and any paper to reuse for future parties. The only thing I am constantly buying is packaging tape!!!!

Check out my other Despicable Me Decoration Ideas.

Topic: How to make a Minion Pinata Tutorial from Despicable Me.

Filed Under: Party Decorations, Pinatas

How to Make a Princess Castle Pinata

November 10, 2019 by rautry

How to Make a Princess Castle Pinata

What you Need:

– Square Box atleast 8×8 inches

– Smaller Cardboard box 4×4 inches

– 4 Paper Towel Rolls (No Paper Towels)

– Tissue Paper in the colors you want the castle to be.

– Bungy Cord or Thick Rope

– Duck Tape

– Candy

– Filler Paper (Newspaper or Tissue Paper is fine)

– 2 sheets of Card Stock

– Glue

How to Make:

1. Take the smaller Box the 4×4 inches and determine the middle for the top. This will be where you put the bungy cord or thick String as a loop to hold the pinata on the cord to move from side to side and up and down.

2. Attach the bungy on the box and secure it.

3. Attach this smaller box on top of the larger box using the Duct Tape.

4. Take the 4 Paper Towel Rolls and Cut a slit vertical on each. Attach each one to the 4 corners of the larger box using Duck Tape.

5. Take the 2 Sheets of Card Stock and cut in half short ways.

6. Make each slice of paper into a cone and attach to the top of each corner using Duck Tape.

7. It is not necessary to fill in the gaps of each rounded corner but it helps to keep its shape. Use the extra filler paper to do this.

8. Close up the bottoms of each corners using Duck Tape.

9. Draw on windows and doors where you want them at. This is where you get to be creative.

10. Cut your tissue papers into about 1 inch squares and attach to the coordinating colors where you want them at.

11. I had some left over princess valentines cards and just cut out the princesses and placed them in the window areas on my castle.

12. It took time but it was all worth it for my little princess. You could just cover the box with the tissue paper being flat instead of the little squares.

Good Luck! And have Fun! Sorry I did not have pictures for each step, I created mine over 3 yrs ago and I wasn’t blogging then.

Check out these other Pinata Tutorials

Filed Under: Pinatas

Sombrero Pinata Tutorial

November 10, 2019 by rautry

Below you will find step by step instructions on how to make a Sombrero Pinata. Most items can be found and purchased at Dollar Tree.

What you Need:

Christmas Cardboard Boxes

Tissue Paper

Glue

Packaging Tape

Bungee Cord

How to Make:

Step 1

Step 2

Step 3

That is it! You are done!

Topic: Sombrero Pinata Tutorial

Filed Under: Pinatas

Charlie Brown Piñata Tutorial

November 10, 2019 by rautry

Snoopy Dog House Pinata that is pretty simple to make. Below you will find a list of supplies you will need plus step by step instructions with pictures on how to make a Charlie Brown Pinata.

What you Need:

– Cardboard boxes

– Bungee Cord

– Red, White, Black Tissue Paper

– Packaging Tape

– Glue

How to Make:

Step 1

First you need to make your cardboard box into the shape of a dog house. Tape the edges tightly secured. I used 2 different boxes. One was a book box about the size of 6 inches on the side by 10 inches. I placed it on the side to make the other box cut apart as the roof of Snoopy’s Dog house.

Step 2

Next you will want to put in your bungee cord as your loop and tape down very securely. This needs to be the strongest part of your pinata.

Step 3

Completely cover the entire cardboard dog house shape piñata with red tissue paper or you can use red wrapping paper that can be found at Dollar Tree.

Step 4

Now take a black sharpie marker and draw on the lines to make it look like wooden pieces.

Step 5

Using black cardstock cut out the door shape to be glued on one side of the dog house. You can add a white arc using white construction paper and using your black sharpie write SNOOPY and glue just above the door shape of the dog house.

That is it! You are done!

Topic: Charlie Brown Pinata – Peanuts Pinata

Filed Under: Pinatas

How to Make a Graduation Smiley Face Pinata

November 10, 2019 by rautry

How to Make a Graduation Smiley Face Pinata

Are you graduating? Do you know someone who is graduating? Don’t you ever get the feeling when you have accomplished something that has taken so long to complete it would feel great to bash something like a Pinata? Here is a simple and easy way to make a Pinata and that is also budget friendly.

What you Need:

– Large Balloon

– Yellow and Black tissue paper

– Glue or Flour and Water Mix

– Newspaper

– Graduation Cap (paper ones can be found at Dollar Tree for $1)

– Bungee Cord

– Packaging Tape

– 2 Bowls

How to Make:

1. First blow air into the balloon until it is as big as you desire and place standing with base into one of the bowls.

2. Make the flour and water paste mix into one of the bowls.

3. Shred your Newspapers into 2 inch width by 6-8 inches in length.

4. Slide the Newspaper strips one at a time through the flour and water paste mix covering both sides of the newspaper.

5. Place the moist strip to the balloon. Repeat until the entire balloon is covered with 1 layer.

6. Let it sit until dry. For quicker drying methods you can use a hair dryer but stand a good distance away to not over heat the paste and balloon. You can also use a fan and turning the balloon until all sides are dry.

7. Continue with the second layer and drying and repeating until it is as thick as you want. I prefer 8-10 layers. This can take anywhere from 4-8 hrs depending on how many layers you want and how fast each layer dries.

8. Take your Bungee cord and slip a loop through a small 4 by 4 inch piece of cardboard and tape down. add this to the inside of the pinata and secure it with tape. This is the handle that the pinata hangs from.

9. Cut a 2 inch by 2 inch squares in both yellow and black tissue paper.

10. Using the eraser tip end of a pencil place 1 square of tissue paper and dip into flour and water paste. Repeat this until your entire pinata is covered.

11. Make sure to draw your patter on the pinata so you know which colors correspond the the pinata. Make sure to add your pinata party favors before closing up the hole.

Check out these other Pinata Tutorials

Treasure Chest, Mario 1Up Mushroom, Tinkerbell Flower, Frog Prince, Blues Clues, Spider-man, Optimus Prime,

Lightening McQueen, Batman, Power Rangers, Transformers, Princess Castle, Dora’s Backpack, Minion, Donald Duck, Handy Manny Measuring Tape

You might also be interesting in Budget Friendly Graduation Announcements and How to Plan a Graduation Party along with Party Planning Checklist Printable (FREE)

Topic: How to Make a Graduation Smiley Face Pinata

Filed Under: Pinatas

BB-8 Piñata Tutorial

November 10, 2019 by rautry

Have you seen Star Wars: The Force Awakens? If not you will want to soon. You will fall in love with BB-8. It cannot be a Star Wars movie without introducing you to another robot. You will see C3PO and R2D2 but this little guys will steal your heart.

My son was so excited to see the movie and now his birthday party will be themed after Star Wars. So came the idea of making BB-8 into a Pinata.

What you Need:

  • Grey, White, Black and Orange Tissue Paper
  • Packaging Tape
  • Paper Circle Lanterns one of each size large and small
  • Bungee Cord

How to Make:

  1. First you will need to take your larger of the two paper circle lanterns and add tissue paper to make it full. Add Packaging tape to the bottom to keep it from falling out.

2. Add your goodies into the middle and continue stuffing. You can use newspaper crunched up instead of tissue paper.

3. Close up the top of the pinata and tie on the bungee cord and secure.

4. Cover the paper circle lantern with white tissue paper and tape down. Add orange where appropriate to make it look like BB-8.

5. Add the gray in the same matter.

6. Add the black to the face as well.

7. Combine both circle lanterns and secure well.

That is it! You are done!

Topic: BB-8 Pinata Tutorial

Filed Under: Pinatas

How to Make a Donald Duck Piñata

November 10, 2019 by rautry

How to Make a Donald Duck Piñata

Do you have a Mickey Mouse fan? How about a Donald Duck Fan? This Donald Duck Pinata was a huge hit for a Mickey Mouse Clubhouse Theme Birthday Party.

What you Need:

– Cardboard box/Large balloon

– Tissue Paper (blue, yellow, black, white)

– Bungy Cord

– Packaging Tape or Duck Tape

– Yellow Cardstock

– Flour

– Warm Water

– Glue

– Scissors

– Pencil

– 2 inch strips of paper preferably notebook paper or newspaper

– Candy and piñata fillings (be creative and have items that connect to the theme)

How to Make:

1. First take your balloon and air it up to the desired size. Tie it off.

2. Take your paper and shred into 2 inch strips if not already done.

3. Make a paste of flour and warm water.

4. Carefully take a strip of paper and dip into paste, add it to the balloon. Cover the entire balloon in one layer.

5. let it sit and dry you can use a hair dryer on a lower setting to dry faster. Depending on how wet the paste is the longer it takes to dry.

6. Repeat steps 4 and 5 until ballon is covered and dry with desired amount of layers. Easy to break piñatas 4-5 layers, harder to break 10 layers.

7. Once the piñata is very dry you can pop the balloon inside if it has not already popped. Cut out a 4 inch by 4 inch area on 3 side to allow it to flap open, this is the entry way for the candy.

8. Reinforce handle (bungy cord) with cardboard and tape. Create a hole at the top of the piñata for the handle just enough the bungy cord can fit thru. Secure with tape.

9. Now the fun part! Time to decorate! First draw on the piñata your pattern to follow. Cut tissue paper in small squares about 2 inches by 2 inches.

10. Cut your yellow beak out of card stock and secure onto the piñata using tape at desired place according to your pattern.

11. Use the pencil, eraser side and place in the middle of a tissue paper. Dip in a glob of glue and place on the piñata in the desired area according to your pattern. Do this for entire piñata.

12. Before securing the open flap be sure to place your piñata candy and party filling favors. Secure the open flap with tape and then cover with tissue paper.

Congrats, You Did It!

Thanks for reading. You can also find more Mickey Mouse Party Ideas.

Check out these other Pinata Tutorials

Treasure Chest, Mario 1Up Mushroom, Tinkerbell Flower, Frog Prince, Blues Clues, Spider-man, Optimus Prime,

Lightening McQueen, Batman, Power Rangers, Transformers, Princess Castle, Dora’s Backpack, Minion, Smiley Face, Handy Manny Measuring Tape

Topic: How to Make a Donald Duck Piñata (Mickey Mouse Clubhouse)

Filed Under: Pinatas

Next Page »

Products

  • Household Handbook Household Handbook: Your Complete Home Management Binder $21.99 Original price was: $21.99.$9.99Current price is: $9.99.
  • Princess Tiana Tiara Princess Tiana Tiara SVG $0.99
  • Shaun The Sheep SVG Shaun the Sheep SVG Invitation $0.99
  • Super Mario Invite Super Mario SVG Invitation $0.99
  • Minecraft Favor Bag Minecraft Creeper Invitation $0.99
try.hpinstantink.com/cmfvfj

Copyright © 2025 · Genesis Framework · WordPress · Log in