Rebecca Autry Creations
  • Home
  • Piñata’s
  • Vacation Bible School
  • Wedding
  • Courses
  • Store

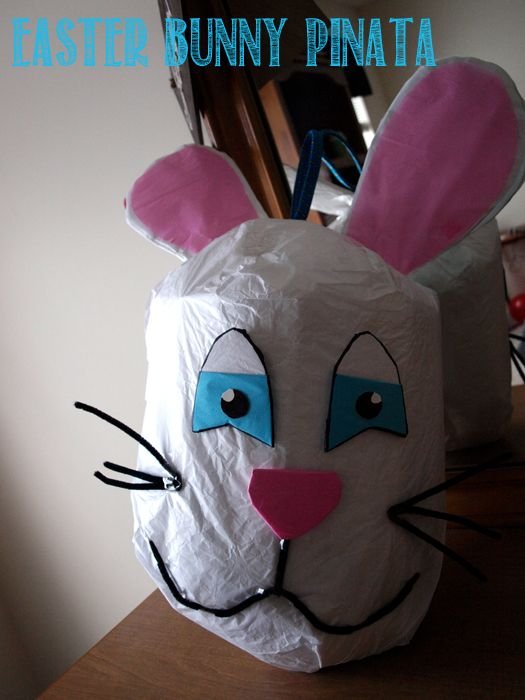
Easter Bunny Piñata Tutorial: A Fun and Easy DIY Craft for Kids

March 3, 2014 by rautry

Easter Bunny Pinata Tutorial: Learn how to craft a festive and fun Easter Bunny pinata with our step-by-step guide. Perfect for Easter celebrations!

%filemane%

Materials needed:

  • A large balloon
  • Newspaper or tissue paper
  • White glue or flour and water mixture
  • Scissors
  • Crepe paper streamers in various colors (pink, white, blue, etc.)
  • Construction paper in pink and white
  • Glue stick or craft glue
  • Candy or small toys to fill the piñata

Step 1: Inflate the balloon to the desired size for your piñata. It should be big enough to hold a good amount of candy or toys, but not so big that it will be difficult to break open.

Step 2: Tear or cut the newspaper or tissue paper into strips. Mix together the white glue with a little bit of water to create a paste. Alternatively, you can mix flour and water together to create a similar paste.

Step 3: Dip the newspaper or tissue paper strips into the paste, and then lay them onto the balloon. Make sure to cover the entire surface of the balloon, leaving a small opening at the top where you will later fill it with candy or toys. Allow the piñata to dry completely, which may take several hours or overnight.

Step 4: Once the piñata is dry, pop the balloon and remove it from inside the piñata. Cut a small hole at the top of the piñata where you left the opening, and fill it with candy or toys.

Step 5: Cut two large bunny ear shapes out of white construction paper. Cut two smaller pink ear shapes, and glue them onto the white ear shapes. Glue the ears onto the top of the piñata.

Step 6: Cut out two circles for eyes and a nose from pink construction paper. Glue them onto the front of the piñata, along with a mouth made from a curved strip of pink construction paper.

Step 7: Use the crepe paper streamers to create a fringe around the bottom of the piñata, making sure to leave enough space for the bunny tail. Cut out a small white pom-pom and glue it onto the back of the piñata for the tail.

Step 8: Hang the piñata from a sturdy surface, and use a stick or bat to hit it until it breaks open and spills out the candy or toys inside.

That’s it! With a little bit of time and creativity, you can create your very own Easter Bunny piñata that is sure to be a hit at your next Easter celebration.

Filed Under: Pinatas

Olaf Pinata Tutorial

February 25, 2014 by rautry

Olaf Pinata Tutorial

Olaf Snowman Pinata is great for Disney Frozen theme party. Olaf the Snowman from Frozen has made the movie a wonderful theme to recreate for any young child. Get your birthday child excited by making a custom Frozen theme just perfect for your little one celebrating another year of life. My Gallery Frozen Olaf Pinata is steadily increasing. This is my first pinata that I have made more than just one! See the gallery below. These are 100% Frozen Olaf homemade pinatas.

%filemane%

Be sure to check out other Disney Frozen Party Decoration Ideas.

What you Need:

– Cardboard box (I used Christmas gift boxes)

– Packaging tape

– White tissue paper

– Black, brown, orange construction/cardstock paper

How to Make:

1. First you need to decide how big you want and if you are doing Olaf’s entire body or just the head like me. Trace the head out making a front and back. Cut the head out. Cut long strips about 2 1/2 inches wide. These strips are for the side.

2. Slowly tape the edges of the front and back to the strips to make a 3D box of Olaf. Make sure to reinforce the sides with tape

3. Take your bungee cord and another small piece of cardboard and punch a hole thru to slide bungee loop thru. Secure down with tape.  Slide the bungee loop thru a hole in the middle top of Olaf’s head. Secure with tape preferably duck tape. This has to be the most secure so your Olaf will continue to hang thru the entire bashing celebration.

4. Cover the entire box with white tissue paper.

5. Cut out the pieces to go on the head. You can find them in the Moms Saving Money Store. Glue on the mouth, eyes and eye brows.

6. Make a cone nose as desired height using a sheet of paper. Cover with Orange tissue paper or you can just cut it out of Orange cardstock. Secure to Olaf’s face with tape.

Topic: Olaf Pinata Tutorial

Filed Under: Pinatas

Dr. Seuss Hat Pinata Tutorial

February 25, 2014 by rautry

Making a Dr. Seuss hat pinata is a fun and creative way to bring some whimsy to your next party or celebration. This colorful pinata is inspired by the iconic hat worn by the beloved author and illustrator, Dr. Seuss. In this post, I’ll guide you through the process of making your very own Dr. Seuss hat pinata that will be the hit of the party.

%filemane%
OLYMPUS DIGITAL CAMERA

Here’s what you’ll need to get started:

  • A large round balloon
  • Newspaper or tissue paper
  • White glue or paper mache paste
  • Scissors
  • Red, white, and black crepe paper
  • A pencil
  • String or twine
  • Candy or small toys for filling the pinata
  • Optional: paint and paintbrushes

Step 1: Inflate the balloon to the desired size for your pinata. You can make it as big or as small as you like, depending on the size of your party and the amount of candy or toys you want to fill it with.

Step 2: Tear or cut newspaper or tissue paper into small strips. Mix equal parts of white glue and water in a bowl to make your paper mache paste.

%filemane%
OLYMPUS DIGITAL CAMERA

Step 3: Dip each strip of paper into the glue mixture and smooth it onto the balloon. Cover the entire surface of the balloon with at least three layers of paper mache, allowing each layer to dry completely before adding the next.

%filemane%
OLYMPUS DIGITAL CAMERA

Step 4: Once the paper mache is completely dry, use scissors to carefully cut a small hole in the top of the balloon. Remove the balloon from inside the pinata.

%filemane%
OLYMPUS DIGITAL CAMERA

Step 5: Draw the outline of the Dr. Seuss hat onto the pinata using a pencil. You can use a reference image online to help guide you.

%filemane%
OLYMPUS DIGITAL CAMERA

Step 6: Cut long strips of red, white, and black crepe paper. Starting at the bottom of the hat, glue the red crepe paper strips onto the pinata, overlapping them slightly as you go. Continue with the white and black crepe paper, alternating colors until you reach the top of the hat.

Step 7: Cut a long piece of string or twine and tie it securely through the hole at the top of the pinata. This will be used to hang the pinata.

%filemane%
OLYMPUS DIGITAL CAMERA

Step 8: Fill the pinata with candy or small toys through the hole at the top. Once it’s filled, carefully seal the hole with more paper mache and allow it to dry.

Step 9: Optional: Once the pinata is completely dry, you can paint on additional details such as stripes, polka dots, or other decorative elements.

And there you have it – a whimsical Dr. Seuss hat pinata that is sure to be the highlight of any party or celebration. Enjoy the fun and excitement of breaking open the pinata to reveal the treasures inside!

Filed Under: Pinatas

Olaf Invitation Tutorial – Frozen

February 24, 2014 by rautry

Are you have a Frozen party soon? Do your kids love Olaf? He stole the heart of many, didn’t he?  Be sure to check out other awesome Frozen Party Ideas. These Olaf Invitation Tutorial are simple and easy to make.

Olaf Invitation Tutorial – Frozen

Olaf Invitation Tutorial – Frozen

Are you have a Frozen party soon? Do your kids love Olaf? He stole the heart of many, didn’t he?  Be sure to check out other awesome Frozen Party Ideas.

You may also be interested in making your very own Olaf Snowman Pinata.

What you Need:

– White Glittery Cardstock

– Black, Brown and Orange Cardstock

– Glue/double sided tape

– Googly eyes (optional)

– Orange Pom Pom (optional)

How to Make:

1. First cut out all your pieces to make your Olaf invitation. The shapes are available in the Moms Saving Money Store.

Take your black base to be ready to have the other pieces added.

2. Take your white Olaf Snowman face and glue onto the black base. Make sure to leave the same amount around of black showing.

3. Take your black Olaf Snowman mouth and thoroughly add glue to the back and position accordingly.

4. Next you will want to add on the eyes. You can exchange the paper eyes for googly eyes to make them extra fun! I personally like the googly eyes on Olaf Snowman Invitations.

5. Glue on your nose. You can exchange the paper nose for an orange pom pom as pictured below.

6. Now add your eyebrows above the eyes. You may even want to tilt them slightly so they will fit on the face and look good!

7. Cut out an extra white face for the back and glue on and write all your information for your party. You can use the print and cut feature on the Cameo Silhouette.

That is it! You are done!

If you would love to have them made for you. 8ct with envelopes are available in the Moms Saving Money Store.

Topic: Olaf Invitation Tutorial – Frozen

Filed Under: Party Decorations Tagged With: #Disney Frozen, #DIY Party, #Frozen, #Olaf, #Party Decorations

LEGO Pinata Tutorial

February 7, 2014 by rautry

%filemane%

Do you have a LEGO fan in the house. Do you tend to step on the LEGOs? Ouch they hurt right? Let’s get excited together and build excitement for the newest LEGO Movie. This LEGO Pinata tutorial is a sure win for an awesome LEGO Party and relatively easy. 

LEGO Pinata Tutorial

Build the best LEGO Party with some easy to create ideas. Customize your party and have some friendly building competition! Remember an easy large LEGO decoration can be a wall of LEGO’s made from plastic tablecloths or poster board purchased from Dollar Tree. Get one of each color and you will have a bright colorful wall.

%filemane%
LEGO Party Ideas

SEE ALSO:

  • Make sure to check out other LEGO Party Ideas.
  • Simple and cheap LEGO Apple Juice Box idea.

What you Need:

  • Red Tissue Paper
  • Cardboard Box or large family size cereal box
  • Packaging Tape
  • Bungee Cord
  • Scissors
  • Small round object you can trace
  • Glue stick
  • Pencil

How to Make:

1. Take an elongated box or if you are like me I used pieces from an Easter display box I got from Dollar Tree. Cut your pieces and tape together. You can also use the large Family Size Cereal Boxes and make it faster!

2. Add your Bungee cord for the handle loop. Secure it with packaging tape. Secure it again! Trust me this will be pulled down on by the weight of your goodies and you want this part to withstand being knocked around.

%filemane%

3. Now that you have your bungee looped and secured, attach it to the remainder of the box by punching a hole with the end of your scissors in the middle of one end. Be sure to secure well with packaging tape.

%filemane%

4. Add the other sides of the box taping them down with packaging tape. Make sure to leave an opening to add all your Pinata goodies. (So lets take a moment here and laugh with me or at me! You see the cereal on the coffee table? My kiddos were obviously around while I was making this pinata. Oh they were so tiny then).

%filemane%

5. Take your pencil and small round object to trace your circles for the LEGO connectors. Once you have traced the circles, take your scissors and cut out all the circles. (More cereal)!

%filemane%

6. Cut long thin strips of cardboard about 1 1/2 inches width for the sides of the LEGO connectors. It is ok if you start to bend and curl them to cut the strips, you need them to be flexible.

%filemane%

7. Put together your circle LEGO Connectors. As mentioned above you need the strips to be flexible so curl them up. Now taking your packing tape attach them to the circles and make them secure.

%filemane%

8. Glue or tape the red tissue paper to the LEGO connectors as well as the LEGO box base. I recommend a glue stick but be careful not to put too much it will discolor your fingers momentarily! Picture I used scotch tape but would have preferred double sided tape. You can get it at Dollar Tree.

%filemane%

9. Attach the LEGO Connectors to the LEGO Box Base. This was a little tricky! You can use liquid glue to adhere the rim of the connectors to the base or you can trace and cut out more circles and tape them to the connectors prior to the red tissue paper. Then tape them to the base.

%filemane%

That is it! You are Done!

lego wall

Topic: LEGO Pinata Tutorial

Filed Under: Party Decorations, Pinatas

Handy Manny Measuring Tape Pinata

January 12, 2014 by rautry

Handy Manny Measuring Tape Pinata

Learn how to create a fun and unique Handy Manny Measuring Tape Pinata with this step-by-step guide! Perfect for a Handy Manny-themed birthday party or as a DIY craft project, our tutorial will show you everything you need to know to make your own colorful and functional pinata.

What you Need:

– Cardboard box

– Packaging Tape

– Purple Tissue Paper

– White Tissue Paper

– File Folders

– Bungee

How to Make:

1. Take your cardboard preferably a rectangle box.

2. Take your bungee and make a loop go thru a hole of a piece of cardboard. Secure with duck tape.

3. Tape the bungee with loop on the outside to the top of the box.

4. Make sure to add all your pinata fillings with candy and goodies and close it up.

5. Add the eyes by using  rolled up into a ball plastic bags. Cover with tape to make the shape.

6. Take your purple tissue paper and cover entire pinata and tape down.

7. Cover the eyes with white tissue paper.

8. Add the white mouth and purple forehead.

9. Add red tongue and black circles for eyes.

That’s it! You are Done!

Topic: Handy Manny Measuring Tape Pinata

Filed Under: Pinatas

Tinkerbell Flower Piñata Tutorial

January 11, 2014 by rautry

Are you hosting a Tinkerbell-themed party and searching for the perfect addition to make it truly magical? Look no further! Introducing our enchanting Tinkerbell flower piñata – a delightful party accessory that will add a burst of color and joy to your celebration.

tinkerbell flower pinata

Whimsical Design: Our Tinkerbell flower pinata is crafted in the shape of a beautiful flower, creating a whimsical and eye-catching centerpiece for your party decorations. The vibrant colors and intricate details make it a visual delight that captures the essence of Tinkerbell’s enchanting world.

Tinkerbell Flower Pinata Tutorial

What you Need:

– Cardboard box

– Packaging Tape

– Scissors

– Various Purple tissue paper

– Green Tissue Paper

– Purple Curling Ribbon

– Double Sided tape

– Scissors

– Pinata candy and party favors

– Baseball Bat – Cord/Thick String (For Smashing Pinata at Party)

– Bungee cord

How to Make:

Step 1: Create the Flower Shape Take a piece of cardboard and cut it into the shape of a flower, ensuring you cut both a front and back piece.

Step 2: Secure the Flower Structure Use strips of cardboard with your desired width to secure both the front and back pieces, following the natural curves of the flower. I used a 3.5 inch width about the size of the flaps of a box.

Step 3: Reinforce with Bungee Cord Create a loop with a strip of cardboard, make a hole in the middle, and thread it through with a bungee cord. Tape it down securely, with the bungee loop facing outward.

Step 4: Fill with Fun Surprises Fill the pinata with tissue paper or newspaper, along with a delightful mix of candies and pinata favors. Seal the pinata shut taping it closed with clear packaging tape.

Step 5: Cover in Vibrant Tissue Paper Wrap the entire piñata with dark purple tissue paper for a visually stunning effect. I used a glue stick to keep the purple tissue paper on the box.

Step 6: Add Light Purple Flower Accents Cut smaller light purple flowers for both sides of the pinata and attach them for an extra touch of charm.

Step 7: Green Tissue Paper Fringe Take green tissue paper, fold a 3-inch strip, cut slits about 1 inch apart, and attach it to the rim of the piñata on both sides.

Pro tip: Attach first and then cut slits for a neat finish.

Step 8: Outline with Curling Ribbon Enhance the inner flower on both sides by outlining it with colorful curling ribbon for a finishing touch.

Now you have a beautifully crafted flower piñata ready to be the highlight of your party! Get creative, have fun, and enjoy the colorful and festive atmosphere you’ve created with your DIY masterpiece. Your guests are sure to be impressed!

That’s it! You are done!

Topic: Tinkerbell Flower Pinata Tutorial

Filed Under: Pinatas

How to make Optimus Prime Pinata

January 8, 2014 by rautry

Learn how to make an Optimus Prime Pinata for your next Transformers-themed party with this step-by-step tutorial. Perfect for kids and adults alike, this fun and easy DIY project will add a touch of excitement to your celebration. Get ready to have a blast with Optimus Prime!

How to Make Optimus Prime Pinata

What you Need:

– Cardboard Box

– Tape

– Scissors

– Red, Blue, Grey or Silver, Black Tissue Paper

– Bungee Cord

How to Make Optimus Prime Pinata:

1. First take your cardboard box and shape it into the cabin and trailer of Optimus Prime.

2. Cover with Silver or Grey Tissue paper over the trailer.

3. Add tissue paper to the cabin. I cut out most of the piece individually and attached with tape.

4. Make sure you fill pinata with goodies before closing up. My pinata back end stayed open until I was completely ready to close.

5. Attach bungee cord to cardboard and tape down.

6. Create a hole in the middle of the top of the trailer and push thru the bungee cord. Secure with tape.

7. Close up the pinata and cover up any holes.

That’s it! You are Done!

All items were purchased at Dollar Tree with the exception of the cardboard box. I did however asked when I saw them throwing out boxes if I could have them. They said sure and I got a good selection of sturdy boxes.

Topic: Optimus Prime Pinata Tutorial

Filed Under: Pinatas

How to make a DIY Minion Pinata Tutorial

December 5, 2013 by rautry

How to make a Minion Pinata Tutorial from Despicable Me

I was seriously trying to talk my son out of a Despicable Me Theme birthday party because I could not think of any ideas for decorations except a million minions!!! However when I finally sat down to plan out my party details with my handy Party Planning Printable I was able to come up with many, many Despicable Me Party ideas and can’t wait to make them all and show them off! I came up with the plan to make a Minion Pinata and while creating I wrote down my steps to make this Minion Pinata Tutorial.

Be sure to check out other DIY party supplies.

Pinatas are a fun and exciting addition to any celebration, especially for kids. If you’re planning a Despicable Me themed party, a Minion pinata is the perfect DIY project. In this step-by-step guide, we’ll show you how to make a Minion pinata that will be the hit of the party.

What you Need:

– Cardboard box

– Packaging tape

– Bungee

– Yellow, White and Blue Tissue paper

– Black Plastic Tablecloth

All of these items can be found at Dollar Tree for $4 total. The cardboard box you can ask if they have any boxes they are getting rid off. You can find boxes at gas stations. Any medium size box will do.

Despicable Me Minions Party Pack $21.99

A Despicable Me Minions Party Pack great for 10-16 guests. A Party in a Box! Cards and Favor Bags are Handmade.

How to Make:

The Base of a Minion Pinata.

1. Take your cardboard box and cut the side so it will lay flat. Go from one side and roll it into a tight overlapping circle. Unroll and do the same from the other end.

2. Tape your box at desired width both inside and outside.

3. Secure the bottom by taping it down inside and outside.

4. Curve the tops of the box and tape into place leaving an area so you can fill it with pinata goodies. I used plastic baggies about halfway added the goodies and then added more plastic bags to the top and help shaped the head area.

5. Close off the top by adding the bungee looped thru a piece of cardboard and attached using tape. Make sure to completely secure the loop.

To Decorate the Minion Pinata.

6. Take white tissue paper and cover the entire Pinata and tape it down. This helps allow the yellow to pop out. Otherwise the yellow will look brownish from the cardboard.

7. Take the yellow tissue paper and wrap the pinata. I used double sided tape to secure it all down.

8. Cut the Blue tissue paper to make it look like a pair of overalls. Include the straps. Secure it on the pinata with tape.

9. Cut a black strip from the plastic tablecloth to fit around the head area for the glasses band. Secure with tape. Cut a halfway U shape out of the black plastic table cloth for the mouth and adhere it to the pinata.

10. Take some cardboard 3/4 in with by 10 -12 inches long and make 2 circles and tape together. These are the goggles. Cover them with grey or silver tissue paper or duck tape.

11. Next cut out 2 cardboard circles that fit just inside your goggles and cover those with white tissue paper.

12. Cut a slightly smaller set of circles from the cardboard, these can remain brown.

13. Cut a set of circles from either black cardstock, construction paper of the black plastic tablecloth. These are the eyes.

14. Put your eyes together the white is the base, then brown and then black. Adjust them accordingly to your desired look.

5. Add the blue pocket to the front of the overalls. Use a piece of cardboard and cut out your pocket shape. I added a few pieces of the plastic table clothe and taped it down. The add the blue over the pocket shape and tape down. Take a blue marker and make your stitches marks, you can also use yellow but it may not show up very well. Adhere the pocket to the pinata. Did you notice mine is upside down!!! I have changed it for the final picture!!!

16. Add buttons to your overalls. You can use real buttons if you have them. I cut out a set of cardboard circles and covered them with black plastic table cloth and secured them with tape to the pinata.

hat is it! You are done!

The total cost for me was FREE having done several theme parties, I already had everything on hand, I save colored tissue paper, plastic table cloths, and any paper to reuse for future parties. The only thing I am constantly buying is packaging tape!!!!

Check out my other Despicable Me Decoration Ideas.

Check out these other Pinata Tutorials

Treasure Chest, Mario 1Up Mushroom, Tinkerbell Flower, Frog Prince, Blues Clues, Spider-man, Optimus Prime,

Lightening McQueen, Batman, Power Rangers, Transformers, Princess Castle, Dora’s Backpack, Smiley Face, Donald Duck, Handy Manny Measuring Tape

Topic: How to make a Minion Pinata Tutorial from Despicable Me.

Filed Under: Pinatas

« Previous Page

Products

  • Household Handbook Household Handbook: Your Complete Home Management Binder $21.99 Original price was: $21.99.$9.99Current price is: $9.99.
  • Princess Tiana Tiara Princess Tiana Tiara SVG $0.99
  • Shaun The Sheep SVG Shaun the Sheep SVG Invitation $0.99
  • Super Mario Invite Super Mario SVG Invitation $0.99
  • Minecraft Favor Bag Minecraft Creeper Invitation $0.99
try.hpinstantink.com/cmfvfj

Copyright © 2025 · Genesis Framework · WordPress · Log in